Are your old cabinet hardware looking dull or outdated? You don’t have to replace them to give your cabinets a fresh, new look.
Refinishing old cabinet hardware is an easy and affordable way to transform your space without spending a fortune. Imagine turning those tired knobs and handles into shiny, eye-catching pieces that make your cabinets stand out. You’ll discover simple, step-by-step tips to refinish your hardware like a pro.
Ready to bring new life to your cabinets? Let’s get started!

Credit: www.youtube.com
Gathering Supplies
Gathering supplies is the first step in refinishing old cabinet hardware. It sets the stage for smooth work and great results. Having the right tools and materials makes the process easier and faster. Planning ahead saves time and avoids frustration.
Knowing what finish to use helps select the correct products. Safety is important to protect yourself during the work. Preparing well ensures a better outcome for your hardware.
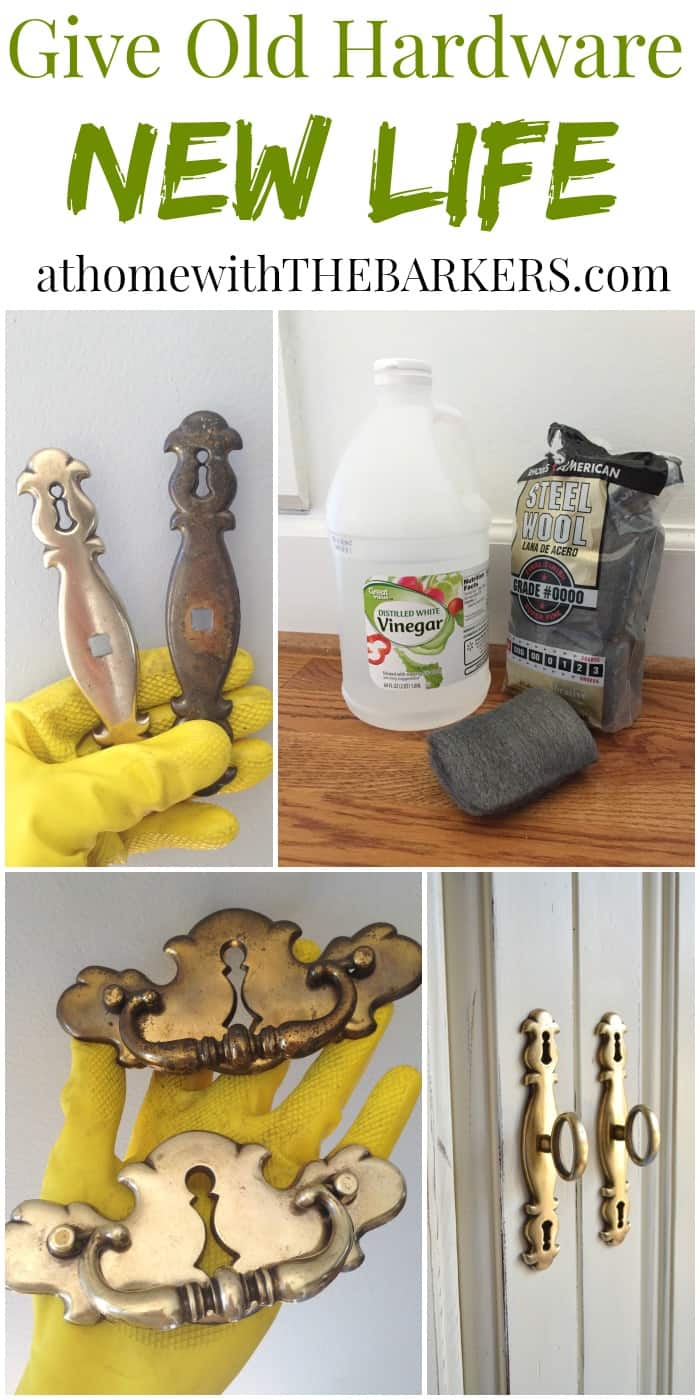
Tools Needed
Start with basic tools like screwdrivers to remove hardware from cabinets. Sandpaper or sanding blocks smooth old surfaces. A small wire brush helps clean rust and dirt. Paintbrushes or foam brushes apply the new finish evenly. Containers for soaking pieces can remove old paint or grime. Gloves protect your hands during cleaning and finishing.
Choosing The Right Finish
Pick a finish that suits the style of your cabinets. Spray paint gives a smooth, even coat. Oil-based finishes add shine and durability. Clear lacquer protects metal from rust and wear. Matte finishes offer a modern, subtle look. Consider the color and texture that fits your room’s design. Always test finishes on a small piece first.
Safety Precautions
Work in a well-ventilated area to avoid harmful fumes. Wear gloves to keep your skin safe from chemicals. Use a mask to prevent inhaling dust or sprays. Keep tools and finishes away from children and pets. Read product labels and follow instructions carefully. Clean your workspace after finishing to avoid accidents.
Removing Hardware
Removing old cabinet hardware is the first step in refinishing. Take your time to avoid damage. Proper removal keeps cabinets safe and hardware reusable. Prepare your tools and workspace before starting. Let’s explore how to do this carefully and clearly.
Labeling Pieces
Label each piece to keep track of its place. Use small sticky notes or masking tape. Write numbers or letters on labels for easy matching. This helps during reinstallation. Avoid mixing screws or handles from different cabinets. Labeling saves time and confusion later.
Safe Removal Techniques
Use the right screwdriver size to prevent stripping screws. Turn screws slowly and steadily. Keep hardware steady as you remove screws. If screws are tight, apply a little oil to loosen them. Avoid using excessive force to protect wood surfaces. Remove all parts carefully and store them safely.
Cleaning And Preparing
Cleaning and preparing old cabinet hardware is the first step to a fresh new look. It helps remove dirt, old paint, and rust. This makes the new finish stick better. Taking time here saves effort later.
Removing Dirt And Grime
Start by soaking the hardware in warm, soapy water. Use a soft brush to scrub off dirt. Avoid harsh tools that can scratch the surface. Rinse well and dry completely. Clean hardware looks better and refinishes easier.
Stripping Old Finish
Old paint or varnish must be removed for a smooth finish. Use a chemical stripper made for metal or wood. Apply it with a brush and wait as directed. Then, scrape off the loosened finish gently. Wear gloves and work in a ventilated area.
Sanding Tips
Light sanding smooths the hardware and removes leftover finish. Use fine-grit sandpaper, around 220 grit. Sand in small, circular motions. Avoid sanding too hard to keep details intact. After sanding, wipe off dust with a clean cloth.
Applying New Finish
Applying a new finish to old cabinet hardware breathes new life into worn pieces. The right finish protects the metal and improves appearance. This step is key to achieving a fresh, clean look. Take time to prepare and apply the finish carefully for best results.
Priming Hardware
Start by applying a primer to the hardware. Primer helps paint stick better and last longer. Use a primer made for metal surfaces. Apply a thin, even coat and let it dry fully. This step prevents peeling and rust, making the finish smooth and strong.
Painting Vs. Spraying
Choose between painting by hand or spraying the finish. Hand painting works well for small jobs or detailed hardware. Use a small brush for control and fewer drips. Spraying gives a smooth, even coat fast. Spray outdoors or in a well-ventilated area. Both methods need thin coats applied slowly.
Drying Times
Allow enough time for each coat to dry. Drying time depends on paint type and room conditions. Wait at least one hour between coats for most paints. Avoid touching the hardware until fully dry. Rushing this step can cause smudges and uneven finish.
Sealing And Protecting
Sealing and protecting old cabinet hardware is a key step in refinishing. It keeps the finish safe from wear and tear. It also stops rust and tarnish from returning. Proper sealing helps your hardware look fresh and last longer.
Choosing A Sealant
Select a sealant that fits your hardware material. Clear lacquer works well on metal for a shiny finish. Polyurethane offers strong protection and is great for high-use items. Avoid sealants that yellow over time or peel easily. Water-based sealants dry fast and have low odor.
Application Methods
Use a soft brush or a small foam brush to apply the sealant. Apply thin, even coats to avoid drips and bubbles. Let each coat dry fully before adding another. Spraying can give a smooth finish but requires good ventilation. Wipe off any excess sealant quickly for a clean look.
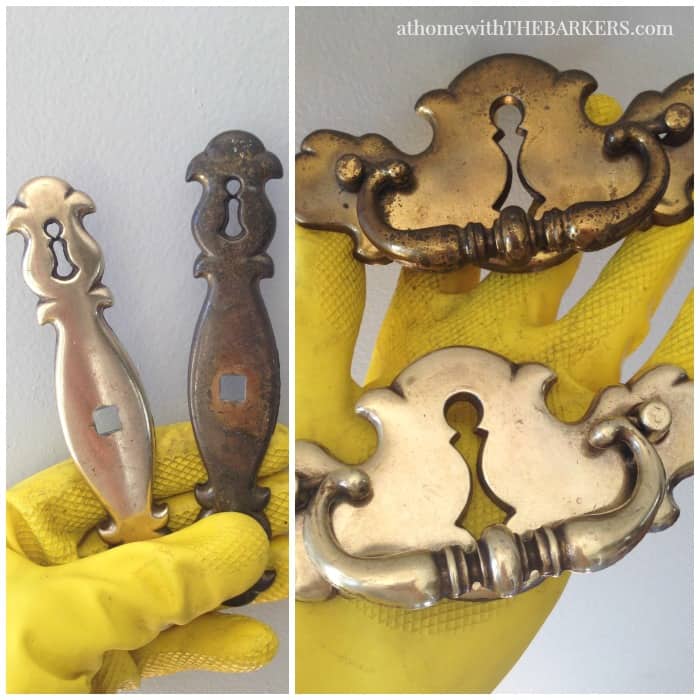
Credit: athomewiththebarkers.com
Reinstalling Hardware
Reinstalling hardware is the final step in refinishing old cabinet pieces. It brings the cabinets back to life. Careful reinstallation keeps the cabinets functional and looking great.
Take your time to match and secure each piece properly. This ensures a neat and durable finish.
Matching Pieces To Doors
Start by sorting the hardware. Group handles and knobs by size and style. Match each piece to its original door or drawer. This keeps the cabinet’s look consistent. Check the holes on the doors. Use the hardware that fits perfectly. Avoid forcing pieces that do not match. This prevents damage to the wood and hardware.
Ensuring Secure Attachment
Use the right screws for each piece. Screws should fit snugly but not strip the holes. Tighten screws by hand first. Then use a screwdriver for a firm hold. Do not over-tighten. Over-tightening can crack the wood or strip threads. Test each handle or knob by pulling gently. Make sure it feels solid and stable. Replace any worn screws for better security.
Maintenance Tips
Keeping your refinished cabinet hardware looking new needs regular care. Proper maintenance helps protect your work and extends the hardware’s life. Simple steps make a big difference.
Cleaning Refurbished Hardware
Use a soft cloth to wipe hardware often. Avoid harsh chemicals that damage the finish. Mild soap and warm water work best for cleaning. Dry the hardware well to stop water spots.
Preventing Wear And Tear
Handle cabinets gently to avoid scratches and dents. Tighten screws if hardware feels loose. Place felt pads behind handles to reduce friction. Regular checks help catch problems early.
Credit: athomewiththebarkers.com
Frequently Asked Questions
How Do I Remove Old Cabinet Hardware Safely?
Use a screwdriver to carefully remove screws holding the hardware. Avoid using excessive force to prevent damage to cabinets. Keep all screws and parts organized for reinstallation or refinishing.
What Materials Are Best For Refinishing Cabinet Hardware?
Use fine steel wool or a wire brush for cleaning metal hardware. Choose spray paint or metal polish designed for your hardware’s material, such as brass or nickel, to ensure a smooth finish.
Can I Refinish Cabinet Hardware Without Removing It?
It’s best to remove hardware for even refinishing. However, light cleaning and polishing can be done in place if removal is difficult. Removing hardware ensures better coverage and a professional look.
How Long Does It Take To Refinish Cabinet Hardware?
Refinishing hardware typically takes 2-4 hours including cleaning, sanding, and drying. Drying time depends on the paint or finish used. Plan for extra time if multiple coats are needed.
Conclusion
Refinishing old cabinet hardware can refresh any room quickly. It saves money and adds a personal touch. With basic tools and some patience, anyone can do it. Clean, sand, and paint or polish for the best look. Small changes bring big results.
Try this simple project to brighten your space today.