
Installing cabinet hardware can be tricky, especially if you want every handle and knob to line up perfectly. If you’ve ever struggled with uneven holes or wasted time measuring over and over, you’re not alone.
But what if there was a simple tool that could make this job faster and more precise? That’s where a cabinet hardware jig comes in. In this guide, you’ll learn exactly how to use this handy tool to transform your cabinet installation from frustrating to flawless.
Keep reading, and you’ll discover easy steps that save you time, effort, and headaches.
Choosing The Right Jig
Choosing the right cabinet hardware jig is a key step for a smooth installation. The right jig helps you place handles and knobs quickly and accurately. It saves time and reduces errors. Picking a jig that fits your needs makes your project easier and better.
Consider what type of jig matches your work style and the hardware you use. Think about the material and build quality to ensure it lasts. Check if the jig works well with your cabinet hardware for perfect results.
Types Of Cabinet Hardware Jigs
There are several types of cabinet hardware jigs. Some jigs work for knobs only, while others fit handles and pulls. Template jigs have fixed hole patterns for common sizes. Adjustable jigs let you change hole spacing. Choose a type that matches your hardware and project size.
Material And Build Quality
The jig’s material affects its durability and accuracy. Plastic jigs are light and affordable but may wear out fast. Metal jigs are stronger and more precise. Look for smooth edges and sturdy parts. Good build quality means the jig stays reliable over many uses.
Compatibility With Hardware
Make sure the jig fits the size and shape of your hardware. Some jigs only fit small knobs or short pulls. Others adjust for long handles or different hole distances. Match the jig to your hardware to avoid mistakes. This ensures clean, even holes every time.
Gathering Necessary Tools
Gathering the right tools is the first step in installing cabinet hardware jig. Having all necessary tools ready makes the process smooth and fast. It helps avoid mistakes and saves time. Prepare your workspace and check your tools before starting.
Essential Tools List
- Cabinet hardware jig – the main tool for precise drilling
- Power drill – to drill holes accurately
- Drill bits – matching your hardware size
- Measuring tape – for exact measurements
- Pencil – to mark drilling points
- Screwdriver – to attach hardware
- Clamps – to hold the jig steady on the cabinet
Optional Accessories For Accuracy
- Level – ensures holes are straight and aligned
- Square ruler – to check right angles
- Masking tape – to prevent wood splintering
- Center punch – to mark hole centers clearly
- Work gloves – protect your hands during drilling
Preparing Your Cabinets
Preparing your cabinets is the first step to installing cabinet hardware jig correctly. Proper preparation ensures accurate placement and a smooth installation process. Taking time to clean and mark your cabinets makes a big difference.
Cleaning And Clearing Surface
Start by cleaning the cabinet surface thoroughly. Remove dust, dirt, and grease. Use a mild cleaner and a soft cloth. This helps the jig stick well and prevents slips. Clear away any objects or handles from the cabinet doors and drawers. A clean surface ensures precise drilling and avoids damage.
Marking Drill Points
Next, mark the drill points carefully. Use a pencil to make small dots where screws will go. Measure twice to avoid mistakes. The cabinet hardware jig will help keep these marks even. Clear and accurate marks guide your drill and save time. This step is key to a neat and professional look.
Credit: www.homedepot.com
Setting Up The Jig
Setting up the cabinet hardware jig is the first step to a neat and easy installation. A jig helps you place handles and knobs in the same spot on every cabinet door and drawer. This saves time and prevents mistakes. Proper setup means your hardware will look balanced and professional.
Adjusting For Handle Size
Start by measuring your cabinet handles. Note the distance between screw holes. Most jigs have adjustable settings to match different sizes. Loosen the knobs or screws on the jig. Slide the guides to fit the handle’s hole spacing. Tighten the knobs to lock the jig in place. Double-check the setting before drilling. Correct adjustment ensures holes line up perfectly.
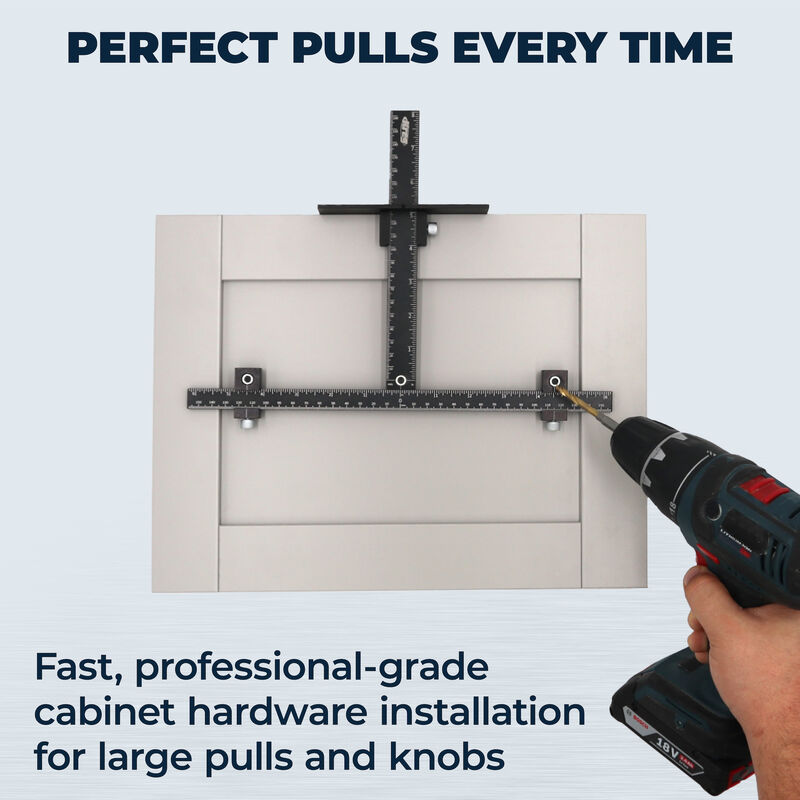
Aligning With Cabinet Doors And Drawers
Next, position the jig on the cabinet face. Align it with the edge or center of the door or drawer. Use the built-in rulers or guides for accuracy. Hold the jig firmly to avoid slipping. Clamp it if possible for extra stability. Check the height and side placement carefully. Proper alignment means your hardware will be straight and consistent.
Drilling With Precision
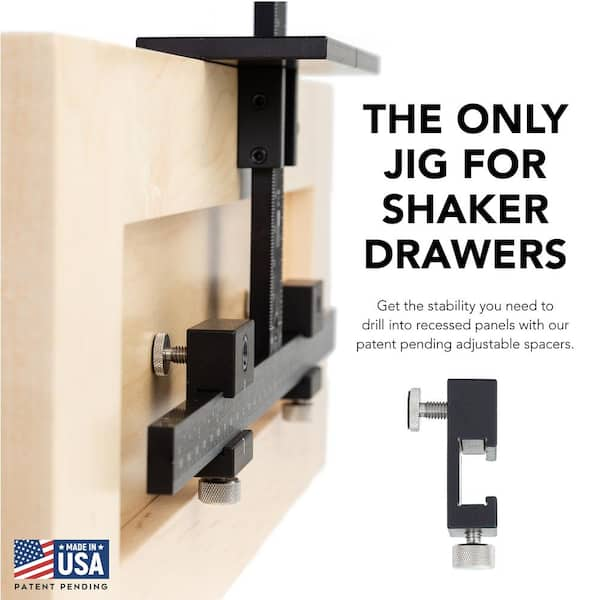
Drilling with precision is key to installing cabinet hardware perfectly. Accurate holes prevent misaligned handles and make the hardware fit well. Using a cabinet hardware jig helps keep your drill steady and your holes consistent. Follow simple steps to secure the jig and drill clean holes every time.
Securing The Jig
Place the jig firmly on the cabinet door or drawer. Make sure it sits flat and does not move. Use clamps or tape to hold the jig in place. A stable jig ensures the drill bit hits the right spot. Check twice before drilling to avoid mistakes.
Drill Techniques For Clean Holes
Use a sharp drill bit designed for wood. Start drilling slowly to avoid slipping. Keep the drill straight and steady throughout the process. Drill just deep enough for the hardware screws. Clean holes improve the look and fit of your cabinet handles.

Credit: truepositiontools.com
Attaching The Hardware
Attaching the hardware to your cabinets is a key step in the installation process. Proper attachment ensures the handles and knobs stay secure and look great. Using the right tools and techniques makes this task easier and more precise.
Screw Selection And Placement
Select screws that match your hardware size and cabinet thickness. Too long screws can damage the cabinet back. Too short screws may not hold the hardware firmly. Place screws straight through the holes in the hardware. Align screws carefully to avoid crooked handles or knobs. Using the cabinet hardware jig helps position screws accurately every time.
Ensuring Firm Attachment
Firm attachment prevents loose or wobbly hardware. Tighten screws with a screwdriver, not a drill, to avoid stripping. Stop tightening once the hardware feels secure. Check each handle or knob by gently pulling it. If it moves, tighten the screws a bit more. Double-check all attachments before finishing your project for a professional look.
Tips For Perfect Alignment
Perfect alignment is key to installing cabinet hardware jig correctly. It ensures the handles or knobs look straight and even on every cabinet door or drawer. Small mistakes can cause hardware to look crooked or uneven. Follow these tips to keep everything aligned and professional.
Double-checking Measurements
Measure twice, drill once. Always check your measurements before drilling holes. Use a ruler or tape measure to mark spots clearly. Compare marks on both sides of the cabinet to keep symmetry. Use the jig as a guide, but confirm its position first. Double-checking saves time and prevents errors.
Common Mistakes To Avoid
Don’t rush the process. Avoid marking holes too close to the edge of the door or drawer. Watch out for uneven spacing between handles. Make sure the jig is tight and does not move while marking. Avoid guessing measurements. Small errors add up and spoil the final look.
Maintaining Your Jig
Maintaining your cabinet hardware jig is important for long-term use. A well-kept jig stays accurate and lasts longer. Regular care keeps it ready for your next project. Small steps can prevent bigger problems later.
Cleaning And Storage
After each use, clean your jig carefully. Remove dust and wood chips with a soft brush. Avoid water or harsh chemicals that can damage it. Wipe down metal parts with a dry cloth to stop rust.
Store the jig in a dry place. Use a protective case or box if you have one. Keep it away from direct sunlight and moisture. Proper storage helps keep its shape and function.
Calibration For Future Use
Check your jig’s measurements before every project. Use a ruler or measuring tape to verify accuracy. Adjust any loose parts to keep holes in the right place. Small errors grow over time without regular calibration.
Mark any changes or notes for reference. This saves time and avoids mistakes later. Keeping your jig calibrated ensures each hole fits perfectly every time.
Credit: www.kregtool.com
Frequently Asked Questions
What Is A Cabinet Hardware Jig?
A cabinet hardware jig is a tool that helps accurately drill holes for handles and knobs. It ensures consistent placement and alignment on cabinet doors and drawers. Using a jig saves time and improves the overall look of your cabinetry hardware installation.
How Do You Use A Cabinet Hardware Jig?
To use the jig, align it on your cabinet surface where you want the hardware. Clamp it securely, then drill holes through the guide holes in the jig. This ensures precise, evenly spaced holes for mounting cabinet handles or knobs.
Can I Install Cabinet Hardware Without A Jig?
Yes, but it’s harder to get perfect alignment without a jig. Freehand drilling can cause uneven hardware placement. A jig provides consistent spacing and positioning, making the installation easier and more professional-looking.
What Types Of Cabinet Hardware Jigs Are Available?
There are adjustable jigs for different drawer sizes and fixed jigs for specific hardware types. Some jigs include multiple hole templates for knobs and pulls. Choose one that fits your cabinet and hardware style for best results.
Conclusion
Installing a cabinet hardware jig makes the job easier and faster. It helps you place handles and knobs in the right spot every time. No guesswork or measuring mistakes. Just follow simple steps and use the jig carefully. Your cabinets will look neat and professional.
Practice a little, and you will gain confidence. Enjoy the satisfaction of a well-done project. This tool saves time and effort for future hardware installations too. Give it a try and see the difference yourself.

