Are you ready to give your cabinets a fresh new look without spending a fortune? Installing cabinet hardware is one of the easiest and most effective ways to transform your kitchen or bathroom.
But if you’ve never done it before, it might feel a bit overwhelming. Don’t worry—this step-by-step video guide will show you exactly how to install cabinet hardware quickly and correctly. By the end, you’ll have the confidence to tackle the job yourself and enjoy that satisfying feeling of a job well done.
Keep reading and watch the video to unlock simple tips that make your cabinets look stunning!
Credit: renovatedfaith.com
Tools You Need
Having the right tools makes cabinet hardware installation simple and fast. Tools help you work with accuracy and avoid mistakes. Prepare your workspace and gather all tools before you start. This saves time and keeps you focused on the task.
Essential Tools List
First, you need a drill or screwdriver to attach screws. A tape measure helps mark exact spots for holes. Use a pencil to draw these marks clearly. A level ensures your handles and knobs sit straight. A ruler or straight edge also helps with alignment. Finally, have the correct screws ready for your hardware.
Optional Tools For Ease
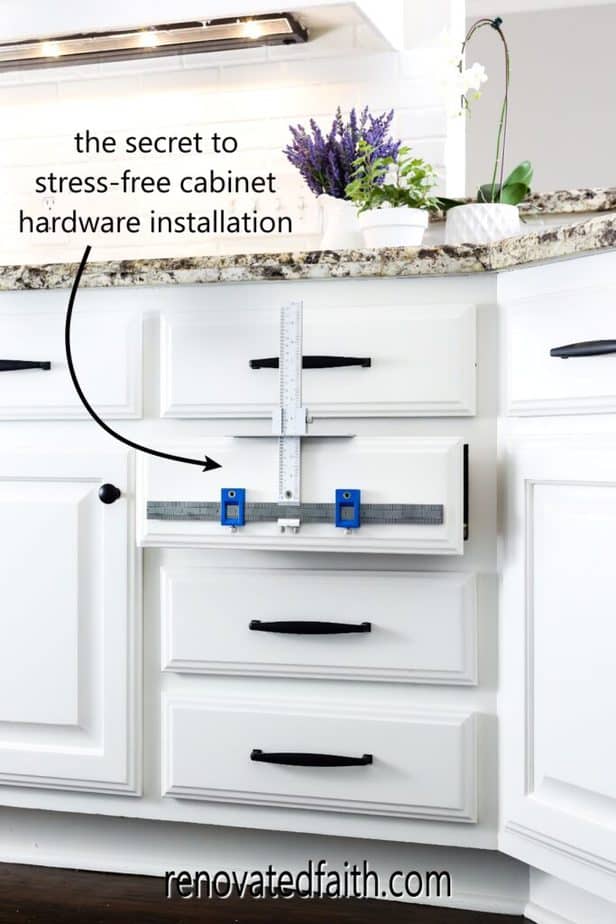
A power drill with a drill bit speeds up screw holes drilling. A clamp holds hardware in place while you work. A template guide helps mark holes quickly and evenly. Use a magnetic screwdriver to keep screws from falling. Small pliers can help tighten or adjust screws carefully. These tools are not required but make the job easier.
Choosing The Right Hardware
Choosing the right hardware for your cabinets makes a big difference. It changes how your cabinets look and feel. The right hardware also helps your cabinets work better. Picking hardware that fits your style and needs is important.
Types Of Cabinet Hardware
Cabinet hardware comes in many types. Knobs are small and easy to use. Pulls are longer and offer a better grip. Handles are sturdy and stylish. Each type suits different cabinet designs and uses.
Matching Hardware To Cabinets
Match hardware style to your cabinet’s look. Classic cabinets go well with simple knobs. Modern cabinets fit with sleek pulls. Choose finishes that blend with your kitchen colors. Brass adds warmth. Chrome gives a clean look. Think about how the hardware feels to touch too.
Preparing The Cabinet
Preparing the cabinet is the first key step to install hardware correctly. This step helps avoid mistakes and saves time. Clean cabinets and clear measurements make the job easier and give a neat finish.
Take your time to prepare well. A smooth preparation sets the stage for a successful installation.
Cleaning And Measuring
Start by cleaning the cabinet surface. Use a soft cloth and mild cleaner. Dirt or grease can stop hardware from sticking well. After cleaning, dry the surface fully.
Next, measure the cabinet carefully. Use a ruler or tape measure to find exact spots for hardware. Measure twice to avoid errors. Accurate measuring ensures the hardware fits and looks right.
Marking Drill Points
Mark drill points clearly using a pencil. Light marks work best and are easy to erase. Use a template or the hardware itself to mark holes. Keep marks straight and even for a professional look.
Double-check all marks before drilling. Correct marks prevent damage to the cabinet and misaligned hardware.
Drilling Holes
Drilling holes is a key step when installing cabinet hardware. It ensures your handles or knobs fit perfectly and stay secure. Proper drilling prevents damage to your cabinets and keeps everything aligned.
Selecting The Drill Bit
Choose a drill bit that matches your hardware screws. Usually, a bit slightly smaller than the screw diameter works best. This allows the screws to grip tightly without splitting the wood.
Use a sharp, high-quality drill bit for clean holes. A dull bit can cause rough edges or damage the cabinet surface.
Drilling Tips For Accuracy
Measure and mark the drill spots carefully before you start. Use a pencil and a ruler to ensure even spacing.
Place a piece of tape over the drill spot to stop the bit from slipping. Drill slowly and straight to avoid angled holes.
Drill halfway through, then check the depth. This helps avoid drilling all the way through accidentally.
Attaching The Hardware
Attaching cabinet hardware is an important step in giving your cabinets a fresh look. This process needs care to make sure handles and knobs fit well and work properly. Small mistakes can cause loose hardware or damage to your cabinets.
Follow clear steps to install hardware firmly. The right tools and steady hands help. This section explains how to screw in handles and knobs and how to ensure a tight fit for lasting results.
Screwing Handles And Knobs
Start by lining up the handle or knob with the pre-drilled holes. Insert the screws through the inside of the cabinet door or drawer. Use a screwdriver to tighten the screws gently.
Avoid over-tightening. It can strip the screws or damage the wood. Turn the screws until the hardware feels snug but not forced. Check that the handle or knob sits straight and even.
Ensuring Tight Fit
After screwing in the hardware, check for any wiggle or movement. Hardware should stay firm when pulled or pushed. If loose, tighten the screws a little more.
For extra security, add small washers between the screw head and the hardware. This helps prevent loosening over time. Test each piece by opening and closing the door or drawer. The hardware should feel steady and secure.

Credit: www.homedepot.com
Final Adjustments
After installing your cabinet hardware, final adjustments ensure everything looks and works perfectly. Small tweaks can make a big difference in the overall appearance and function. Take your time to check each piece carefully. This step helps prevent future problems and keeps your cabinets looking neat and sturdy.
Checking Alignment
Look closely at all handles and knobs. Are they straight and even? Misaligned hardware can spoil the cabinet’s look. Use a level or ruler to check spacing and height. Adjust screws slightly to fix any unevenness. Make sure each piece lines up with others on the same door or drawer. Consistent alignment creates a clean, professional finish.
Fixing Loose Hardware
Test each handle and knob by gently pulling them. Loose hardware feels shaky and may fall off soon. Tighten screws using a screwdriver. Avoid overtightening to prevent damage to the cabinet or hardware. If screws don’t hold well, try using longer screws or adding small anchors. Secure hardware keeps cabinets safe and easy to use every day.
Common Mistakes To Avoid
Installing cabinet hardware can look simple but has common mistakes. These errors cause misalignment or damage. Avoiding these problems saves time and effort. Here are two common mistakes to watch for during installation.
Misaligned Hardware
Misalignment makes cabinets look uneven and unprofessional. Measure twice before drilling holes. Use a level or template to mark spots. Align handles and knobs carefully on each door or drawer. Small errors add up quickly across many pieces.
Wrong Screw Size
Using the wrong screw size can damage cabinets or hardware. Screws too long may go through the door. Screws too short may not hold the hardware securely. Check the screw length and diameter before installing. Match screws to the hardware and cabinet thickness.

Credit: www.youtube.com
Frequently Asked Questions
What Tools Do I Need To Install Cabinet Hardware?
You need a drill, screwdriver, measuring tape, pencil, and a level. These tools ensure accurate placement and secure installation.
How Do I Measure For Cabinet Hardware Placement?
Measure the cabinet door or drawer width. Mark the center or desired position with a pencil for precise alignment.
Can I Install Cabinet Hardware Without Drilling?
Yes, adhesive-backed hardware is available but less durable. Drilling offers a stronger, long-lasting hold for cabinet hardware.
How Do I Avoid Damaging Cabinets When Installing Hardware?
Use painter’s tape to protect surfaces. Drill pilot holes to prevent wood splitting and ensure proper screw placement.
Conclusion
Installing cabinet hardware can be simple and quick. Follow the steps carefully to avoid mistakes. Use the right tools and measure twice before drilling. Take your time to align handles and knobs correctly. A well-installed hardware improves your cabinet’s look and function.
Practice makes perfect, so don’t rush the process. Enjoy the new style you create in your space. Keep this guide handy for future projects. Small changes can make a big difference in your home.