Removing fasteners can be tricky, especially when they are stuck, rusty, or hidden. If you’ve ever struggled to take apart a project or fix something around the house, you know how frustrating it can be.
But don’t worry—this guide will show you simple, effective ways to remove fasteners quickly and safely. By learning these easy techniques, you’ll save time, avoid damage, and feel more confident handling any task that comes your way. Keep reading, and you’ll discover the secrets to making fastener removal hassle-free every time.
Types Of Fasteners
Fasteners hold things together in many projects. Knowing their types helps to remove them correctly. Each fastener needs a different tool and method for removal.
Screws
Screws have a spiral thread. They twist into wood, metal, or plastic. Use a screwdriver or drill to turn them out. Some screws have flat heads, others have cross-shaped heads.
Nails
Nails are smooth and sharp at one end. They are pushed or hammered into surfaces. Pull nails out carefully with a claw hammer or nail puller. Nails do not twist out like screws.
Bolts And Nuts
Bolts are metal rods with threads on one end. Nuts fit onto bolts to hold parts tight. Use a wrench or socket to turn nuts and bolts. Hold the bolt steady while loosening the nut.
Rivets
Rivets join metal pieces by deforming one end. They do not twist or pull out easily. Drill through the rivet to remove it. Replace rivets with new ones to keep strength.
Common Challenges
Removing fasteners can be tricky. Many people face problems that make the task harder. Knowing these common challenges helps you prepare and work smarter. This section covers the main issues you might meet when removing fasteners.
Stripped Heads
Stripped heads happen when the tool slips and damages the fastener’s top. This makes it hard to grip and turn the fastener. Using the wrong size tool or too much force can cause stripped heads. Once stripped, removing the fastener needs special tools or tricks.
Rust And Corrosion
Rust and corrosion build up over time, especially in outdoor or wet areas. They cause the fastener to stick tightly to the surface. Rust weakens the metal, making it fragile or stuck. Removing rusted fasteners often needs rust remover or extra effort.
Tight Or Stuck Fasteners
Tight or stuck fasteners refuse to move easily. They can be over-tightened or jammed by dirt and debris. Using too much force risks breaking the fastener or tool. Patience and the right techniques help loosen these stubborn fasteners.
Essential Tools
Removing fasteners requires the right tools. Without proper tools, the task becomes harder and takes more time. Using the correct tools helps protect the fastener and your project. Here are the essential tools needed for removing fasteners efficiently.
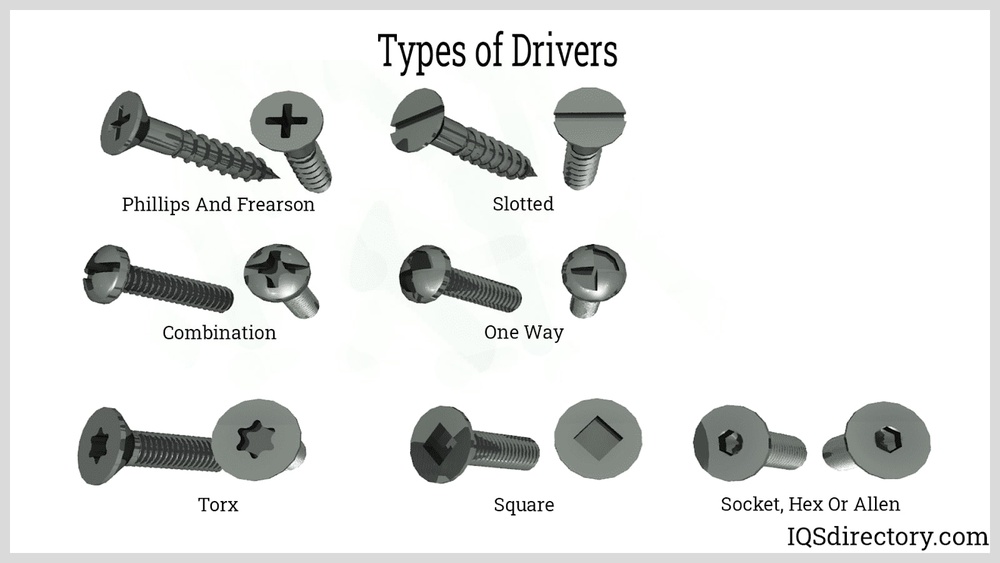
Screwdrivers And Impact Drivers
Screwdrivers come in many shapes and sizes. Choose the right type for the screw head: flat, Phillips, or Torx. Impact drivers add power to loosen tight screws. They work well on rusted or stuck fasteners. Use them carefully to avoid damage.
Pliers And Wrenches
Pliers grip fasteners firmly for turning or pulling. Needle-nose pliers reach tight spots easily. Wrenches fit nuts and bolts of various sizes. Adjustable wrenches offer flexibility when sizes vary. Both tools help remove fasteners that screwdrivers cannot handle.
Pry Bars And Claw Hammers
Pry bars help lift or separate fasteners from surfaces. They provide leverage to ease removal. Claw hammers pull out nails quickly. Use the claw end to grip the nail head. These tools are useful for stubborn or hidden fasteners.
Lubricants And Penetrating Oils
Lubricants reduce friction between fasteners and surfaces. Penetrating oils soak into rust and corrosion. They loosen stuck or seized fasteners. Apply oils and wait a few minutes before trying again. This step often saves fasteners from breaking.

Credit: www.youtube.com
Step-by-step Removal Techniques
Removing fasteners can be tricky without the right steps. Using proper techniques helps avoid damage to materials. Follow each step carefully for smooth removal. This guide covers screws, nails, bolts, nuts, and rivets.
Removing Screws Without Damage
Choose the correct screwdriver that fits the screw head. Apply firm pressure while turning counterclockwise. Use a manual screwdriver for better control. If the screw is stuck, apply a drop of oil. Let it sit for a few minutes. Then try turning again slowly. Avoid using too much force to stop stripping.
Extracting Nails Safely
Use a claw hammer or nail puller. Position the claw under the nail head carefully. Rock the tool back and forth gently. Pull the nail straight out to avoid wood damage. If the nail is deep, tap the tool under the head. Use a block of wood as a lever to protect surfaces.
Loosening Bolts And Nuts
Select the right wrench or socket size. Turn the bolt or nut counterclockwise. If tight, spray with penetrating oil. Wait 10 minutes before trying again. Use steady pressure to avoid rounding edges. For extra grip, use a rubber band over the bolt head.
Detaching Rivets
Drill the center of the rivet head carefully. Use a drill bit slightly smaller than the rivet diameter. Drill until the head separates from the body. Remove the remaining rivet with pliers. Wear safety glasses to protect your eyes. Clean the hole before inserting a new fastener.
Tips For Stubborn Fasteners
Stubborn fasteners can be a real challenge. They often stick tight due to rust, dirt, or old age. Using the right methods helps free them without damage. These tips focus on safe and effective ways to loosen stuck fasteners.
Using Heat To Loosen
Heat expands metal, breaking the bond holding the fastener. Use a heat gun or propane torch carefully. Apply heat directly to the fastener for a few minutes. Avoid overheating nearby parts to prevent damage. After heating, try turning the fastener slowly. Heat softens rust and makes removal easier.
Applying Penetrating Oils Effectively
Penetrating oils seep into tight spaces and loosen rust. Spray or drip oil on the fastener and wait 10-15 minutes. Reapply oil if needed for better results. Tap the fastener gently to help oil reach inside. Oils reduce friction and help the fastener turn smoothly. Choose oils made for rust and corrosion.
Tapping And Vibrating Methods
Light tapping can break rust bonds without damage. Use a small hammer or mallet to tap the fastener gently. Vibrations help loosen stuck threads. A vibrating tool or impact driver works well for this. Tapping and vibration make turning the fastener easier. Always tap lightly to avoid stripping the fastener head.

Credit: www.novafabrication.com
Preventing Damage
Removing fasteners can be tricky. Damage can happen easily to surfaces and tools. Taking care during removal keeps materials safe. It also saves time and money. This section explains how to prevent damage while removing fasteners.
Protecting Surrounding Materials
Cover nearby surfaces with tape or cloth. This stops scratches and dents. Use the right tools to avoid slipping. Work slowly and carefully around delicate areas. Check the area often to prevent accidental harm.
Avoiding Fastener Breakage
Choose the correct driver size for the fastener. Apply steady, even pressure during removal. Avoid forcing the fastener if it feels stuck. Use penetrating oil to loosen tight fasteners. Breakage makes removal harder and damages materials.
Maintaining Tool Condition
Keep tools clean and free from rust. Sharpen or replace worn-out bits regularly. Use tools designed for the fastener type. Proper tools reduce slipping and stripping risks. Well-maintained tools make fastener removal easier and safer.
When To Seek Professional Help
Removing fasteners can be tricky. Sometimes, you might damage the material or tool. Knowing when to ask for help saves time and avoids mistakes. Professionals have the right tools and skills. They handle tough fasteners safely and quickly.
Signs You Need Professional Help
Fasteners stuck or rusted beyond your tools’ reach. Stripped screw heads that won’t turn. Fasteners in hard-to-reach places causing injury risk. Using too much force that might break the object.
Risks Of Removing Fasteners Alone
Damaging the surface or surrounding area. Hurting your hands or fingers. Breaking the fastener, making removal harder. Wasting time and effort on a tough job.
Benefits Of Hiring A Professional
Fast and safe removal with proper tools. Protects your belongings from damage. Saves stress and physical effort. Ensures the job is done right the first time.

Credit: diy.stackexchange.com
Frequently Asked Questions
What Tools Are Best For Removing Fasteners Safely?
Common tools include screwdrivers, pliers, wrenches, and pry bars. Choose based on fastener type and size. Using the right tool prevents damage to materials and ensures safe removal.
How Do I Remove Rusted Or Stuck Fasteners?
Apply penetrating oil and let it sit for 10-15 minutes. Use impact tools or heat carefully to loosen the fastener. Always wear safety gear when working with rusted parts.
Can I Reuse Fasteners After Removal?
Reusing fasteners depends on their condition. Inspect for damage, rust, or wear. Replace any fastener that looks compromised to maintain safety and structural integrity.
What Precautions Should I Take When Removing Fasteners?
Wear safety goggles and gloves to protect yourself. Use the correct tools and avoid excessive force. Work in a well-lit area to prevent accidents.
Conclusion
Removing fasteners can be simple with the right tools and care. Always choose the correct tool for the fastener type. Take your time to avoid damage to materials or yourself. Practice safety by wearing gloves and eye protection. Clean the area before and after removal to keep things tidy.
With patience and the right method, removing fasteners becomes easier each time. Keep these tips in mind for your next project. You will feel more confident handling fasteners on your own.