Are you struggling to remove stayput fasteners and don’t know where to start? You’re not alone.
These little fasteners can be tricky, but with the right tips, you can get them out quickly and without damage. You’ll discover simple, step-by-step methods that make the process smooth and hassle-free. Keep reading to save time and avoid frustration—your next project will thank you!

Credit: www.youtube.com
What Are Stayput Fasteners
Stayput fasteners are small devices that hold materials firmly in place. They stop parts from moving or slipping. These fasteners are strong and reliable. They keep things secure without damaging the surface. Stayput fasteners come in many designs to fit different needs.
Types Of Stayput Fasteners
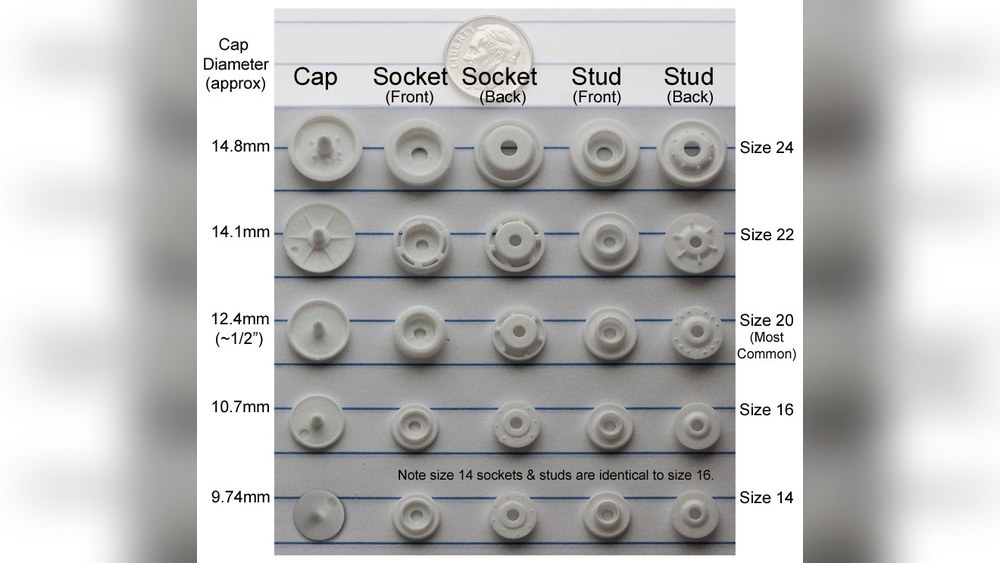
There are several types of stayput fasteners. Some use clips to hold parts together. Others use screws or nails that stay tight. Some fasteners are made of plastic, while others are metal. Each type works best for certain materials and jobs.
Common Uses
Stayput fasteners are used in many places. They hold wires and cables in homes and offices. They keep panels and covers fixed on machines. These fasteners also secure upholstery in furniture. Builders and repair workers use them for many tasks.
Credit: www.pycawnings.com
Tools Needed For Removal
Removing stayput fasteners requires the right tools for a smooth process. Using proper tools saves time and prevents damage. Below are the essential tools needed for removal.
Basic Hand Tools
Start with simple hand tools. A flathead screwdriver helps pry the fastener gently. Needle-nose pliers grip and pull small pieces. A hammer taps the screwdriver or pliers to loosen stuck fasteners. These tools work well for light or easy-to-reach fasteners.
Specialized Equipment
For tough or stubborn fasteners, use specialized tools. A pry bar gives extra leverage to remove tight fasteners. A fastener removal tool fits around the fastener for a clean pull. An electric drill with a bit can help if the fastener is screwed in. These tools make hard jobs easier and protect surfaces.
Preparation Before Removal
Preparing before removing Stayput fasteners is important for safety and success. It helps avoid damage and injury. Taking time to get ready makes the job easier and faster.
Safety Measures
Wear safety glasses to protect your eyes from flying debris. Use gloves to protect your hands from sharp edges. Make sure your clothes fit well and cover your skin. Keep a first aid kit nearby in case of cuts or scrapes. Work slowly and carefully to avoid accidents. Keep children and pets away from the workspace.
Workspace Setup
Clear the area around the fasteners to have enough room to work. Remove any loose items that can cause tripping or distractions. Use a sturdy table or workbench to hold your tools and materials. Ensure good lighting so you can see the fasteners clearly. Have all necessary tools ready before you start. Keep a trash bin nearby to dispose of removed fasteners and debris.
Step-by-step Removal Process
Removing Stayput fasteners requires care and the right steps. This process helps keep your materials safe and the fastener intact for reuse. Follow these simple steps to remove Stayput fasteners smoothly and quickly.
Loosening The Fastener
Start by cleaning the area around the fastener. Dirt can make removal harder. Use a screwdriver or a flat tool to gently wiggle the fastener. This loosens its grip. Avoid using too much force to prevent damage.
Extracting Without Damage
Place a thin tool under the fastener head. Slowly lift it while supporting the surrounding material. Use steady pressure to pull the fastener out. Work carefully to avoid bending or breaking it. Patience is key here.
Handling Stubborn Fasteners
For stuck fasteners, apply a small amount of lubricant. Let it sit for a few minutes. Tap gently around the fastener with a hammer to loosen rust or debris. Use pliers for extra grip if needed. Take your time to prevent harm.
Tips For Efficient Removal
Removing stayput fasteners can be tricky without the right approach. Efficiency saves time and protects materials. Follow these simple tips for smooth removal. These will help avoid damage and frustration.
Careful planning and the right tools make the job faster. Knowing common pitfalls helps you stay on track. Focus on safety and precision for best results.
Avoiding Common Mistakes
Do not rush the removal process. Forcing fasteners can break them or damage surfaces. Use the correct tool size for each fastener type. Applying too much force leads to stripped heads. Take time to identify the fastener before starting. Keep the work area clean to avoid slips and accidents.
Speeding Up The Process
Use power tools with adjustable torque settings. This reduces manual effort and speeds up removal. Apply penetrating oil to stuck fasteners to loosen them. Let it sit for a few minutes before trying again. Work in a well-lit area to see fasteners clearly. Organize tools nearby for quick access during the job.
Aftercare And Replacement
After removing stayput fasteners, proper aftercare and replacement are vital. This keeps the surface safe and ready for use. Damage can occur during removal. Fixing it quickly prevents bigger problems.
Inspecting The Area
Check the surface closely for holes or cracks. Look for any loose material around the fastener spots. Clean the area of dirt and debris. This helps new fasteners stick better. Use a bright light to see clearly. Small damages need filling before new fasteners go in.
Installing New Fasteners
Choose fasteners that match the original type and size. Align them carefully with the old holes. Push or screw them in firmly but gently. Avoid forcing fasteners to prevent new damage. Test the hold to ensure stability. Replace any fasteners that do not fit well.
Credit: www.nhakhoaviethung.com.vn
Frequently Asked Questions
What Tools Are Needed To Remove Stayput Fasteners?
To remove stayput fasteners, use pliers, a flathead screwdriver, and a hammer. These tools help loosen and pry the fasteners safely. Wearing gloves protects your hands during removal. Proper tools ensure efficient and damage-free fastener removal.
How Do You Safely Remove Stayput Fasteners?
To safely remove stayput fasteners, gently pry them with a screwdriver. Use pliers for extra grip if needed. Avoid excessive force to prevent damage. Always wear protective gloves and eye protection for safety.
Can Stayput Fasteners Be Reused After Removal?
Stayput fasteners are typically designed for one-time use. Removing them often damages their locking mechanism. It’s best to replace them with new fasteners for secure reattachment and safety.
What Causes Stayput Fasteners To Become Difficult To Remove?
Stayput fasteners become hard to remove due to rust, paint buildup, or corrosion. Over time, environmental factors cause them to stick tightly. Proper cleaning and lubrication can help ease the removal process.
Conclusion
Removing stayput fasteners is simple with the right tools and steps. Take your time and work carefully to avoid damage. Using proper techniques makes the process smoother and safer. Practice patience, and the fasteners will come out without trouble. This guide helps you handle stayput fasteners with confidence.
Keep these tips in mind for future projects. Now, you can remove stayput fasteners quickly and easily.