Are you ready to make your projects easier and more secure? Installing an Airloc fastener might sound tricky, but with the right steps, you can do it quickly and confidently.
Whether you’re working on clothing, bags, or outdoor gear, knowing how to install this fastener will save you time and frustration. In this guide, you’ll discover simple, clear instructions that anyone can follow. Keep reading, and you’ll master the technique that professionals trust for a strong, reliable hold every time.
Airloc Fastener Basics
Understanding the basics of Airloc fasteners helps in using them correctly. These fasteners are strong and reliable for holding materials together. They are easy to install and save time in many projects. Knowing their types and uses can guide you in choosing the right one.
Types Of Airloc Fasteners
Airloc fasteners come in several types. Each type fits different materials and thicknesses. Some common types include standard, heavy-duty, and specialized fasteners. Standard fasteners suit light materials. Heavy-duty fasteners work well with thick or tough materials. Specialized fasteners serve unique needs like waterproofing or high strength. Choosing the right type ensures a secure hold.
Common Uses And Benefits
Airloc fasteners are popular in many industries. They join fabric, leather, plastic, and metal. These fasteners are common in clothing, upholstery, and automotive sectors. They provide strong grip and resist loosening over time. Benefits include quick installation and reusable parts. Airloc fasteners reduce damage to materials. Their design allows easy removal without tools. This saves money and effort in repairs.

Credit: www.ebay.com
Tools Needed
Installing an Airloc fastener requires a few specific tools. These tools help make the process smooth and accurate. Having the right tools saves time and avoids damage to the fastener or materials. Below are the essential tools and some optional accessories that can make installation easier.
Essential Tools
A rivet gun or pneumatic tool is necessary to set the Airloc fastener. It provides the force needed to secure the fastener firmly. A drill with the correct drill bit size is also required. This creates the hole for the fastener to fit into. A measuring tape or ruler helps you mark precise locations for drilling. Lastly, safety glasses protect your eyes from metal shards during drilling and setting.
Optional Accessories
Using a deburring tool can smooth the edges of drilled holes. This ensures a clean fit and prevents damage to the fastener. A center punch helps mark drill spots precisely. It keeps the drill bit from slipping. A clamp or vice can hold materials steady during drilling and fastening. These accessories improve accuracy and ease the installation process.
Preparing The Surface
Preparing the surface is the first step to install an Airloc fastener correctly. A clean and well-marked surface helps the fastener hold tightly. This step ensures the fastener lasts longer and works as expected.
Cleaning The Area
Start by removing dirt, dust, and grease from the surface. Use a clean cloth with mild soap and water to wipe the area. Avoid harsh chemicals that might damage the material. Let the surface dry completely before moving on. A dry, clean surface helps the fastener stick better.
Marking Fastener Positions
Next, decide where to place the fasteners. Use a pencil or a light marker to mark the spots. Make sure the marks are evenly spaced for a neat look. Double-check the measurements to avoid mistakes. Clear and accurate marks make the installation easier and precise.

Credit: www.youtube.com
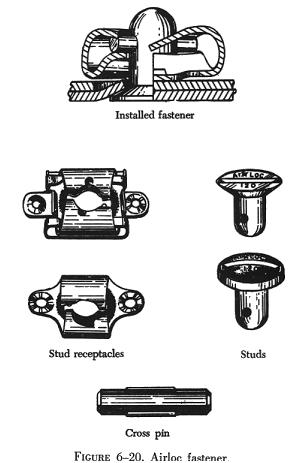
Fastener Installation Steps
Installing an Airloc fastener is a simple task that anyone can do. Follow these clear steps to ensure the fastener works perfectly. Each step helps you place and secure the fastener correctly. Take your time to get the best result.
Aligning The Fastener
Start by positioning the fastener on the fabric or surface. Make sure the parts line up straight. Check that the fastener matches the hole or area where it will go. Good alignment stops damage and improves hold.
Attaching The Base
Place the base part of the fastener on the marked spot. Use the right tool to press or hammer it gently. Avoid pushing too hard to prevent bending. Secure the base firmly to keep it steady.
Securing The Fastener
Next, attach the other half of the fastener. Press it onto the base carefully. Use tools if needed for a tight fit. Ensure the parts snap together without gaps. This step locks the fastener in place.
Testing The Fit
After installation, check how the fastener opens and closes. Pull gently to test its hold. It should fasten securely without slipping. Fix any loose parts before using it regularly.
Troubleshooting Tips
Troubleshooting tips help fix common problems during Airloc fastener installation. Small issues can stop your project. Quick solutions save time and effort. Knowing what to check first makes your work smooth.
Common Installation Issues
Fasteners may not align properly. This causes poor fastening strength. Incorrect tool use can damage the fastener. Sometimes, the material is too thick or thin. Pins might not lock in place. Loose fasteners lead to weak joints. Dirt or debris can block installation.
Quick Fixes
Check alignment before pressing the fastener. Use the correct tool size and type. Clean the material surface well. Adjust material thickness if needed. Push pins firmly until they snap. Tighten loose fasteners gently. Remove dirt with a soft brush or cloth. Try again if the fastener fails the first time.
Credit: avstop.com
Maintenance And Care
Proper maintenance and care keep Airloc fasteners working well. Regular attention prevents problems and saves money. Clean fasteners often and check them for damage. This helps fasteners last longer and work smoothly every time.
Cleaning Fasteners
Remove dirt and debris from fasteners regularly. Use a soft brush or cloth to clean them. Avoid harsh chemicals that may damage the material. Light cleaning with mild soap and water works best. Dry fasteners completely before use to stop rust.
Ensuring Longevity
Check fasteners for wear and tear often. Replace any damaged parts immediately. Store fasteners in a dry, cool place to avoid rust. Lubricate moving parts with light oil if needed. Proper care helps fasteners stay strong and reliable for years.
Frequently Asked Questions
What Tools Are Needed To Install An Airloc Fastener?
You need a rivet gun, drill, drill bits, and the Airloc fastener kit. Proper tools ensure secure installation and durability.
How Do I Prepare The Surface For Airloc Fastener Installation?
Clean the surface thoroughly and mark the drilling spots accurately. A clean, marked surface ensures proper alignment and fastener strength.
Can I Install Airloc Fasteners On Different Materials?
Yes, Airloc fasteners work on metals, plastics, and composites. Choose the correct fastener size for each material for best results.
How Do I Avoid Damaging The Fastener During Installation?
Use the correct drill size and apply steady pressure when setting the fastener. Avoid over-tightening to prevent damage or failure.
Conclusion
Installing an Airloc fastener is simple and quick. Follow each step carefully for the best fit. Use the right tools to avoid damage. Check the fastener after installation to ensure it holds tight. Practice a few times to get comfortable with the process.
This fastener saves time and keeps items secure. Keep your workspace clean and organized for safety. Now, you can install Airloc fasteners with confidence and ease.