Have you ever faced the frustrating challenge of changing a deadbolt that has no visible screws? It can feel like a puzzle with no clear solution.
But don’t worry—this guide will show you simple, step-by-step tricks to get that stubborn lock off and replace it quickly. Whether you’re upgrading your security or fixing a jammed lock, you’ll learn easy methods that anyone can follow. Keep reading, and you’ll gain the confidence to tackle this tricky task without calling a locksmith.
Your home’s safety is worth it!
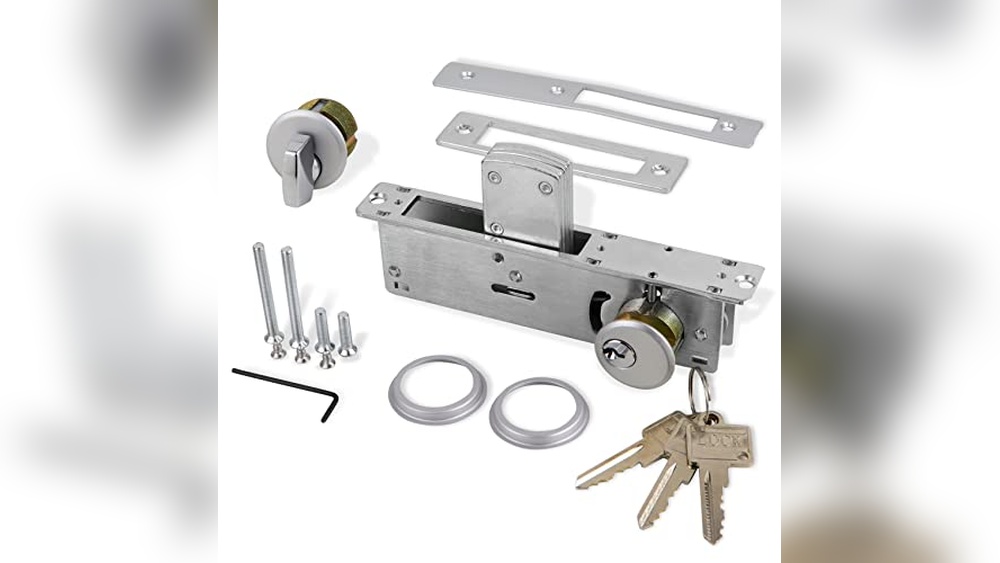
Identify The Deadbolt Type
Identifying the type of deadbolt is the first step in changing one without visible screws. Different deadbolts have unique designs that hide their fasteners. Knowing the type helps in choosing the right method to remove it safely. This section explains how to spot hidden release mechanisms and snap-in or twist-off designs. Understanding these features makes the process easier and faster.
Look For Hidden Release Mechanisms
Some deadbolts hide their screws behind small covers or plates. These covers often snap or slide off with gentle pressure. Check around the knob or the faceplate for tiny slots or seams. Use a flat tool, like a screwdriver or a plastic card, to gently pry the cover. Removing the cover reveals screws or release buttons underneath. Pressing or sliding these buttons can release the deadbolt for removal.
Check For Snap-in Or Twist-off Designs
Other deadbolts use snap-in or twist-off parts instead of screws. The knob or thumb turn may snap into place or twist off with force. Hold the knob firmly and try twisting it counterclockwise. If it resists, try pushing it inward while twisting. Some models require pressing a hidden button or tab before twisting. This design allows removal without tools or visible screws. Identifying this helps avoid damage during removal.

Credit: diy.stackexchange.com
Gather Necessary Tools
Gathering the right tools is the first step to change a deadbolt with no visible screws. Without proper tools, the job becomes harder and may cause damage. Prepare everything before starting to save time and avoid frustration.
Tools help you remove parts carefully and keep the lock working well. Choose tools that fit the job and your skill level. This guide shows what to pick and why.
Select Screwdrivers And Pry Tools
Choose screwdrivers with different heads like flat and Phillips. Small ones work better for tight spaces. A thin pry tool or a plastic spudger helps to lift covers gently. Avoid metal tools that can scratch or break parts.
Some deadbolts hide screws under the faceplate. Pry tools help remove this plate softly. Use screwdrivers only after hiding screws appear. This prevents damage to the door and lock.
Prepare Lubricants And Cleaning Supplies
Lubricants make parts move smoothly. Use graphite powder or silicone spray. Avoid oil-based lubricants that attract dust and dirt. Clean the lock before applying lubricant to remove dust and old grease.
Use a soft cloth and a small brush for cleaning. This keeps the lock parts working well for a long time. Clean and lubricate before reassembling the deadbolt.
Remove The Exterior Plate
Removing the exterior plate is the first step in changing a deadbolt without visible screws. This plate covers the lock mechanism and holds the exterior part in place. Removing it carefully lets you access the inner parts of the deadbolt for replacement or repair.
Locate The Release Tab Or Slot
Check the edges of the exterior plate closely. Many deadbolts have a small release tab or slot hidden on the side or bottom. This tab holds the plate firmly but allows easy removal. Use a flashlight to spot it clearly.
Apply Pressure To Detach The Plate
Press or slide the release tab gently. You might need a flat tool like a screwdriver to push it. While pressing, pull the exterior plate straight away from the door. The plate should come off without force. Avoid bending or breaking the plate during this step.

Credit: www.youtube.com
Detach The Interior Assembly
Detaching the interior assembly is the first step in changing a deadbolt without visible screws. This part of the lock holds the turn knob and connects the lock to the door. Removing it carefully prevents damage to the door and makes it easier to reach the lock mechanism inside. Follow these steps to take off the interior assembly safely.
Find The Mounting Points
Look closely at the interior side of the lock. You might see small indentations or holes. These are the mounting points holding the assembly to the door. Some locks have hidden clips or tabs instead of screws. Use a flashlight to spot these details clearly. Knowing where the assembly attaches helps you detach it without force.
Carefully Pull Off The Interior Components
Hold the interior assembly firmly but gently. Try pulling it straight away from the door. If it does not come off, press or slide the clips or tabs you found earlier. Use a flat tool like a plastic card to ease the parts apart. Avoid bending or breaking any plastic parts. Once loose, lift the assembly away to expose the inside of the lock.
Extract The Deadbolt Mechanism
Extracting the deadbolt mechanism is a key step in changing a deadbolt without visible screws. This process allows you to access the internal parts for removal or replacement. It requires patience and careful handling to avoid damage.
Slide Out The Bolt
Start by sliding the bolt out of the door edge. Use gentle pressure to avoid bending or breaking it. Sometimes, tapping lightly with a small tool helps. If the bolt resists, check for hidden catches or covers. Removing the bolt clears the way to access the lock’s inner parts.
Inspect For Damage Or Wear
After removing the bolt, check it closely. Look for cracks, rust, or signs of wear. Damaged bolts can cause lock problems or security risks. Also, inspect the bolt hole in the door frame. Clear any dirt or debris that might block smooth movement. This step ensures your new deadbolt works properly and lasts longer.
Install The New Deadbolt
Installing a new deadbolt without screws can seem tricky. Focus on placing each part carefully. Make sure the lock fits well. This step ensures your door is secure and works smoothly.
Align The Bolt With The Door
Start by positioning the bolt inside the door. The bolt must slide easily into the strike plate. Check that the bolt lines up with the hole on the door frame. Move the bolt back and forth to test its motion. Adjust the bolt’s position if it sticks or does not fit well.
Attach Interior And Exterior Parts Securely
Place the exterior part of the deadbolt on the door first. Then, hold the interior piece inside the door. Connect them carefully through the door’s hole. Use the lock’s mechanism to hold both sides tightly together. Make sure the pieces do not move or feel loose. Tighten any built-in fasteners to keep the lock stable.
Test The New Lock
Testing the new lock is a key step after installation. It makes sure the lock works correctly and keeps your door secure. Take time to check every part of the lock before finishing the job. This helps avoid problems later and gives peace of mind.
Check Lock Operation From Both Sides
Start by turning the key or thumb turn on the outside. See if the bolt moves smoothly. Do the same on the inside. Try locking and unlocking several times. The lock should work easily without sticking. Check that the key comes out without force.
Ensure Smooth Bolt Movement
Push and pull the door gently while locking and unlocking. The bolt should slide in and out without resistance. Listen for any unusual sounds like grinding or clicking. If the bolt sticks, adjust the strike plate. Make sure the bolt fits fully into the door frame.
Troubleshooting Tips
Troubleshooting a deadbolt without visible screws can be tricky. Some parts may resist removal or feel stuck. Others might not align correctly, blocking smooth operation. These common issues need simple, clear solutions. Follow these tips to ease the process and avoid damage.
Handle Stubborn Components
Stubborn parts often need gentle tapping or twisting. Use a rubber mallet or the handle of a screwdriver to tap lightly. Avoid using too much force that might break the lock. Applying a small amount of lubricant can help loosen tight areas. Let it sit for a few minutes before trying again. If the deadbolt still won’t budge, check for hidden clips or covers hiding the release mechanism.
Adjust Alignment Issues
Misaligned deadbolts cause jamming or difficulty turning the key. Check the strike plate on the door frame. It might be out of place or installed too high or low. Loosen the screws slightly and move the plate until the bolt fits smoothly. Tighten screws after adjustment. Also, inspect the door’s edge for swelling or warping. Sanding or planing the edge can improve alignment and ease deadbolt operation.

Credit: diy.stackexchange.com
Frequently Asked Questions
How Do I Remove A Deadbolt With No Visible Screws?
To remove a screwless deadbolt, look for a hidden release mechanism. Use a flathead screwdriver or tool to gently pry off the faceplate. Some models have a small hole to insert a tool that releases the lock. Always check the manufacturer’s instructions for specific steps.
Can I Change A Deadbolt Without Removing The Entire Lock?
Yes, you can change the deadbolt cylinder without removing the whole lock. Access the cylinder by removing the faceplate or turn piece. This allows you to replace the core while keeping the lock housing intact. It’s a quick way to rekey or upgrade security.
What Tools Are Needed To Replace A Deadbolt With No Screws?
You typically need a flathead screwdriver, a small pick tool, or a specialized removal key. Some locks require a drill if parts are stuck. Having a flashlight and lubricant can help ease the removal process and prevent damage.
How Do I Install A New Deadbolt After Removing The Old One?
Align the new deadbolt with the existing door holes. Insert the latch mechanism first, then attach the exterior and interior plates. Secure parts by snapping or sliding them into place, depending on the lock design. Test the lock for smooth operation before finalizing installation.
Conclusion
Changing a deadbolt without screws can seem tricky at first. Step-by-step, you can remove and replace it safely. Use the right tools and follow the process carefully. Take your time to avoid damage. After changing the deadbolt, check if it works smoothly.
A secure lock helps keep your home safe. Practice these steps to feel more confident next time. Simple tasks like this save money and give peace of mind. Keep your door secure with proper maintenance.