Are you looking to connect a single light switch but don’t know where to start? You’re in the right place.
Wiring a light switch might seem tricky, but with the right steps, you can do it yourself safely and confidently. Imagine flipping that switch and watching your room light up, knowing you made it happen. In this guide, you’ll find clear, simple instructions that anyone can follow.
Ready to take control of your home lighting? Let’s get started!
Tools And Materials Needed
Before starting to connect a single light switch, gather all necessary tools and materials. Having the right items ready makes the job safer and easier. It also helps avoid delays or mistakes during installation.
Each tool has a specific purpose. The right materials ensure the switch works correctly and lasts longer. Below are the main tools and materials needed for this task.
Basic Tools
A screwdriver set is essential. Use both flathead and Phillips screwdrivers to fit different screws.
Wire strippers help remove insulation from wires without damaging the metal inside. Needle-nose pliers are useful for bending and twisting wires.
A voltage tester is critical for safety. It checks if wires carry electricity before you touch them.
Materials For Wiring
Buy a single-pole light switch suitable for your home’s voltage. Use electrical wires rated for your circuit, usually 14 or 12 gauge.
Wire nuts secure wire connections safely. Electrical tape adds extra protection around wire nuts and exposed wires.
A wall plate covers the switch and keeps wiring hidden. Choose one that fits your switch and wall box.
Safety Equipment
Wear insulated gloves to protect from electric shocks. Safety glasses guard your eyes from wire bits or sparks.
Use a flashlight or work light if the area is dark. Good lighting helps you see wires and connections clearly.
Safety Precautions
Working with electrical switches can be risky without proper safety steps. Taking precautions protects you from shocks and accidents. Safety should be your first focus before starting any wiring task.
Follow simple rules to keep yourself safe. Use the right tools and check the power source carefully. Small mistakes can cause serious harm.
Turn Off Power Supply
Always switch off the power at the main circuit breaker. Confirm no electricity flows by using a voltage tester. Never touch wires if the power is on.
Wear Protective Gear
Use insulated gloves and safety glasses. These protect your hands and eyes from shocks and sparks. Avoid loose clothing that can catch on wires.
Use Proper Tools
Choose tools designed for electrical work. Insulated screwdrivers and wire strippers reduce the risk of shock. Avoid using damaged or worn-out tools.
Check Wiring And Connections
Inspect wires for damage before starting. Replace frayed or broken wires to avoid shorts. Make sure all connections are tight and secure.
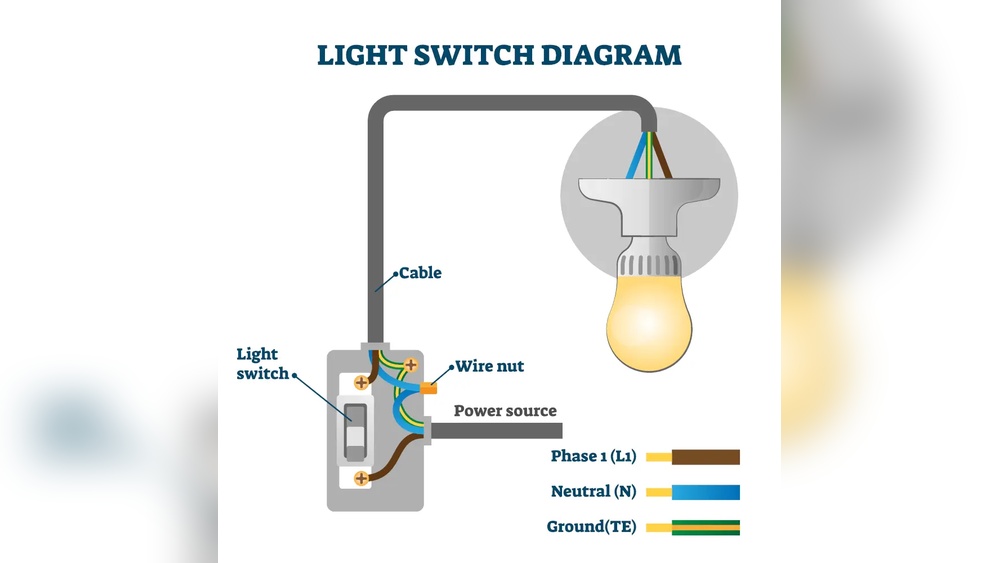
Identify The Wiring Setup
Before connecting a single light switch, identifying the wiring setup is essential. This step helps ensure safety and proper function. Knowing the wiring layout avoids mistakes and saves time. It also allows you to work with confidence and accuracy.
Locate The Electrical Box
First, find the electrical box where the switch will go. It is usually inside the wall, behind the switch cover. Turn off the power at the circuit breaker to avoid shocks. Remove the switch cover carefully. Look inside the box to see the wires connected to the switch. The box holds all the wiring and the switch components.
Understand Wire Types
Inside the box, wires have different colors and functions. Common wires include black, white, and green or bare copper. Black wires carry power from the breaker to the switch. White wires usually return power to the light. Green or bare wires are ground wires for safety. Identifying each wire’s role helps connect the switch correctly. Use a voltage tester to confirm power wires before touching anything.
Turn Off The Power
Turning off the power is the first step before connecting a single light switch. It keeps you safe from electric shocks. Always treat electricity with respect. Even a small mistake can cause serious harm.
Before starting, locate your home’s main electrical panel. This is usually in a basement, garage, or utility room. You need to find the right circuit breaker that controls the light switch.
Locate The Main Electrical Panel
Find the main electrical panel in your home. It looks like a metal box with a door. Inside, you will see several switches or breakers. Each one controls power to different parts of the house.
Identify The Correct Circuit Breaker
Look for the breaker labeled for the room or area of the light switch. If labels are missing or unclear, test by turning off breakers one by one. Check if the light switch has no power.
Turn Off The Circuit Breaker
Flip the correct breaker switch to the “off” position. This cuts the power to the switch. Double-check by trying to turn the light on. It should not light up.
Use A Voltage Tester
Use a voltage tester to confirm no electricity flows to the switch. Touch the tester’s probes to the wires. The tester should show no voltage before you touch any wires.
Remove The Old Switch
Removing the old light switch is the first step in installing a new one. This step needs care and safety. You must turn off the power before touching anything. This prevents electric shocks and accidents.
Once the power is off, you can start removing the switch cover and screws. The old switch might be held tightly, so take your time. Keep all screws safe to reuse or replace later.
Find the circuit breaker and switch it off. Double-check by trying the old switch. No light means power is off. Safety first.
Remove The Switch Cover Plate
Use a screwdriver to take off the cover plate. Place screws in a safe spot. This gives clear access to the switch.
Unscrew The Old Switch
Loosen the screws holding the switch. Pull the switch gently from the wall box. Don’t force it.
Disconnect The Wires
Note how wires are connected. Loosen terminal screws or release wires from push-in holes. Keep wires from touching each other.
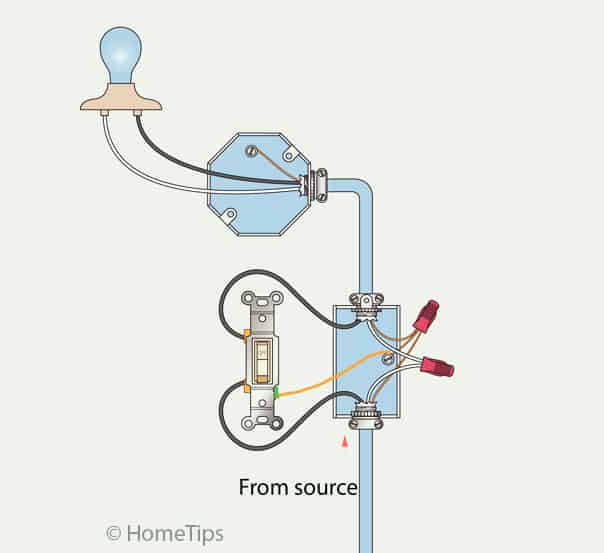
Credit: www.hometips.com
Connect The New Switch
Connecting the new switch is a simple step that brings your light back to life. It involves attaching the ground wire, connecting the hot wires, and securing the switch in place. Follow each step carefully to ensure safety and proper function.
Attach The Ground Wire
The ground wire is usually green or bare copper. Attach it to the green screw on the switch. This step prevents electrical shocks. Wrap the wire clockwise around the screw. Tighten the screw firmly but do not over-tighten.
Connect The Hot Wires
Identify the hot wires, often black or red. Connect each hot wire to the brass screws on the switch. Wrap the wire clockwise around the screw. Tighten the screws securely. Make sure wires do not touch each other or other parts.
Secure The Switch
Push the wires gently into the electrical box. Align the switch with the mounting holes. Use screws to fasten the switch to the box. Check if the switch is tight and does not move. Replace the switch cover plate to finish.
Test The Connection
Testing the connection of a single light switch is a key step. It confirms the switch works safely and correctly. Without testing, you cannot be sure the wiring is right. This step helps avoid electric shocks or damage.
Testing takes just a few minutes. It requires simple tools anyone can use. Follow the right steps to check the switch before finishing the job.
Turn The Power Back On
First, restore electricity at the breaker box. This powers the switch and light fixture. Make sure no tools or hands touch wires while turning power on. Safety is the top priority.
Use A Voltage Tester
Check the switch terminals with a voltage tester. This tool shows if current flows through the wires. A reading confirms the wires connect properly. No voltage means a wiring mistake needs fixing.
Flip The Switch
Operate the switch by moving it up and down. The connected light should turn on and off. This shows the switch controls the circuit as expected. If the light stays off, double-check wiring.
Inspect For Loose Connections
Look closely at all wire connections. Ensure screws hold wires tight. Loose wires cause flickering lights or no power. Tighten any loose connections before finalizing the switch installation.
:max_bytes(150000):strip_icc()/how-to-wire-and-install-single-pole-switches-1152330-05-2de77af170364a6fb3846f30634a5cd3.jpg)
Credit: www.thespruce.com
Reinstall The Switch Plate
Reinstalling the switch plate is the last step after wiring your single light switch. This step protects the wiring and gives a clean look to your wall. It is simple but important for safety and appearance.
Follow these steps carefully to ensure the switch plate fits well and stays secure.
Make sure the power is off before handling the switch plate. Use a tester to confirm no electricity flows to the switch.
Align The Switch Plate
Place the switch plate over the switch. Align the screw holes with the switch box holes. Check it sits flat against the wall.
Screw The Plate In Place
Insert the screws into the holes. Tighten them gently with a screwdriver. Avoid overtightening to prevent cracking the plate.
Check The Fit And Finish
Look closely to confirm the plate is flush with the wall. The switch should move freely without touching the plate edges.
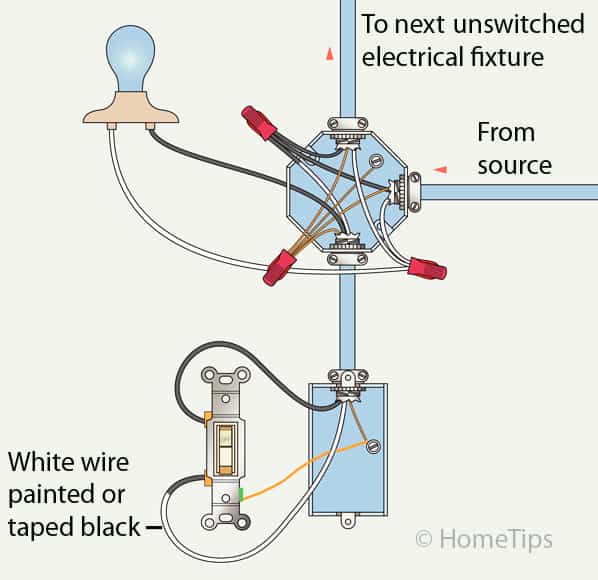
Credit: www.hometips.com
Frequently Asked Questions
How Do I Safely Connect A Single Light Switch?
Turn off the power at the circuit breaker first. Use a voltage tester to ensure no electricity flows. Connect the black (hot) wire to the switch terminal. Attach the white (neutral) wire to the wire nut. Secure grounding wires properly before closing the switch box.
What Tools Are Needed To Connect A Single Light Switch?
You will need a screwdriver, wire stripper, voltage tester, wire nuts, and electrical tape. These tools help safely strip, connect, and secure wires. Using proper tools ensures a safe and reliable switch installation.
Can I Connect A Single Light Switch Without An Electrician?
Yes, if you understand basic electrical safety and wiring. Always turn off power before working. Follow wiring diagrams carefully. If unsure, consult a professional to avoid hazards or code violations.
What Color Wires Connect To A Single Light Switch?
Typically, the black (hot) wire connects to the switch terminal. The white (neutral) wire bypasses the switch and connects directly in the box. The green or bare copper wire is the ground and must be connected to the switch’s grounding screw.
Conclusion
Connecting a single light switch is simple with clear steps. Always turn off power before starting work. Check your wires carefully and connect them as shown. Use tools safely and test the switch after installation. This guide helps you save time and avoid mistakes.
Practice patience and follow instructions closely. Soon, you will control your lights with ease. Feel confident to handle small home electrical tasks yourself. Safety and care make the job smooth and successful.

