Have you ever wanted to control a single light from two different switches? Maybe one switch is at the room entrance, and the other is near your bed.
It sounds simple, but wiring it correctly can be tricky if you don’t know where to start. You’ll discover easy steps to set up two switches for one light, saving you time and hassle. By the end, you’ll feel confident making your lighting more convenient and smart.
Keep reading to learn how you can take control of your lighting with just two switches!
Basic Concepts Of Two-switch Lighting
Understanding how to control one light with two switches starts with the basic concepts of two-switch lighting. This setup lets you operate a single light from two different places. It is common in hallways, staircases, or large rooms with multiple entrances.
Knowing the basics helps you install and use the switches properly. It also helps with troubleshooting any issues that may come up.
What Is A Two-way Switch
A two-way switch is a simple electrical switch that controls a light from two locations. It has three terminals that connect wires. The switch can change the flow of electricity between these wires.
This change allows the light to turn on or off from either switch. Both switches work together to control the same light bulb.
Benefits Of Controlling One Light From Two Points
Controlling one light from two points adds convenience to your home. You can turn the light on or off from different spots without walking back.
This setup increases safety, especially in dark areas like stairs. It also saves energy by making it easy to switch lights off.
Two-way switches improve home comfort and make daily tasks simpler.
Credit: theorycircuit.com
Required Tools And Materials
To control one light with two switches, gather the right tools and materials first. This step ensures a smooth and safe installation. Having everything ready will save time and avoid problems during the work.
Essential Tools For The Job
Start with a screwdriver set, including flat-head and Phillips types. Use a voltage tester to check power before handling wires. Wire strippers help remove insulation cleanly. Pliers can twist wires or hold parts firmly. A drill with bits may be needed for new holes. Finally, a tape measure ensures accurate placement of switches.
Types Of Switches Needed
Use two three-way switches to control one light from two locations. These switches have three terminals plus a ground. They allow power to flow through different paths. Avoid regular single-pole switches as they only control one location. Buy switches rated for your home’s voltage and current.
Safety Equipment
Wear insulated gloves to protect against electrical shock. Safety glasses shield your eyes from dust and debris. Turn off power at the circuit breaker before starting. Use a lockout tag to prevent others from turning power back on. Work in a dry area to reduce shock risk.
Preparing For Installation
Preparing for installation is the first step to control one light with two switches. Careful preparation makes the process safe and smooth. Understanding the basics helps avoid common mistakes. This section covers key tasks before you start wiring.
Turning Off Power Safely
Always turn off power at the circuit breaker. This stops electricity flow to the switches. Use a voltage tester to check wires. Make sure no current is running before touching anything. Safety first to prevent shocks and accidents.
Locating Existing Wiring
Find where the current wires run inside the walls. Look for cables near the switches and the light fixture. Use a stud finder with wire detection or gently remove switch plates. Knowing wire paths helps plan new switch connections.
Planning Switch Placement
Decide where to put the two switches. They should be easy to reach and use. Common spots are near doorways on either side of the room. Mark the wall for new switch boxes. Good placement means better convenience and function.
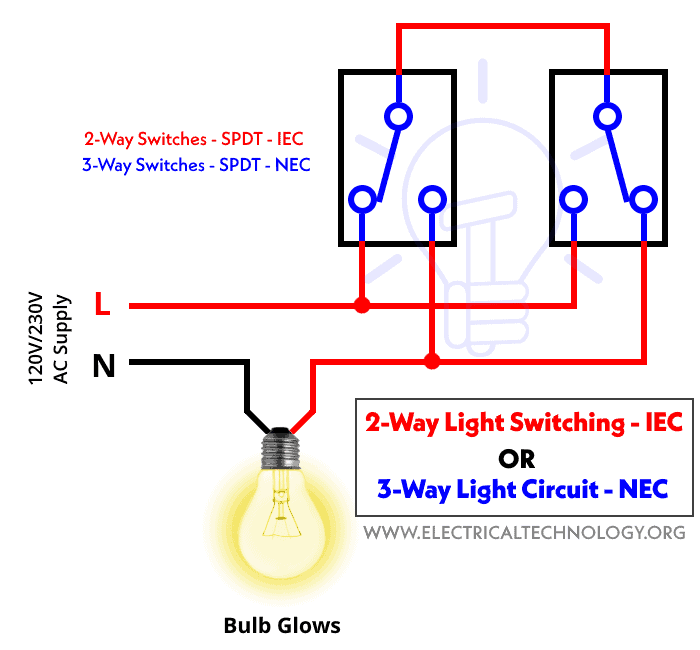
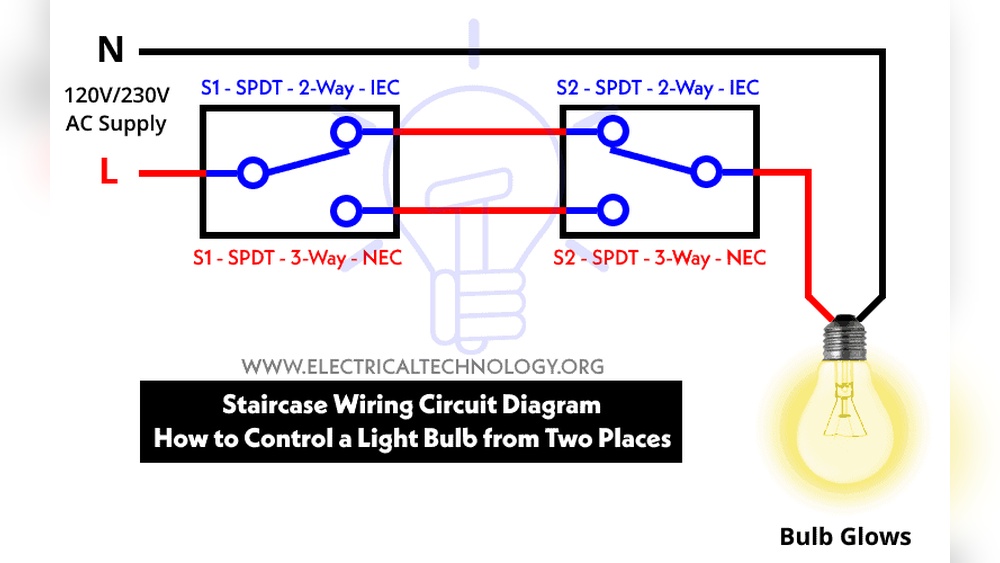
Credit: www.electricaltechnology.org
Step-by-step Wiring Instructions
Wiring two switches to control one light may seem tricky. Follow these clear steps to make it simple. This guide helps you set up the wiring safely and correctly. Use basic tools and take safety precautions before starting.
Wiring The First Switch
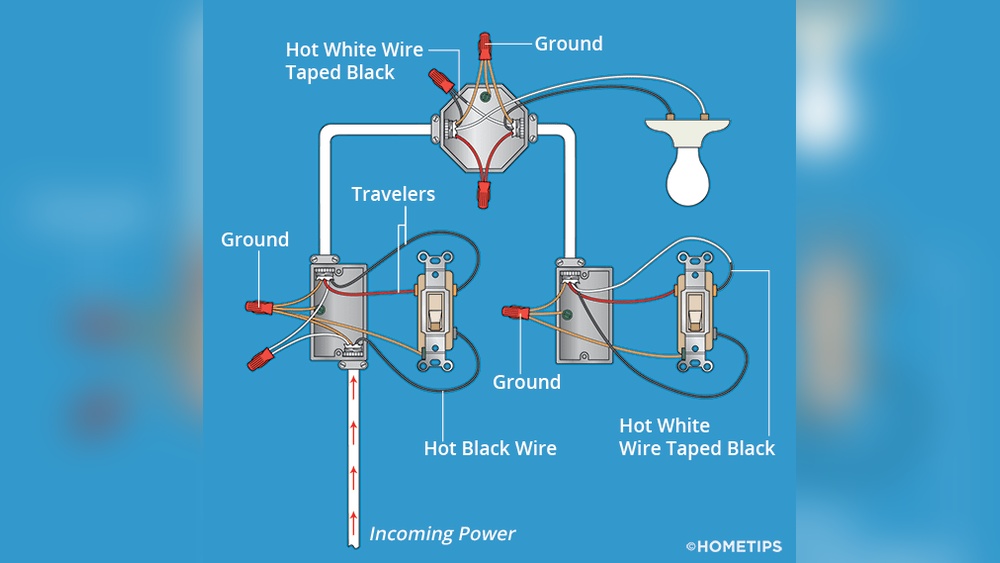
Turn off the power at the circuit breaker. Connect the black (hot) wire from the power source to the common terminal on the first switch. Attach two traveler wires to the remaining terminals on the switch. These travelers will connect to the second switch. Secure all connections tightly and use wire nuts where needed.
Connecting The Second Switch
At the second switch box, connect the traveler wires from the first switch to the traveler terminals. Attach the black wire going to the light fixture to the common terminal on this switch. Ensure all wires are firmly connected. Cover any exposed wire with electrical tape for safety.
Linking The Light Fixture
Connect the black wire from the second switch to the light fixture’s black wire. Join the white neutral wires from the power source and the light fixture together. Attach the ground wires to the switch boxes and light fixture. Double-check all connections before turning the power back on.
Testing And Troubleshooting
Testing and troubleshooting are key steps after wiring two switches to control one light. These steps ensure the switches work correctly and the light responds as expected. Simple checks can save time and prevent safety issues.
Verifying Proper Operation
Test the switches by flipping each one on and off. The light should turn on or off with either switch. Try all combinations to confirm the wiring is correct. Listen for any unusual sounds from the switches. Check if the light flickers or stays dim. Proper operation means the light responds reliably to both switches.
Common Wiring Mistakes
Wrong wire connections often cause problems. Confusing the traveler wires or mixing the line and load wires is common. Forgetting to connect the ground wire can be unsafe. Loose connections can make the light flicker or not work. Using the wrong switch type also leads to failure. Identify these mistakes by carefully reviewing the wiring setup.
Fixing Switch Malfunctions
Tighten any loose wires with a screwdriver. Replace switches that feel loose or have broken parts. Use a voltage tester to check for power at each switch. Swap out switches if the light does not respond properly. Make sure the traveler wires connect to the correct terminals. Fixing these issues restores proper function to the lighting system.

Credit: diy.stackexchange.com
Tips For A Professional Finish
Getting a professional finish when controlling one light with two switches is key. It ensures the setup works well and looks neat. Simple steps can make a big difference. A clean job saves time and trouble later. Here are some tips to help you achieve that polished result.
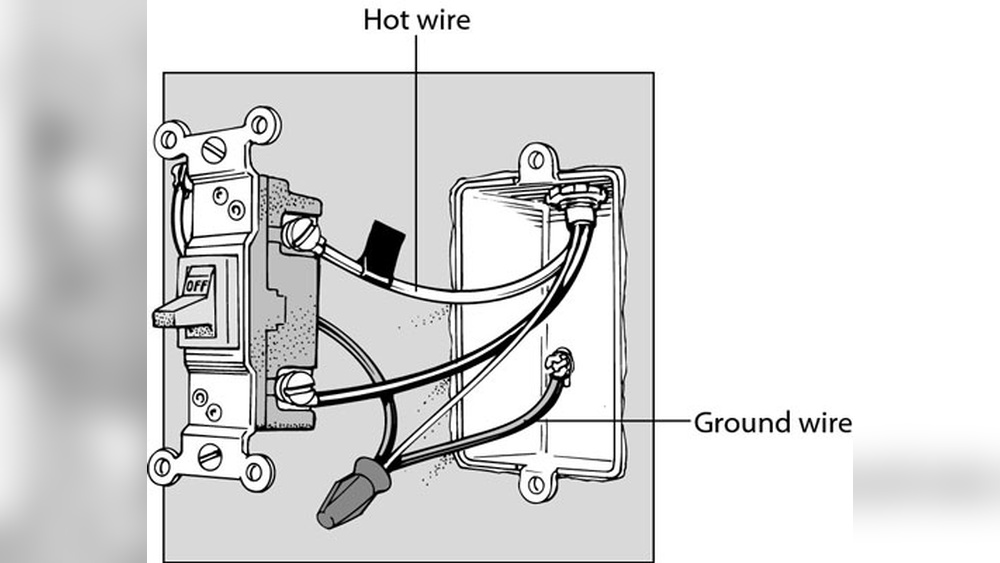
Securing Switches And Wiring
Firmly fix switches to the wall box. Loose switches can cause problems and look bad. Use the right screws and tighten them well. Arrange wires neatly inside the box. Avoid crowding to prevent shorts or damage. Proper wire placement helps in long-term reliability.
Labeling For Future Reference
Mark each wire with clear labels. Use simple tags or colored tape. Label the traveler wires and common wires. This helps in future repairs or upgrades. Clear labels save time and reduce confusion. Keep a note of your wiring setup for reference.
Maintaining Safety Standards
Turn off power before starting any work. Double-check with a voltage tester for safety. Use wires rated for your electrical load. Follow local electrical codes strictly. Proper grounding is essential to avoid shocks. Safety protects you and your home from hazards.
Frequently Asked Questions
How Do Two Switches Control One Light?
Two switches use a three-way wiring system. This allows either switch to turn the light on or off independently. The switches are connected by traveler wires, enabling control from multiple locations.
What Tools Are Needed For Two-switch Light Control?
You need a screwdriver, wire stripper, voltage tester, and electrical tape. Also, use three-way switches and proper wiring. Always follow safety precautions to avoid electric shock or wiring errors.
Can I Install Two Switches For One Light Myself?
Yes, if you understand electrical wiring basics and follow safety rules. Turn off power before working. If unsure, consult a licensed electrician to avoid hazards or code violations.
Why Use Two Switches For One Light?
Two switches provide convenient light control from different locations. This setup is ideal for hallways, staircases, and large rooms. It improves comfort and efficiency in daily lighting use.
Conclusion
Controlling one light with two switches makes your home more convenient. It lets you turn the light on or off from different places. The wiring may seem tricky at first, but careful steps make it simple. Using the right tools and safety measures helps you avoid problems.
This setup works well in hallways, stairs, and large rooms. Try this method to improve your lighting control today. Small changes bring big comfort to your daily life.