If you own a floor jack, you know how important it is to keep it in top shape. But when oil leaks or seals wear out, it can stop working properly—and that’s frustrating.
Removing all oil seals from your floor jack might sound tricky, but with the right steps, you can do it yourself. Imagine saving time and money by fixing it on your own. In this guide, you’ll learn exactly how to remove every oil seal safely and efficiently.
Ready to get your floor jack working like new again? Let’s dive in.

Credit: www.youtube.com
Tools Needed
Removing all oil seals from a floor jack requires the right tools. Using proper equipment makes the task easier and safer. This section explains the tools needed for the job. You will find clear guidance on what to prepare before starting.
Essential Equipment
Start with a set of wrenches to loosen bolts and nuts. A screwdriver set helps remove small screws and pry seals gently. Seal pullers or snap ring pliers are useful for removing oil seals without damage. A clean cloth or rag is necessary to wipe away grease and dirt. Have a container ready to catch any leaking oil. A replacement oil seal should be on hand for reinstallation.
Safety Gear
Wear safety gloves to protect your hands from sharp edges and oil. Safety glasses prevent dirt or oil from getting into your eyes. Use protective clothing to keep your clothes clean and safe. Work in a well-ventilated area to avoid breathing harmful fumes. Proper safety gear reduces risks and ensures a smooth repair process.

Credit: www.ebay.com
Preparing The Floor Jack
Preparing the floor jack is the first step in removing all oil seals. It ensures safety and makes the job easier. Take time to set up correctly before starting any work.
Positioning The Jack
Place the floor jack on a flat, stable surface. This prevents it from tipping or moving during work. Ensure there is enough light around the jack for clear visibility. Lock the wheels if your jack has them. This keeps the jack steady and safe.
Cleaning The Area
Wipe off dirt and grease from the jack’s surface. Use a clean cloth or paper towel for this task. Cleaning helps you see all parts clearly. It also prevents dirt from entering the jack when you open it. Keep the workspace neat to avoid losing small parts.
Draining The Hydraulic Fluid
Draining the hydraulic fluid is the first important step to remove all oil seals from a floor jack. It helps avoid spills and makes the job cleaner. Removing old fluid ensures the jack works well after repairs. Follow simple steps to drain the fluid safely.
Locating The Drain Valve
Find the drain valve on the floor jack. It is usually at the bottom or near the hydraulic cylinder. The valve may look like a small screw or plug. Use a wrench to open it carefully. Let the fluid flow into a container to catch it. Avoid opening the valve too fast to prevent splashes.
Proper Fluid Disposal
Hydraulic fluid is harmful to the environment. Do not pour it down drains or on the ground. Pour the fluid into a sealed container. Take the container to a recycling center or hazardous waste facility. Dispose of the fluid following local rules. Clean tools and hands after the job.

Credit: www.wikihow.com
Accessing The Oil Seal
Accessing the oil seal is the first step in removing it from a floor jack. This step requires careful handling to avoid damaging other parts. Understanding the jack’s structure helps make the process easier.
Remove parts blocking the seal to get clear access. Keep track of all components for smooth reassembly later.
Removing The Outer Components
Start by placing the floor jack on a stable surface. Use the right tools to unscrew bolts and nuts. Remove the handle and any covers that block the seal. Store these parts safely to prevent loss. Check for clips or pins holding parts together. Gently take them out without forcing.
Identifying The Seal Location
Locate the oil seal by following the jack’s cylinder or piston area. The seal sits around the moving parts to prevent oil leaks. Look for a round rubber or metal ring. Clean the area to see the seal clearly. Take note of its position and orientation. This helps when fitting the new seal correctly.
Removing The Oil Seal
Removing the oil seal from a floor jack is an important step in maintenance and repair. The oil seal keeps the hydraulic fluid inside, so it must be handled carefully. Proper removal helps avoid leaks and ensures the jack works well again.
Take your time with this process to prevent damage to the jack or the seal seat. Follow the right techniques to remove the seal smoothly and safely.
Techniques For Seal Removal
Start by cleaning the area around the seal. Dirt can make removal harder and cause damage. Use a small screwdriver or seal puller to gently pry out the seal. Work slowly to avoid bending the seal or scratching the jack.
Tap lightly with a hammer if the seal is stuck. Use a wooden block to protect the jack’s surface. Avoid using sharp tools that can cut or deform the seal seat.
Avoiding Damage
Damage to the seal seat can cause leaks and reduce jack performance. Always use the right tools for seal removal. Avoid forcing the seal out quickly. This can bend metal parts or tear the seal housing.
Check the seal seat for scratches or dents after removal. Smooth surfaces help new seals fit tightly. Replace any damaged parts before installing a new seal.
Cleaning And Inspecting Parts
Cleaning and inspecting parts is a key step in removing all oil seals from a floor jack. This step helps keep your jack working well. Dirt and old oil can block parts and cause damage. Careful cleaning makes sure everything works smoothly.
Inspecting the parts helps find any damage early. Fixing small problems now prevents big issues later. Take your time and check each piece closely. This care extends the life of your floor jack.
Removing Debris And Residue
Start by wiping off loose dirt with a dry cloth. Use a brush to clean hard-to-reach areas. Apply a small amount of cleaner to remove old oil and grease. Avoid soaking parts to prevent rust. Dry each part thoroughly with a clean cloth. Clear parts help oil seals fit well and work properly.
Checking For Wear And Tear
Look closely for cracks, rust, or worn surfaces. Check moving parts for smooth motion and no sticking. Pay attention to seals and rubber parts for cracks or hardening. Replace any parts that look damaged or weak. Using good parts keeps the floor jack safe and strong.
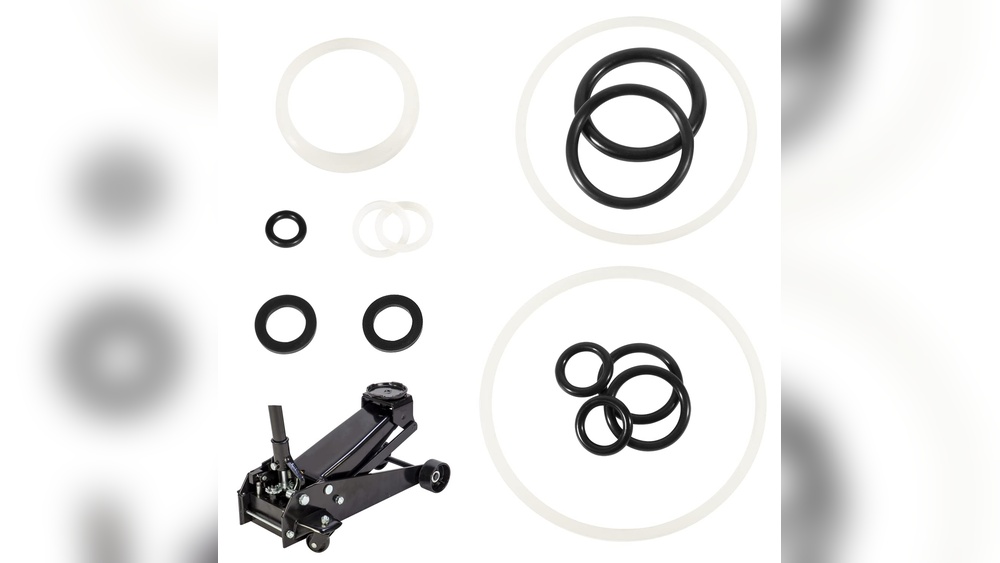
Replacing The Oil Seal
Replacing the oil seal in a floor jack is a key step to keep it working well. A worn or damaged seal can cause oil leaks and reduce the jack’s efficiency. This process involves choosing the right seal and carefully installing it. Follow these steps to ensure your floor jack stays in good condition and operates safely.
Selecting The Correct Seal
Choose a seal that fits your floor jack model exactly. Check the jack’s manual for size and type details. Using the wrong seal can cause leaks or damage. Look for seals made from durable materials like rubber or polyurethane. These materials resist oil and wear better. Always buy seals from trusted suppliers to ensure quality.
Installing The New Seal
Clean the seal area thoroughly before installation. Remove any dirt, old oil, and debris. Place the new seal carefully into the groove. Avoid bending or twisting the seal during placement. Use a seal driver or a similar tool to press it evenly. Make sure the seal sits flush and tight. Test the jack after installation to check for leaks and smooth operation.
Reassembling The Floor Jack
Reassembling the floor jack is an important step after removing all oil seals. It brings your tool back to life and ensures it works safely. Take your time to fit each part correctly. Proper reassembly helps avoid leaks and malfunctions.
Organize all parts in order before you start. Clean each component to prevent dirt inside the jack. Follow the steps carefully to avoid missing anything. Tighten bolts and screws just enough, not too much.
Reattaching Components
Begin with the main parts like the pump and cylinder. Place the seals in their correct spots. Attach small parts like springs and valves carefully. Use the right tools to avoid damage. Check that each piece fits tightly and moves smoothly.
Do not force parts. They should fit easily if aligned well. Tighten screws and bolts firmly but avoid over-tightening. This keeps the floor jack safe and functional.
Testing For Leaks
After reassembly, test the floor jack for leaks. Pump the handle slowly and watch for oil drips. Check around seals and connections. If you see oil, stop and fix the problem.
Also, listen for strange sounds. They may signal a problem. Test the jack under light load first. Confirm it holds pressure and lifts properly. Fix leaks immediately to maintain safety.
Maintenance Tips
Maintenance is key to keep your floor jack working well. Oil seals need care to last long and work properly. These tips help you avoid damage and costly repairs. Follow them to keep your floor jack in top shape.
Regular Inspection
Check the floor jack often for leaks or cracks. Look closely at the oil seals for any damage. Replace worn or broken seals quickly to stop oil leaks. Clean the seals and surrounding parts to avoid dirt buildup. Early inspection saves time and money later.
Proper Storage
Store the floor jack in a dry, clean place. Keep it away from dust and moisture to protect the seals. Lower the jack completely before storing to reduce pressure on seals. Cover it with a cloth or plastic to avoid dirt. Proper storage helps the seals last longer and work better.
Frequently Asked Questions
How Do I Safely Remove An Oil Seal From A Floor Jack?
Use a seal puller or flathead screwdriver carefully. Avoid damaging the jack housing. Wear gloves for protection and work slowly to prevent leaks or damage.
What Tools Are Needed To Remove Floor Jack Oil Seals?
Common tools include a seal puller, flathead screwdriver, pliers, and rubber mallet. These tools help safely pry out the seal without damaging parts.
When Should I Replace The Oil Seal On A Floor Jack?
Replace the oil seal if you notice oil leaks or reduced jack performance. Regular inspection helps maintain jack efficiency and prevents further damage.
Can I Reuse An Old Oil Seal After Removal?
No, reusing old seals can cause leaks. Always replace with a new seal to ensure proper sealing and jack safety.
Conclusion
Removing all oil seals from a floor jack takes patience and care. Follow each step slowly to avoid damage. Keep your tools ready and work in a clean space. Checking seals regularly helps keep the jack working well. With the right approach, you can fix leaks and maintain safety.
Take your time and double-check your work. This task is not hard but needs focus. Proper care extends your floor jack’s life and performance.