If you’ve just installed a Honeywell digital deadbolt or are planning to, knowing how to program it is key to keeping your home secure and convenient. Imagine unlocking your door with just a code, no keys needed.
It sounds simple, but getting the programming right can feel tricky at first. Don’t worry—this guide will walk you through each step clearly and easily. By the end, you’ll have full control over your lock’s settings, making your home safer and your life easier.
Let’s get started and make your Honeywell deadbolt work exactly how you want it to.
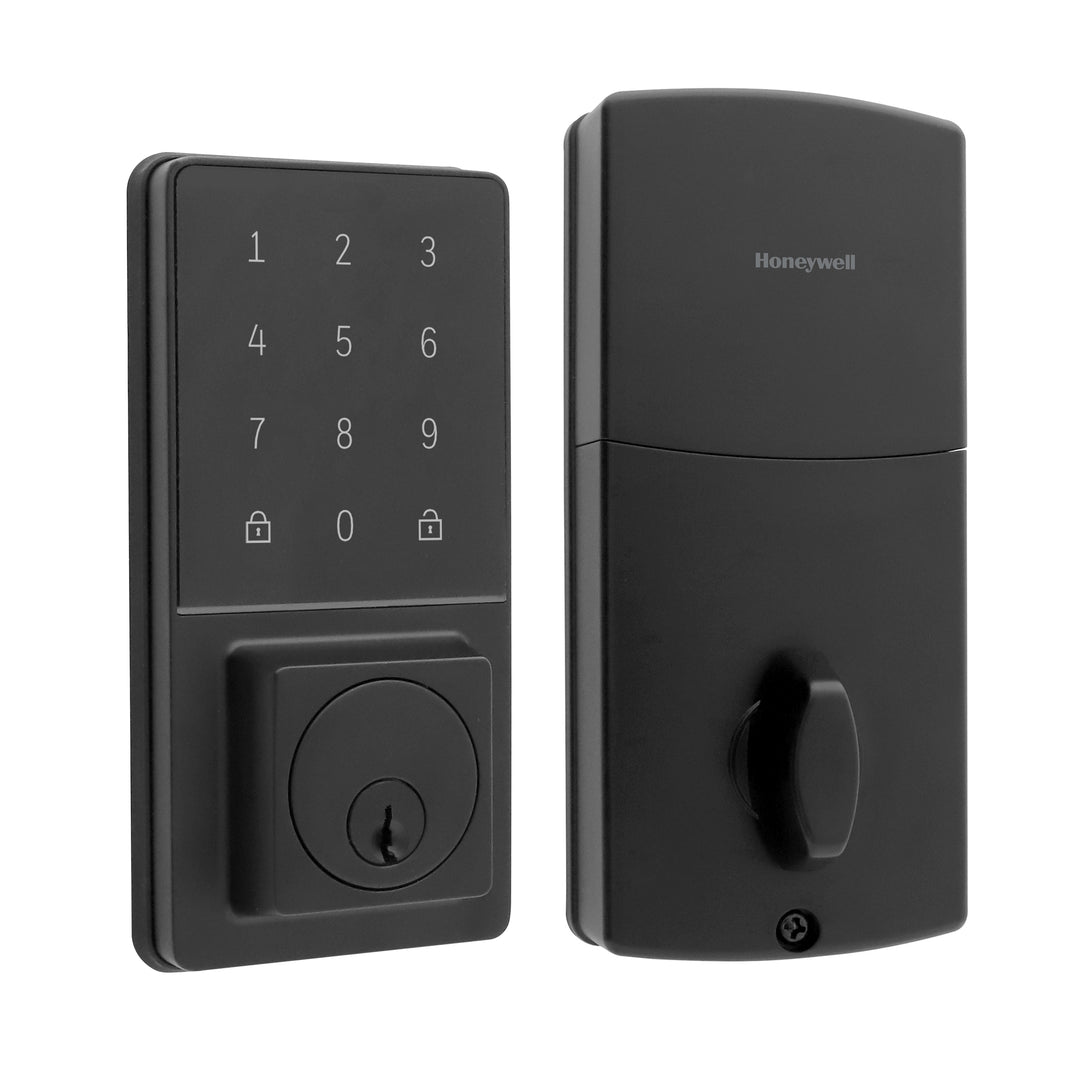
Credit: honeywellsafes.com
Preparing Your Deadbolt
Preparing your Honeywell digital deadbolt correctly makes programming easier. This step ensures the lock is ready and works without problems. Taking time now saves effort later.
Follow simple actions before starting to program. Check all parts and tools. Confirm the lock’s battery is strong. Find the programming code needed for setup.
Gather Required Tools
Collect tools before you begin. Most models need a screwdriver. A small flashlight helps in dark areas. Have your user manual close for reference. These tools make programming smooth and fast.
Check Battery Status
Test the battery to avoid interruptions. Weak batteries cause errors during programming. Open the battery compartment carefully. Use a battery tester or replace with new batteries. Strong power keeps the deadbolt working properly.
Locate Programming Code
Find the programming code on your lock. It is usually inside the battery compartment. Look on a sticker or metal plate. This code allows you to access programming mode. Keep it safe and handy while setting up.
Entering Programming Mode
Entering programming mode is the first step to set up your Honeywell digital deadbolt. This mode lets you change codes and adjust settings. It is simple but must be done carefully to avoid errors.
Follow the steps below to access programming mode safely and quickly.
Accessing The Keypad
Start by locating the keypad on your deadbolt. It is usually on the outside part of the door. Make sure the keypad is clean and dry.
Press the button above the keypad or the small reset button to wake it up. The keypad will light up, showing it is ready for input.
Using The Master Code
Enter the master code on the keypad. This code is set by default or by the installer. It usually has 6 digits. Type the code carefully.
Press the lock or check button after entering the master code. This confirms your identity and grants access to programming mode.
Confirming Programming Mode
The keypad will beep or flash lights to show it has entered programming mode. This signal means you can now change codes or settings.
If there is no beep or light, try the master code again. Check the battery if it still does not work.
Adding User Codes
Adding user codes to your Honeywell digital deadbolt lets you control who can enter your home. You can create multiple codes for family, friends, or service people. Each code works like a key but is easier to manage and change. Follow these steps to add new user codes safely and quickly.
Choosing A New User Code
Pick a code that is easy to remember but hard to guess. Avoid using simple sequences like 1234 or your birth year. The code should be 4 to 8 digits long, depending on your lock model. Use a mix of numbers that do not repeat or follow a pattern.
Entering And Saving Codes
Start by pressing the lock’s programming button. Enter your master code first, then press the user code option. Type the new user code carefully. Press the lock or check button to save the code. Wait for a beep or light signal that confirms the save.
Verifying User Codes
Test each new code before closing the door. Enter the code on the keypad and check if the lock opens. If it does not work, repeat the steps to enter the code again. Regularly verify codes to keep your home secure and update them if needed.
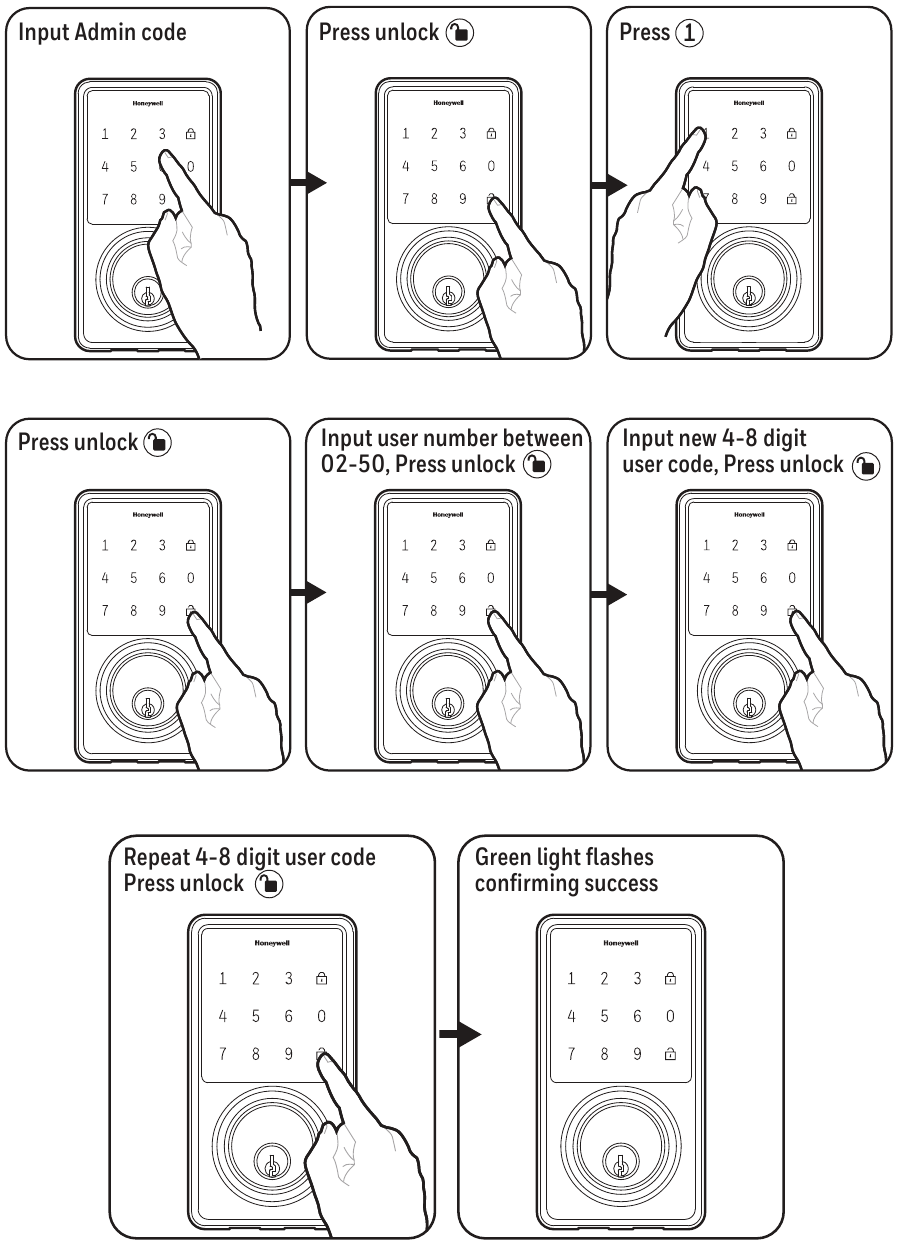
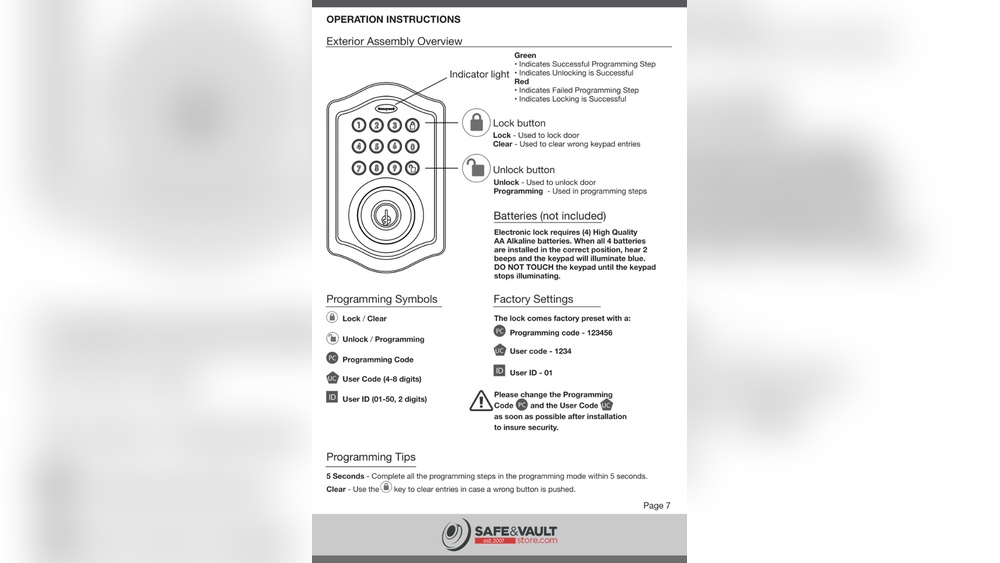
Credit: www.manualslib.com
Deleting User Codes
Deleting user codes on your Honeywell digital deadbolt keeps your home secure. Removing old or unused codes stops unwanted access. This process is quick and easy to follow. It helps you manage who can enter your space.
Selecting Codes To Remove
First, decide which user codes need deleting. Check your list of active codes on the lock’s interface. Identify codes that no longer need access. Take note of the code numbers before proceeding.
Executing Code Deletion
Enter the programming mode on your Honeywell deadbolt. Follow the instructions in the user manual to start code removal. Input the code number you want to delete. Confirm your choice to erase the code from memory.
Confirming Removal
After deletion, verify the code is removed. Try entering the deleted code to test. The lock should not grant access. This step ensures your security settings are updated correctly.
Configuring Additional Settings
Configuring additional settings on your Honeywell digital deadbolt helps customize its functions. These settings enhance security and convenience. You can change how the lock behaves to fit your daily needs.
Adjusting these options is simple and quick. It ensures your lock works the way you prefer. Below are key settings you can modify easily.
Setting Auto-lock Timer
The auto-lock timer controls how long the door stays unlocked. You can set it to lock automatically after a few seconds or minutes. This feature helps keep your home secure without needing to lock the door manually.
To set the timer, access the programming mode. Choose the time delay that suits your routine. Shorter times improve security. Longer times add convenience.
Enabling Or Disabling Sound
Your lock can make sounds for each button press or action. These sounds confirm your input and alert you to errors. You can turn these sounds on or off based on your preference.
Silent mode is useful in quiet environments. Sounds help in noisy areas where feedback is needed. Adjust this setting in the lock’s menu to match your lifestyle.
Adjusting Lock Modes
Honeywell deadbolts offer different lock modes. These include normal lock, vacation mode, and privacy mode. Each mode changes how the lock responds to codes and keys.
Switching modes is easy through the programming options. Vacation mode disables all codes temporarily. Privacy mode allows locking from inside without codes. Choose the mode that fits your security needs.
Troubleshooting Common Issues
Honeywell digital deadbolts offer convenience and security, but sometimes issues arise. Troubleshooting common problems can save time and avoid frustration. This guide helps you fix typical deadbolt issues quickly.
Resetting The Deadbolt
Resetting your Honeywell deadbolt clears errors and restores factory settings. Start by removing the battery cover. Press and hold the reset button for 10 seconds. Release the button when the LED flashes. The lock will reset, erasing all codes. Reprogram your access codes after this step.
Handling Unresponsive Keypad
If the keypad does not respond, check the battery first. Dirt or dust may block the keys. Clean the keypad gently with a soft cloth. Avoid water or harsh cleaners. Press each button firmly to test. Sometimes, a reset can also fix unresponsiveness.
Replacing Batteries
Low battery power often causes deadbolt problems. Open the battery compartment on the inside panel. Remove old batteries and insert new ones with correct polarity. Use high-quality alkaline batteries for best results. Close the cover securely and test the lock.
Safety Tips And Best Practices
Programming your Honeywell digital deadbolt is simple. Protecting your home requires safe habits. Follow these safety tips and best practices. They keep your lock secure and working well.
Choosing Strong Codes
Pick codes that are hard to guess. Avoid using birthdays or simple numbers like 1234. Use a mix of numbers that only you know. Strong codes make it harder for others to enter your home.
Regular Code Updates
Change your lock codes often. This stops old codes from being used by others. Update codes after visitors or service workers leave. Regular updates keep your home safer over time.
Maintaining Lock Hardware
Check your lock parts regularly. Clean the keypad and mechanical parts to avoid damage. Replace batteries on time to prevent lock failure. Well-maintained hardware ensures your deadbolt works smoothly.
Credit: www.youtube.com
Frequently Asked Questions
How Do I Set Up Honeywell Digital Deadbolt?
To set up, first install batteries in the lock. Press the programming button inside. Enter a new master code following the manual’s instructions. This code lets you add user codes and configure settings easily.
How To Add User Codes To Honeywell Deadbolt?
Enter programming mode with the master code. Press the user code button. Input a new user code, then press the lock or unlock button to save. The lock confirms with a beep or light.
How To Reset Honeywell Digital Deadbolt?
Locate the reset button inside the lock. Press and hold it for 10 seconds. The lock will beep, indicating reset. This erases all codes and returns settings to factory default.
What Batteries Does Honeywell Digital Deadbolt Use?
Honeywell digital deadbolts typically use four AA alkaline batteries. Use fresh, high-quality batteries for best performance. Replace batteries when the low battery indicator appears to avoid lockouts.
Conclusion
Programming your Honeywell digital deadbolt is simple and quick. Follow each step carefully to avoid mistakes. Double-check your codes and settings before final use. Keep your user manual handy for future reference. Regularly update your codes to stay secure. Enjoy the convenience and safety of your smart lock.
Stay confident knowing your home is well protected.