Is your floor jack leaking and causing frustration? You rely on this tool to lift heavy loads safely, so a leak can quickly become a big problem.
But don’t worry—fixing a leaky floor jack is easier than you think. In this guide, you’ll discover simple steps to identify the cause of the leak and repair it yourself. Keep reading, and you’ll have your floor jack working like new again in no time.
Identifying Floor Jack Leaks
Identifying leaks in a floor jack is the first step to fixing the problem. Leaks cause loss of hydraulic fluid. This stops the jack from lifting properly. Spotting leaks early saves time and money. It also keeps the jack safe to use.
Common Leak Signs
Look for wet spots under the floor jack. Hydraulic fluid is usually clear or light amber. Dark or dirty fluid means the jack needs service. Check for oily residue on the jack body. The handle might feel sticky or hard to move. The jack may not hold weight well. These signs hint at a leak or fluid loss.
Locating The Leak Source
Clean the jack before checking for leaks. Use a cloth to wipe all surfaces. Raise the jack slightly to pressurize the system. Look closely at seals and joints. These are common leak points. Check around the pump, release valve, and cylinder. Use a flashlight to see small cracks or wet spots. Mark the exact place where fluid appears. This helps in repair and part replacement.

Credit: soleditalia.dk
Tools And Materials Needed
Fixing a leaky floor jack requires the right tools and parts. Having these ready makes the repair easier and faster. You can avoid mistakes and save time by preparing well. Below is a list of what you need to gather before starting.
Essential Repair Tools
- Wrenches – to loosen and tighten bolts.
- Screwdrivers – for removing screws and covers.
- Pliers – to grip and pull small parts.
- Drain pan – to catch leaking hydraulic fluid.
- Clean rags – for wiping parts and spills.
- Jack stands – for safety while working under the jack.
- Rubber gloves – to protect your hands from fluid.
- Flashlight – to see inside tight or dark areas.
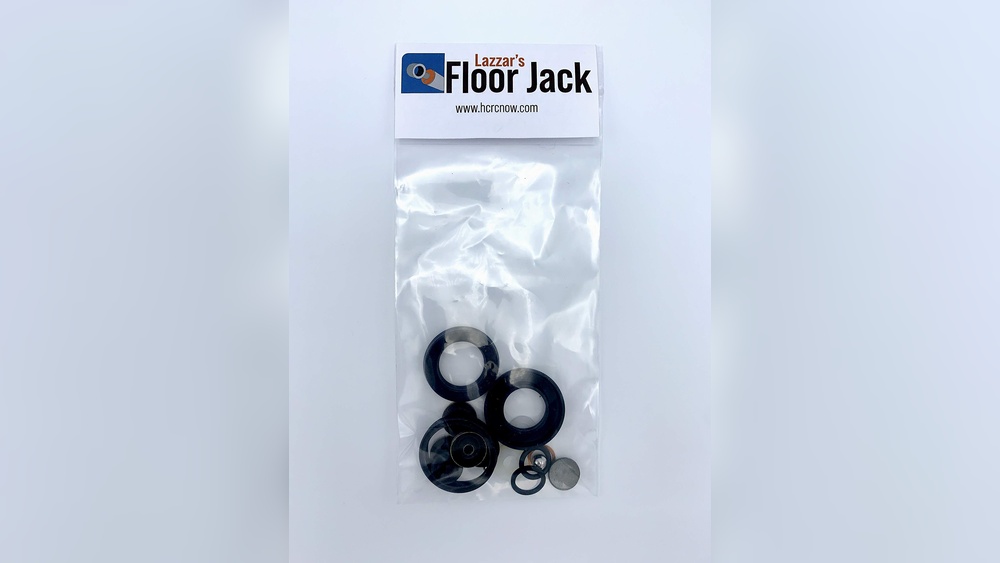
Recommended Replacement Parts
- Hydraulic oil – the fluid that powers the jack.
- Seals and O-rings – to stop leaks around joints.
- Valve kit – controls the flow of hydraulic fluid.
- New pump piston – if the old one is worn out.
- Pressure release valve – ensures safe operation.
- Replacement bolts and screws – in case originals are damaged.
Preparing The Floor Jack For Repair
Preparing a floor jack for repair is an important first step. It helps you work safely and fix the leak properly. Before starting, you need to get the jack ready. This process includes safety checks, cleaning, and careful inspection. Taking time here saves effort later. It also helps you find the exact problem.
Safety Precautions
Always wear gloves to protect your hands. Safety goggles protect your eyes from dirt and fluid. Work in a well-ventilated area to avoid breathing harmful fumes. Make sure the jack is on a flat surface to stop it from moving. Never try to repair a loaded jack. Lower the jack fully before starting any work. Keep children and pets away during the repair process. These steps reduce the risk of injury or accidents.
Cleaning And Inspection
Begin by wiping the jack with a clean cloth. Remove dirt, grease, and old oil from all parts. Use a mild cleaner to remove tough grime. Check for any visible cracks or damage on the body. Look closely at the seals and hydraulic parts for leaks. Note any broken or worn pieces for replacement. Clean parts help you see the problem clearly. Inspection helps plan the repair and find missing parts.

Credit: www.jalopyjournal.com
Fixing The Hydraulic Fluid Leak
Fixing a hydraulic fluid leak in a floor jack is important for safe use. A leak lowers the jack’s lifting power and can cause damage. Most leaks happen because seals or O-rings wear out. Repairing these parts stops the leak and restores the jack’s function. After fixing leaks, refilling the hydraulic fluid is necessary to keep the jack working well.
Replacing Seals And O-rings
First, identify the source of the leak. Often, worn seals or O-rings cause fluid to escape. Remove the jack’s hydraulic cylinder carefully. Use a wrench or screwdriver to open the parts holding the seals. Take out the old seals and O-rings. Replace them with new ones that match the size exactly. Clean the area before putting the parts back. Tighten all screws and bolts securely. Test the jack for leaks after reassembly.
Refilling Hydraulic Fluid
Next, refill the jack with the right hydraulic fluid. Check the manufacturer’s guide for the correct type. Remove the fill plug on the jack’s reservoir. Pour fluid slowly to avoid air bubbles. Fill until the fluid reaches the recommended level. Replace the fill plug tightly. Pump the jack handle several times to remove air. Check for leaks and test the jack’s lifting ability. Repeat if the jack feels weak or leaks persist.
Repairing Air Leaks And Pressure Issues
Repairing air leaks and pressure issues is key to fixing a leaky floor jack. Air leaks cause the jack to lose pressure and fail to lift properly. Pressure problems can make the jack unsafe and unreliable. Finding and fixing these issues restores the jack’s strength and safety.
Checking Valves And Hoses
Start by inspecting all valves and hoses. Look for cracks, holes, or worn areas. These damage spots let air escape. Use soapy water on valves and hoses. Bubbles show where leaks exist. Replace any faulty hoses or valves. Tighten loose connections to stop air loss.
Adjusting Pressure Components
Pressure problems often come from misadjusted parts. Check the pressure release valve and pump mechanism. Turn the pressure release valve slowly to adjust. Test the jack after each change. Ensure the jack holds pressure without dropping. Replace worn seals or springs if needed. Proper adjustment keeps the jack firm and safe.
Testing The Floor Jack After Repair
Testing the floor jack after repair is a vital step. It confirms the fix worked and the jack is safe to use. This step prevents accidents and saves time later. Follow simple checks to make sure your jack works properly.
Leak Verification
Start by inspecting the jack for any signs of fluid leaks. Use a clean cloth to wipe around repaired areas. Watch for fresh oil or hydraulic fluid drops. Check under the jack after you lift and lower it several times. No leaks mean the seal is holding tight. Repeat this test a few times to be sure.
Functionality Check
Next, test the jack’s lifting ability. Place the jack under a sturdy object. Pump the handle slowly and watch it rise smoothly. The jack should lift without jerking or slipping. Lower it carefully and note if it holds the load steadily. If the jack moves well and stays firm, it is working correctly. This step ensures your repair is complete and reliable.
Maintenance Tips To Prevent Future Leaks
Preventing leaks in your floor jack saves time and money. Good maintenance keeps the jack working longer and safer. Simple steps help you avoid costly repairs.
Regular Inspection Routine
Check the floor jack before every use. Look for oil spots or wet areas. Tighten loose bolts and nuts. Inspect seals and hoses for cracks or wear. Early detection prevents small leaks from growing. Keep a log to track any issues. Replace damaged parts quickly.
Proper Storage Practices
Store the floor jack in a dry place. Avoid damp areas that cause rust or damage. Keep the jack upright to stop oil from leaking. Use a cover to protect it from dust and dirt. Clean the jack after each use. Proper storage extends its life and prevents leaks.

Credit: stonedesignbysantos.com
Frequently Asked Questions
What Causes A Floor Jack To Leak Hydraulic Fluid?
A floor jack leaks hydraulic fluid mainly due to worn or damaged seals. Over time, seals crack or become brittle. This allows fluid to escape and reduces jack efficiency. Regular maintenance can help identify leaks early and prevent further damage.
How Do I Fix A Leaking Floor Jack Seal?
To fix a leaking seal, first release pressure and drain hydraulic fluid. Then, remove the seal carefully and replace it with a new one. Make sure to clean the jack thoroughly before reassembling. Finally, refill with the correct hydraulic fluid and test the jack.
Can I Repair A Floor Jack Leak Myself?
Yes, you can repair a floor jack leak yourself if you have basic mechanical skills. Follow safety guidelines, use proper tools, and replace faulty seals or components. If unsure, consult a professional to avoid injury or further damage.
How Often Should Floor Jack Seals Be Replaced?
Floor jack seals should be inspected regularly and replaced every 1-2 years or when leaks occur. Frequent use or harsh conditions may require more frequent replacement. Timely seal replacement ensures safe and efficient jack operation.
Conclusion
Fixing a leaky floor jack saves money and extends its life. Start by checking the seals and hydraulic fluid. Clean parts carefully and replace any damaged pieces. Test the jack after repairs to ensure it works well. Regular maintenance helps avoid leaks and keeps your jack safe.
Simple steps make the repair easier than you might think. Keep your tools in good shape to get the best results every time.