If you’re ready to give your deck a clean, sleek look without visible screws or nails, hidden deck fasteners are the way to go. But you might be wondering—how exactly do you install these fasteners to get a flawless finish?
You’re in the right place. This step-by-step guide will walk you through the process, making it simple and straightforward. By the end, you’ll know how to secure your deck boards firmly while keeping the surface smooth and attractive. Keep reading, and you’ll discover tips that save you time and help you achieve professional results on your deck project.
Choosing Fasteners
Choosing the right hidden deck fasteners is key to a strong and neat deck. The correct fastener ensures stability and prevents damage over time. Factors like deck material and climate affect your choice. Understanding types, material compatibility, and tools helps you pick fasteners that fit your project.
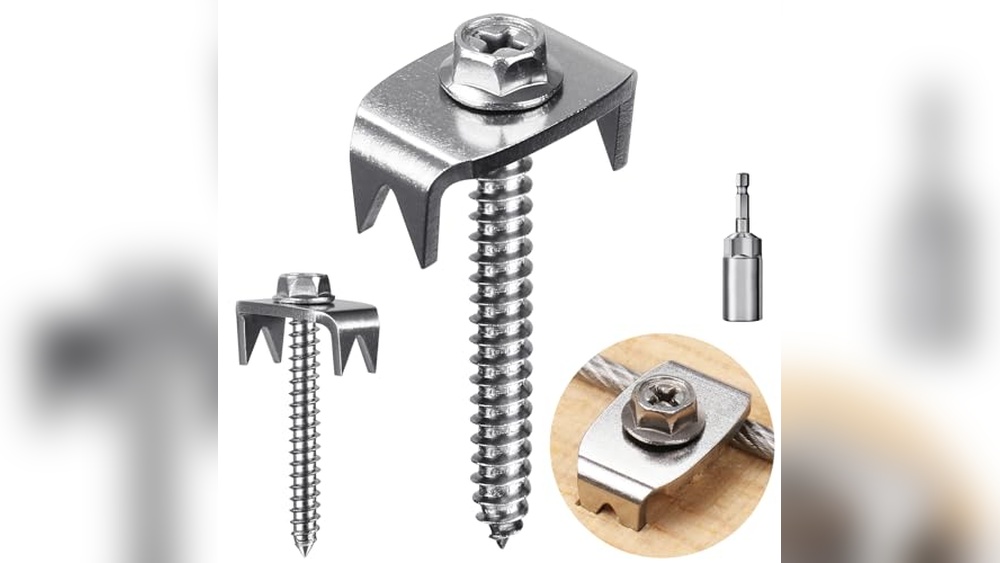
Types Of Hidden Fasteners
Several hidden fasteners exist, each serving different decking types. Some fasteners clip into grooves on deck boards. Others use screws to hold boards without visible heads. Some fasteners allow board expansion and contraction. Choose based on your deck board profile and spacing needs.
Material Compatibility
Fasteners must suit your decking material for durability. Composite boards need corrosion-resistant fasteners. Wood decks require fasteners that resist rust and staining. Check fastener coatings and materials for compatibility. The wrong fastener can cause staining or weaken your deck.
Tools Required
Prepare proper tools before starting installation. Most hidden fasteners require a drill or impact driver. Some need specific bits or drivers included in kits. A spacer tool helps keep even gaps between boards. Having all tools ready speeds up installation and improves results.
Preparing The Deck
Preparing the deck is the first step for installing hidden deck fasteners. This stage sets a solid base for a neat, strong finish. Proper preparation saves time and avoids problems during installation. Focus on the deck boards and joists to ensure everything fits perfectly.
Inspecting Deck Boards
Check each deck board carefully before starting. Look for cracks, warps, or rot. Replace any damaged boards. Use smooth, dry boards for best results. Make sure boards are straight and uniform in size. This helps fasteners hold well and keeps the deck stable.
Marking Joist Locations
Find and mark the joists under the deck boards. Use a measuring tape and pencil for accuracy. Mark each joist clearly on the boards’ edges. This step guides where to place hidden fasteners. Correct marking ensures fasteners align well with joists, improving deck strength.
Cleaning Grooves
Clean the grooves on each deck board before installing fasteners. Remove dirt, dust, or old debris using a brush or compressed air. Clean grooves help fasteners slide in smoothly and hold firmly. Keep grooves dry and free from obstructions for a secure fit.
Starter Clip Setup
Setting up the starter clips is the first step in installing hidden deck fasteners. This step ensures the deck boards start straight and secure. Proper setup helps avoid gaps and misalignment later.
Positioning Clips
Place the starter clips at the edge of the deck frame. Space them evenly along the joists. This keeps the boards steady as you work.
Securing To Joists
Attach the clips firmly using screws. Drive the screws into the joists, not just the surface. This provides a strong hold for the first board.
Aligning First Board
Slide the first deck board into the starter clips. Check that the board is straight and flush with the deck edge. Adjust the clips if needed before tightening all screws.

Credit: www.fastenmaster.com
Installing Deck Boards
Installing deck boards with hidden fasteners creates a clean, professional look. This method hides screws and nails, protecting the deck surface and improving durability. Follow each step carefully for a strong, even deck.
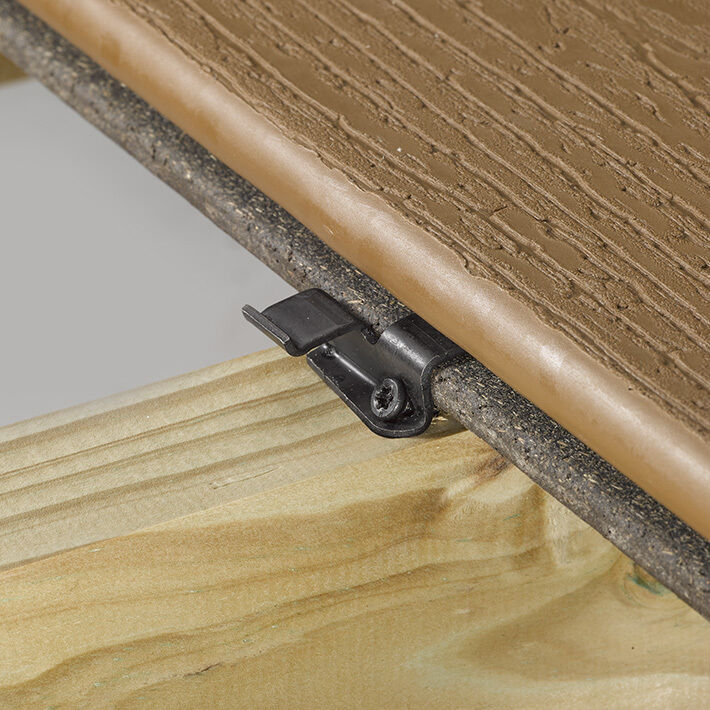
Sliding Boards Into Clips
Start by placing the first deck board along the frame edge. Slide the hidden fastener clip into the groove on the board’s side. Make sure the clip fits tightly inside the groove. Push the board gently toward the clips fixed on the joist. The board should lock securely without gaps. Repeat this for each board, moving across the deck.
Ensuring Proper Spacing
Maintain even spacing between boards for water drainage and expansion. Use spacing tools or plastic shims to keep gaps consistent. The gap size depends on the board material and climate. Check manufacturer instructions for exact spacing. Proper spacing prevents warping and extends deck life.
Fastening At Every Joist
Secure each clip with screws at every joist. Use screws designed for your fastener system. Drive screws straight and flush to avoid damage. Fastening at every joist keeps boards stable and safe. Inspect each fastener to confirm it holds tight before adding the next board.
Finishing Touches
Finishing touches complete your hidden deck fastener installation. These final steps ensure your deck looks clean and lasts longer. Pay close attention to details. Your deck will shine and stay safe.
Installing Edge Trim
Edge trim gives your deck a smooth, polished look. Attach trim along the deck’s outer edges. Use screws designed for decking material. Make sure the trim fits tightly and aligns well. This step hides any fasteners and rough edges.
Checking For Loose Boards
Inspect the deck surface carefully. Press down on each board to check for movement. Tighten screws or fasteners if boards shift or squeak. Secure boards prevent accidents and keep the deck sturdy. This check improves the deck’s safety and durability.
Cleaning The Deck Surface
Remove dirt, dust, and debris from your deck. Sweep the surface with a soft broom. Use mild soap and water for stains or sticky spots. Avoid harsh chemicals that can damage decking material. A clean deck looks inviting and helps protect the wood or composite.
Common Issues
Installing hidden deck fasteners can make your deck look clean and smooth. Still, some common problems may come up during installation. Knowing these issues helps you fix them quickly. This section covers the most frequent challenges and how to handle them.
Dealing With Warped Boards
Warped boards cause uneven decking and poor fastener fit. Check each board before installation. Use a straightedge to spot warping. Slight warps can be corrected by twisting boards gently. For severe warping, replace the board. Installing warped boards may damage fasteners or cause gaps later.
Avoiding Clip Damage
Hidden fastener clips can break if handled roughly. Always use the right tools for fastening. Avoid over-tightening screws, which can crack clips. Handle clips with care during placement and removal. Store unused clips safely to prevent bending or snapping.
Correcting Alignment Problems
Proper board alignment ensures a smooth deck surface. Misaligned boards create uneven gaps and look messy. Start by placing the first board straight and secure. Use spacers to keep consistent gaps between boards. Adjust clips and boards as you go to maintain alignment. Check alignment often to avoid major corrections later.
Maintenance Tips
Proper maintenance keeps hidden deck fasteners working well and your deck looking great. Regular care prevents damage and extends fastener life. Follow simple steps to maintain your deck’s hidden fasteners.
Regular Inspection
Check hidden fasteners at least twice a year. Look for signs of rust, looseness, or damage. Pay special attention after heavy rain or storms. Early detection avoids costly repairs. Tighten any loose screws carefully to keep boards secure.
Fastener Replacement
Replace fasteners that show corrosion or breakage. Use the same type and size of fastener for best results. Remove damaged fasteners gently to avoid harming the deck boards. Installing new fasteners ensures deck stability and safety.
Protecting Deck Finish
Keep the deck surface clean to protect hidden fasteners. Sweep off leaves and debris regularly. Avoid harsh chemicals that may damage the finish and fasteners. Apply a suitable deck sealant or stain to protect wood and fasteners from moisture.
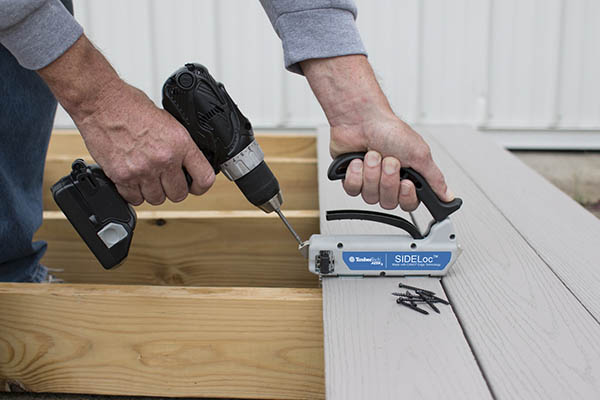
Credit: www.timbertech.com
Credit: www.fastenmaster.com
Frequently Asked Questions
How Do You Install Hidden Fastener Decking?
Slide the hidden fastener into the deck board groove. Align it over each joist. Secure with screws. Work from the outer edge inward. Repeat for all boards until the deck is fully fastened.
When Not To Use Hidden Deck Fasteners?
Avoid hidden deck fasteners on softwood or boards without grooves. Do not use them on uneven or warped decking. They are unsuitable for thick or non-grooved boards and places prone to moisture trapping or limited ventilation.
Do Trex Hidden Fasteners Go On Every Joist?
Trex hidden fasteners should be installed on every joist to ensure secure and stable decking. This provides proper board support and prevents movement.
How To Hide Fasteners On Deck?
Use hidden fasteners that attach boards from the sides or below. Install clips into board grooves for a seamless look. Secure fasteners at each joist to keep boards tight and fasteners invisible.
Conclusion
Installing hidden deck fasteners creates a clean, smooth deck surface. This method hides screws and nails, improving deck appearance. Follow steps carefully to ensure fasteners stay secure. Always check alignment and spacing for the best results. With practice, installation becomes faster and easier.
A well-installed deck adds value and enjoyment to your outdoor space. Keep tools handy and work patiently for quality results. Enjoy your beautiful deck with a seamless finish.