Are you ready to hang shelves, pictures, or heavy decorations but unsure how to secure them properly? Knowing how to drill wall anchors can save you time, frustration, and even damage to your walls.
In this guide, you’ll discover simple, step-by-step instructions that make the process easy—even if you’ve never picked up a drill before. By the end, you’ll feel confident to tackle your project like a pro and keep your walls strong and safe.
Keep reading to learn the secrets to perfect wall anchors every time.

Credit: stonedesignbysantos.com
Choosing The Right Wall Anchor
Choosing the right wall anchor is key to a strong and safe hold. Different walls and weights need different anchors. Picking the right one stops damage and keeps your items secure. Understanding the types, matching them to your wall, and knowing weight limits helps you make the best choice.
Types Of Wall Anchors
There are many wall anchor types. Plastic expansion anchors are common and good for light loads. Toggle bolts have wings that open inside the wall for strong support. Molly bolts expand behind the wall, holding medium weights well. Threaded anchors screw directly into drywall for quick installs. Each type fits different needs and walls.
Matching Anchors To Wall Material
Wall material affects anchor choice. Drywall needs anchors that spread weight, like toggle bolts or molly bolts. Concrete or brick requires heavy-duty anchors, such as sleeve anchors or masonry anchors. Plaster walls work best with anchors that expand slowly. Use the right anchor for your wall to avoid cracks and loose mounts.
Weight Capacity Considerations
Check the weight your anchor can hold. Light-duty anchors hold up to 20 pounds. Medium-duty anchors support 50 pounds or more. Heavy-duty anchors can hold over 100 pounds. Always choose an anchor with a higher weight rating than your item. This prevents accidents and keeps your wall safe.
Gathering Necessary Tools
Gathering the right tools is the first step in drilling wall anchors. The right tools make the job easier and safer. Prepare everything before starting to avoid interruptions. Each tool has a specific role in the process.
Drill And Drill Bits
A power drill is essential for making holes in the wall. Use the correct drill bit size to match the anchor. Choose a drill bit designed for your wall type—wood, drywall, or masonry. Sharp drill bits make cleaner holes and reduce effort.
Measuring Tools
Accurate measurements ensure anchors go in the right place. Use a tape measure or ruler to mark spots on the wall. A pencil works well for light markings. A level helps keep holes straight and even.
Safety Gear
Protect yourself during drilling. Wear safety glasses to shield your eyes from dust and debris. Gloves protect your hands from sharp edges. Use ear protection if the drill is loud. Safety first keeps the job smooth and injury-free.
Marking The Drill Spot
Marking the drill spot is the first step to a strong and safe anchor. It helps avoid mistakes that can damage walls or weaken the anchor hold. Taking time to mark the exact drill point ensures the anchor fits well and holds weight.
Careful marking starts with knowing the wall’s structure. Precise measurements keep the anchors aligned and balanced. A level tool guarantees the marks are straight, which is key for a professional look.
Finding Studs Or Solid Surfaces
Studs give the best support for wall anchors. Use a stud finder to locate them under the drywall. Mark the edges of the stud to find its center. Drilling into the stud provides a firm grip for heavy items.
For hollow walls, look for solid surfaces like masonry or concrete. These also offer strong hold but need special anchors. Avoid weak spots or empty spaces that can cause anchors to fail.
Measuring Anchor Placement
Measure the distance between each anchor point carefully. Use a tape measure to get exact spacing. Mark each spot clearly with a pencil. Proper spacing helps distribute the load evenly on the wall.
Take your time to check measurements twice. This step prevents errors that could lead to crooked or loose fixtures. Consistent placement looks neat and supports the object securely.
Using A Level For Accuracy
A level ensures all marks are perfectly horizontal or vertical. Place the level along your marks and adjust until the bubble is centered. Draw a straight line if multiple anchors need alignment.
Level marks help avoid slanted installations. This is important for shelves, frames, and other visible items. Accurate alignment improves both function and appearance.
Credit: www.homedepot.com
Drilling The Hole
Drilling the hole is a key step in installing wall anchors correctly. The hole must fit the anchor tightly to hold weight well. Too big or too small can cause problems. This part of the process needs careful attention to size, speed, and care to protect the wall.
Selecting The Correct Drill Bit Size
Choose a drill bit that matches the anchor’s size. Check the anchor packaging for recommended drill bit size. The hole should be just wide enough for the anchor to fit snugly. Using a smaller bit makes the anchor hard to insert. A larger bit will make the anchor loose and weak.
Drilling At The Right Speed
Drill slowly and steadily. Fast drilling can cause the bit to slip or damage the wall. Slow speed helps keep control and accuracy. Stop drilling once you reach the needed depth. Mark the drill bit with tape to avoid going too deep.
Avoiding Wall Damage
Use a level to mark the drilling spot. Check for wires or pipes inside the wall before drilling. Start with a small pilot hole to reduce pressure. Hold the drill firmly but gently. Avoid pushing too hard to prevent cracks or holes too big. Clean dust from the hole before inserting the anchor.
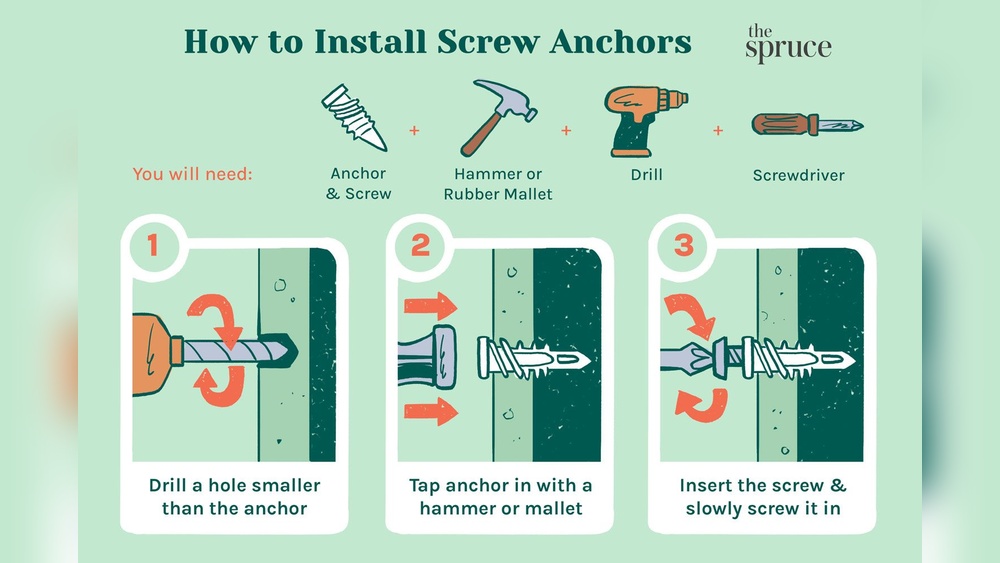
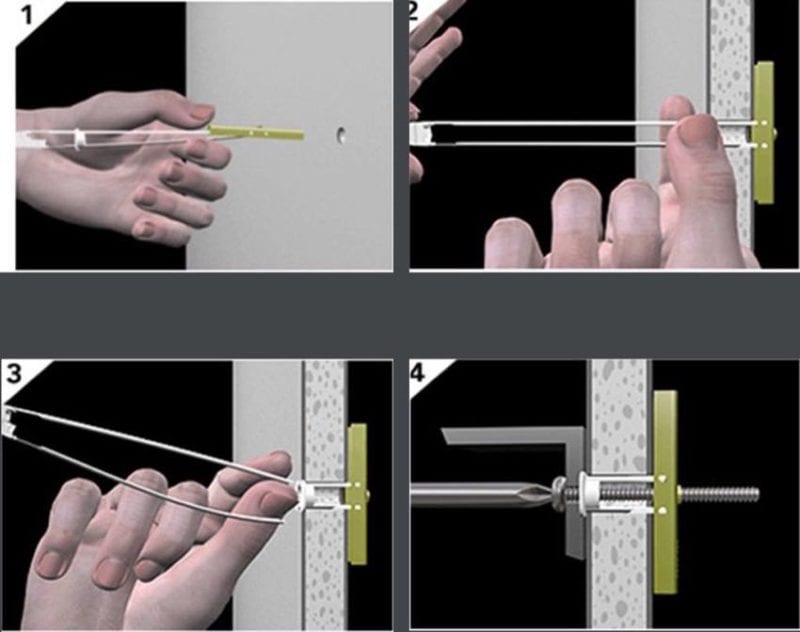
Installing The Wall Anchor
Installing wall anchors correctly ensures your fixtures stay secure. Each type of anchor requires a specific method for best results. Understanding how to place them properly helps avoid damage to your walls and keeps items steady.
Inserting Plastic Or Metal Anchors
Choose the right size anchor for your hole. Gently push the plastic or metal anchor into the drilled hole. Tap it lightly with a hammer until it sits flush with the wall surface. Avoid forcing the anchor to prevent cracking the wall.
Securing Toggle Bolts
Fold the toggle wings against the bolt shaft. Push the toggle through the drilled hole until it opens inside the wall. Pull back gently to lock it in place. Tighten the bolt slowly, allowing the wings to grip the wall firmly.
Checking Anchor Stability
After installation, test the anchor by applying light pressure. Wiggle the anchor to check for movement. A stable anchor should feel firm and secure. If loose, remove and reinstall with a larger anchor or different type.
Credit: www.protoolreviews.com
Mounting Your Item
Mounting your item on the wall is the final step after drilling and placing anchors. This step requires care to ensure the item stays secure and looks good. Follow these simple instructions to mount your item correctly.
Aligning With Anchors
Hold the item close to the wall. Line up the holes on your item with the anchors. Take your time to make sure they match perfectly. This alignment helps the screws go in straight. It also prevents damage to the wall or the item.
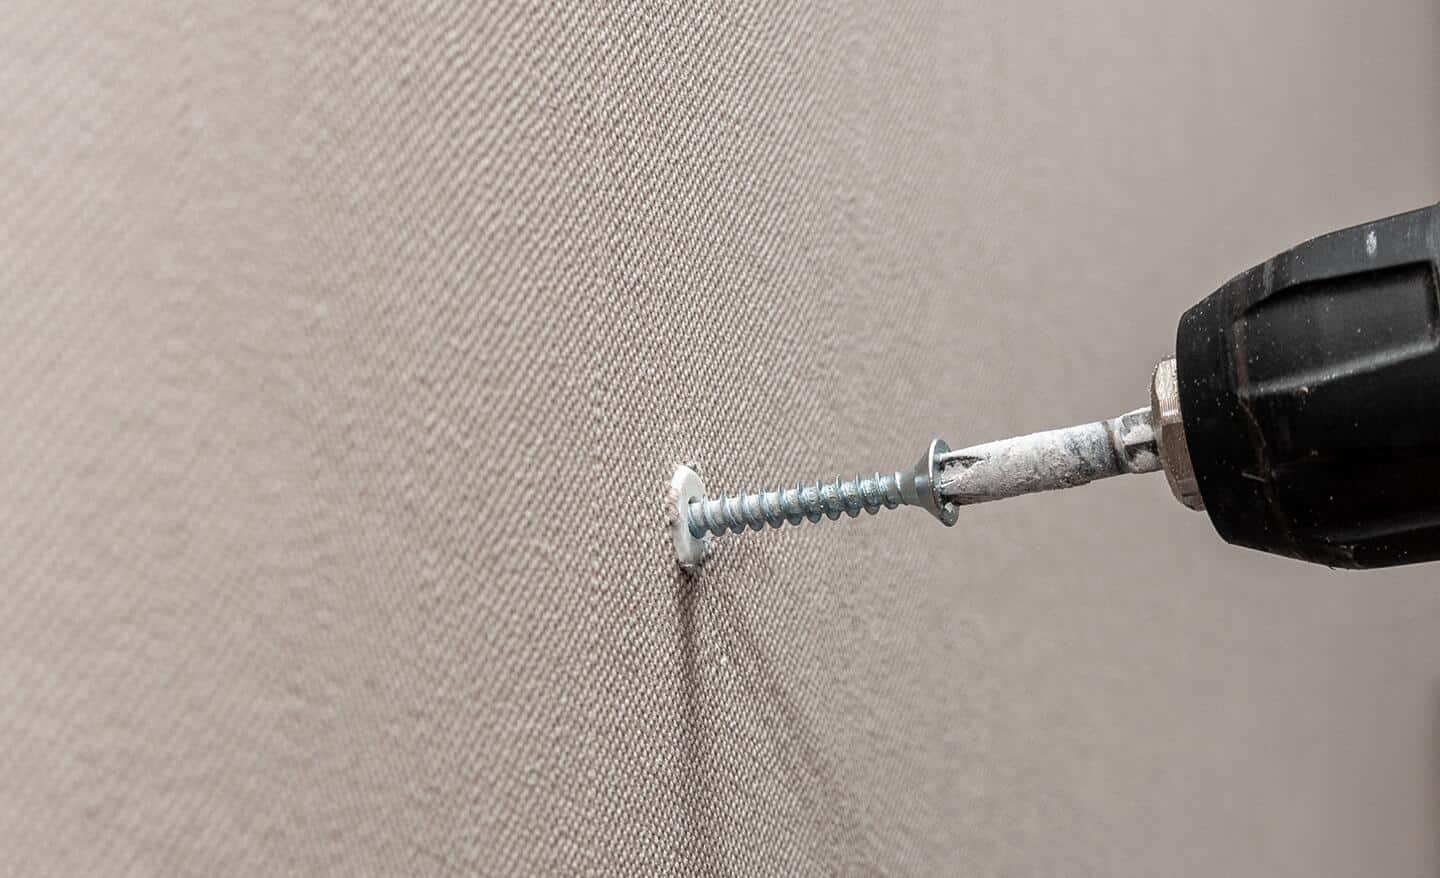
Screwing In Fixtures
Insert screws into the aligned holes. Use a screwdriver or drill with a screw bit. Turn the screws slowly and steadily. Stop when you feel resistance. Do not over-tighten, as this can strip the anchor or break the wall.
Testing For Security
After screwing in, gently pull or push the item. Check if it moves or feels loose. A secure item should not wobble or shift. If it does, tighten the screws slightly. Repeat testing until the item feels firm and safe.
Troubleshooting Common Issues
Drilling wall anchors can sometimes lead to small problems. These issues may stop your project or make it less secure. Knowing how to fix these common problems saves time and effort. Below are solutions to frequent troubles with wall anchors.
Dealing With Loose Anchors
Loose anchors do not hold items firmly on the wall. Check if the hole is too big for the anchor. Use a larger anchor size for better fit. Another trick is to fill the hole with wood glue or drywall compound. Let it dry before inserting the anchor again. This creates a tighter grip. Avoid forcing the anchor, as it can break the wall.
Fixing Misaligned Holes
Misaligned holes cause hanging items to look crooked. Mark the correct spot carefully before drilling. If you drilled the wrong place, fill the hole with spackling paste. Wait for it to dry and sand it smooth. Drill a new hole in the right spot. Use a level to check alignment before hanging anything.
Handling Cracks Or Wall Damage
Cracks around anchors weaken the wall’s strength. Stop drilling if cracks appear. Remove the anchor gently. Repair cracks with patching compound or plaster. Allow the repair to dry fully. Sand the area smooth before drilling a new hole nearby. Choose a spot away from the damaged area for better support.
Tips For Long-lasting Mounting
Mounting items on walls can last a long time with the right care. Proper steps keep anchors strong and secure. This section shares tips to help your wall anchors hold firm and last longer.
Regular Inspection
Check your mounted items regularly. Look for any signs of looseness or damage. Tighten screws if needed. Early fixes prevent bigger problems later.
Avoiding Overloading
Do not put too much weight on anchors. Each anchor has a weight limit. Stay below this limit to keep mounts safe. Heavy loads can pull anchors out of the wall.
Choosing Quality Materials
Use strong anchors made from good materials. Cheap anchors may break or wear out fast. Pick anchors suited for your wall type. Quality materials ensure better hold and durability.
Frequently Asked Questions
What Tools Are Needed To Drill Wall Anchors?
You need a drill, drill bits, wall anchors, a screwdriver, and a pencil. These basic tools ensure precise and secure anchor installation.
How Do I Choose The Right Wall Anchor Size?
Select an anchor size based on the wall type and load weight. Match the anchor diameter to your screw for a snug fit.
Can I Drill Anchors Into Drywall Safely?
Yes, drywall anchors are designed for safe use in drywall. Use the correct anchor type to avoid damage and ensure support.
How Deep Should I Drill For Wall Anchors?
Drill a hole slightly deeper than the anchor length. This allows the anchor to fit fully and hold securely.
Conclusion
Drilling wall anchors can feel tricky at first. Take your time and follow each step carefully. Use the right tools and measure twice before drilling. This helps avoid mistakes and keeps your wall safe. Practice makes the process easier and more confident.
Soon, you will hang shelves, pictures, or hooks with ease. Remember, safety matters—wear goggles and check for wires. With patience, drilling wall anchors becomes a simple task anyone can do. Keep these tips in mind for your next project.