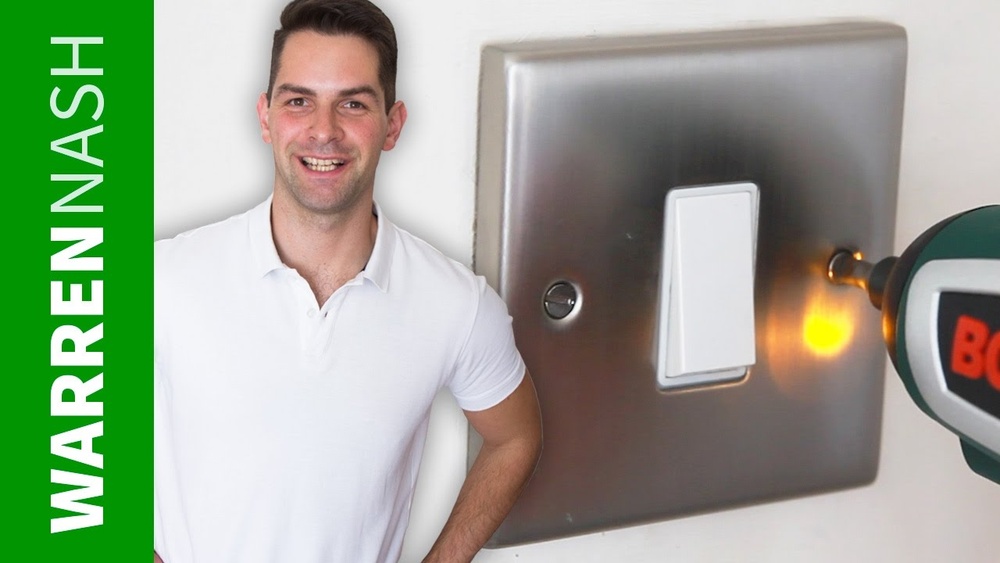
Have you ever stood in a hallway or at the top of the stairs, wishing you could control your lights from two different switches? That’s exactly what a three-way light switch does.
But what happens when one stops working? You might think replacing it is complicated or expensive. The truth is, you can fix it yourself—quickly and safely. In this guide, you’ll learn step-by-step how to replace your three-way light switch with confidence.
Keep reading, and by the end, you’ll save money and gain a handy skill you’ll use again and again.

Credit: www.youtube.com
Tools And Materials Needed
Replacing a three-way light switch requires some basic tools and materials. Having the right items makes the job easier and safer. Prepare everything before you start working on the switch.
Gather the tools and materials listed below. Each one plays an important role in the replacement process. Using the correct tools helps avoid mistakes and damage.
Essential Tools For Replacing A Three-way Switch
- Screwdriver (flathead and Phillips)
- Wire stripper
- Voltage tester
- Needle-nose pliers
- Electrical tape
- Flashlight
Materials Needed For The Switch Replacement
- New three-way switch
- Wire connectors (wire nuts)
- Electrical box (if needed)
- Replacement screws (usually come with the switch)
- Wall plate cover
Safety Gear To Use
- Insulated gloves
- Safety goggles
- Non-conductive footwear
Safety Precautions
Always turn off the power at the breaker before starting. Double-check with a tester to ensure no electricity flows. Wear insulated gloves to avoid shocks during the switch replacement.
Turn Off The Power
Always switch off the power at the circuit breaker before starting. Never trust the wall switch to cut power completely. Use a voltage tester to confirm no current flows. Safety starts with no electricity running through wires.
Use Proper Tools
Use insulated tools designed for electrical work. Avoid metal tools without insulation. Proper tools reduce the risk of electric shocks. Keep tools organized and within reach for smooth work.
Wear Safety Gear
Wear rubber-soled shoes to avoid electric shocks. Use safety glasses to protect eyes from debris. Gloves provide extra protection but ensure they are dry. Safety gear guards against unexpected accidents.
Double-check Wiring
Label wires before disconnecting them. Take photos for reference to avoid mistakes. Confirm wire colors and connections carefully. Correct wiring prevents short circuits and damage.
Work In Good Lighting
Ensure the work area is well-lit. Use a portable lamp if needed. Good visibility helps avoid errors. Clear light makes the task easier and safer.
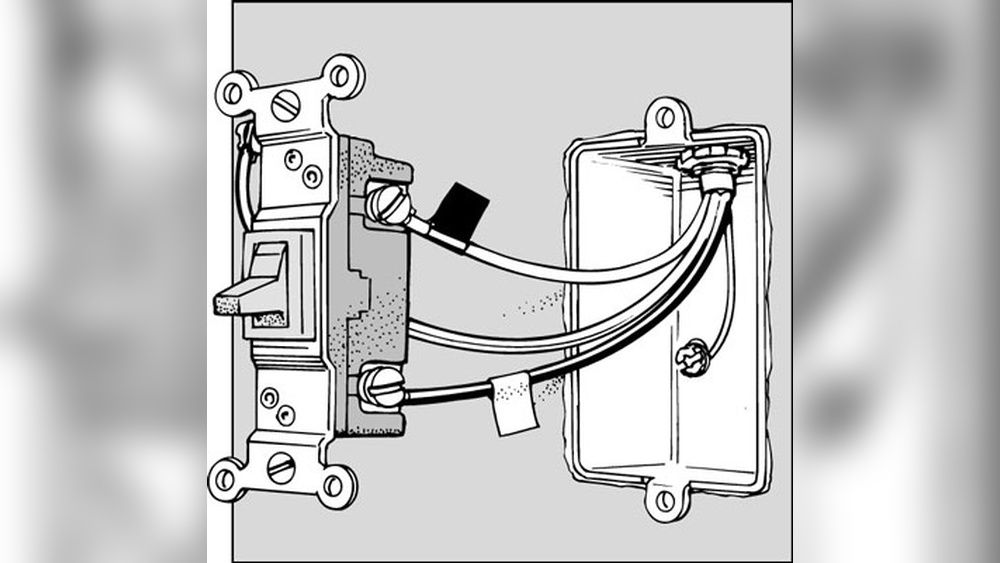
Identify The Three Way Switch Setup
Identifying the three way switch setup is the first step to replace it safely. This type of switch controls one light from two different locations. Understanding how it works helps avoid mistakes during replacement.
Look for two switches controlling the same light. These are usually in separate rooms or at opposite ends of a hallway. The wiring inside these switches is different from a regular single-pole switch.
Locate Both Switches
Find the two switches that control the same light fixture. Test by turning one switch on and off, then check if the light changes. The other switch should also control the light’s power.
Before checking wires, turn off power at the circuit breaker. Use a voltage tester to confirm no electricity flows in the switch box. Safety first to avoid shocks or injury.
Open The Switch Boxes
Remove the switch cover plates and unscrew the switches from the boxes. Pull the switches out gently to see the wires. Take note of how wires connect to each switch.
Identify Wire Types
Three way switches have three wires plus a ground wire. Two traveler wires carry current between switches. The common wire connects to the power source or light fixture.
Label The Wires
Use tape or markers to label each wire before removal. Mark the common wire and traveler wires separately. This helps during reinstallation to connect wires correctly.

Credit: www.electrical-online.com
Turn Off Power
Turning off the power is the first and most important step before replacing a three-way light switch. This step keeps you safe from electric shock. Always make sure no electricity flows to the switch you are working on.
Failing to turn off the power can cause serious injury or damage. Take your time to locate the correct circuit breaker and switch it off. Double-check the power status before starting any work.
Locate The Circuit Breaker
Find your home’s electrical panel. Look for the breaker that controls the light switch. It is usually labeled for easy identification. If not labeled, try turning off breakers one by one.
Switch Off The Power
Flip the correct breaker to the OFF position. This stops electricity from reaching the switch. You may hear a click when the breaker turns off. Keep it off until the job is done.
Test For Power
Use a voltage tester or a non-contact voltage detector. Touch the tester to the switch wires. The tester will show if power is still there. If it lights up, power is still on. Turn off the breaker again.
Remove The Old Switch
Start by turning off the power at the circuit breaker. Unscrew the old switch carefully and pull it out from the wall box. Disconnect the wires from the switch terminals to prepare for the new one.
Turn Off The Power
Start by switching off the power to the circuit. Use the main breaker box to cut electricity. This step is crucial to avoid shocks or injuries. Confirm the power is off by testing the switch with a voltage tester. Safety first.
Remove The Switch Cover Plate
Use a screwdriver to take off the cover plate. This reveals the screws holding the switch in place. Keep the screws safe for later use. The cover plate usually pops off easily after unscrewing.
Unscrew The Old Switch
Remove the screws that secure the switch to the electrical box. Gently pull the switch out to expose the wires. Do not pull too hard to avoid damaging the wires. Handle with care.
Note Wire Positions
Look closely at how the wires are connected. Take a photo or label each wire with tape. This helps to connect the new switch correctly. Remember, three-way switches have more wires than regular ones.
Disconnect The Wires
Loosen the screws holding the wires on the switch terminals. Carefully remove each wire from the old switch. Keep the wires straight and untangled. Now, the old switch is ready to be replaced.
Inspect And Prepare Wiring
Before replacing a three-way light switch, inspecting and preparing the wiring is vital. This step helps ensure safety and a smooth installation process. Careful inspection prevents common mistakes and electrical hazards.
Take your time to check the existing wires. Look for any damage or loose connections. Proper preparation saves time and effort during the switch replacement.
Turn Off The Power
Switch off the power at the circuit breaker. Confirm the power is off by testing the switch with a voltage tester. This step protects you from electric shock.
Remove The Switch Plate And Inspect Wires
Unscrew the switch plate carefully. Pull the switch out gently to see the wiring behind it. Note the wire colors and their positions for reference.
Check Wire Condition And Length
Look for frayed or damaged wires. Ensure wires are long enough to connect to the new switch. Trim or strip wires if needed, but avoid cutting too short.
Identify Common, Traveler, And Ground Wires
Recognize the common wire by its darker color or label. Traveler wires usually have different colors or markings. The ground wire is bare copper or green.
Prepare Wires For Connection
Straighten wires for easy handling. Strip about half an inch of insulation from wire ends. This ensures good contact with the new switch terminals.
Connect The New Three Way Switch
Connecting the new three-way switch is a key step in replacing your old switch. This part ensures the lights work correctly from both switch locations. Take your time to identify each wire before attaching them. Proper connection avoids flickering or non-working switches. Follow the steps carefully for a safe and smooth setup.
Identify Common And Traveler Wires
Start by finding the common wire on the old switch. The common wire is usually darker or marked differently. The two other wires are traveler wires. They connect the two switches and allow control from both ends. Use a voltage tester to confirm which wire is which. Mark the wires with tape to avoid confusion.
Attach Wires To New Switch
Attach the common wire to the common terminal on the new switch. The common terminal is often marked or a different color. Connect the traveler wires to the traveler terminals. These are usually brass-colored screws. Tighten all screws firmly to hold the wires in place. Double-check each connection before pushing the switch back into the box.
Secure The Switch And Restore Power
After wiring the new three-way switch, securing it properly is important. This step keeps the switch safe and ensures it works well. Also, restoring power is the final action that brings the switch to life.
Take your time to make sure the switch is tight and stable. Loose switches can cause problems or even be dangerous. Use the screws that came with the switch to fasten it into the wall box. Check that no wires are pinched or bent.
Once the switch is secure, restore power at the circuit breaker. Turn the breaker back on carefully. Test the switch by flipping it on and off. Make sure the lights respond correctly from all switch locations.
Fasten The Switch In The Wall Box
Align the switch with the holes in the wall box. Insert the screws and tighten them gently. Avoid over-tightening to prevent damage. The switch should feel firm but not forced.
Replace The Switch Plate Cover
Place the cover over the switch carefully. Use the small screws to attach the cover. This protects the wiring and gives a finished look. Wipe the cover clean if needed.
Turn On The Circuit Breaker
Go to your breaker panel and find the switch you turned off. Flip it to the ON position. Listen for a click and check the power indicator if available. This action restores electricity to the switch.
Test The Three-way Switch Operation
Flip the switch from both locations. Check that the light turns on and off each time. This confirms the wiring is correct and secure. If the light does not respond, recheck the wiring connections.
Test The Switch Operation
Testing the switch operation is a vital step after installing a three-way switch. It confirms if the wiring is correct and the switch works well. Without testing, you risk having a faulty or unsafe connection.
This part is simple and quick. It helps avoid future problems with your lighting setup. Follow these steps carefully to check the switch operation.
Turn On The Power Supply
First, restore power to the circuit by turning on the breaker. Make sure the power switch to the light fixture is also on. This allows electricity to flow and lets you test the switch.
Check Each Switch Position
Flip the first switch to the ON position. Notice if the light turns on. Then switch it off and flip the second switch. The light should respond to each switch independently.
Test All Switch Combinations
Try all possible switch positions. Turn one switch on and the other off, then reverse. The light must turn on or off correctly in every case. This confirms the three-way switch works properly.
Look For Flickers Or Delays
Watch the light for flickering or delay when switching. Flickers or slow response may mean loose wiring or poor connection. Fix any issues before finishing the installation.
Use A Voltage Tester For Safety
Use a voltage tester on terminals to ensure no power is present when off. This step protects you from electric shock. It also helps confirm the switch cuts power as expected.
Troubleshooting Tips
Replacing a three-way light switch can sometimes be tricky. Troubleshooting helps find and fix problems quickly. It saves time and avoids frustration. This section offers simple tips to solve common issues.
Check The Power Supply
Start by turning off the main power. Use a voltage tester to check wires at the switch. Make sure power is off before touching anything. No power means the problem is elsewhere in the circuit.
Inspect The Wiring Connections
Loose or wrong wires cause switches to fail. Look for disconnected or frayed wires. Tighten all screws and match wires to correct terminals. Follow the wiring diagram carefully for accuracy.
Test The Switches Individually
Sometimes one switch is faulty, not both. Remove each switch and test it with a multimeter. Replace any switch that does not show continuity when toggled.
Look For Damaged Components
Check for burnt or broken parts inside the switch box. Damaged wires or terminals need replacement. Avoid using damaged switches as they cause safety risks.
Verify The Ground Connection
A missing ground wire can cause problems. Confirm the ground wire is connected to the switch and box. Proper grounding improves safety and switch performance.
Recheck The Traveler Wires
The traveler wires link the two switches. Ensure the traveler wires connect to the correct terminals. Swapping traveler wires will stop the switch from working properly.

Credit: www.reddit.com
Frequently Asked Questions
What Tools Are Needed To Replace A Three Way Light Switch?
You need a screwdriver, voltage tester, wire stripper, needle-nose pliers, and electrical tape to replace a three way switch safely and effectively.
How Do You Identify Traveler Wires In A Three Way Switch?
Traveler wires connect the two switches. Use a voltage tester to identify them by checking which wires carry current when toggled.
Can I Replace A Three Way Switch Without Turning Off Power?
No, always turn off the circuit breaker before replacing a three way switch to avoid electrical shock or injury.
How Long Does It Take To Replace A Three Way Switch?
Replacing a three way switch typically takes 20 to 40 minutes, depending on your experience and wiring complexity.
Conclusion
Replacing a three-way light switch can save you money and time. Follow the steps carefully for safety and success. Turn off the power before starting any work. Double-check your wiring to avoid mistakes. Take your time and don’t rush the process.
With patience, you can fix or upgrade your switches easily. Enjoy better control of your lights after the job. Simple tasks like this build your confidence in home repairs. Keep your tools ready for future projects. Stay safe and work smart every time.