Have you ever flipped your light switch, only to find nothing happens? It’s frustrating, and you might wonder if you need to call an electrician or replace the whole switch.
The good news is, fixing a light switch is often easier than you think. You’ll discover simple steps to identify the problem and get your lights working again quickly and safely. Keep reading—you’ll save time, money, and avoid the hassle of living in the dark.
:max_bytes(150000):strip_icc()/wall-switch-troubleshooting-and-repair-1824662-03-a1ccda0cf1fa4683b714801ae678b90c.jpeg)
Credit: www.thespruce.com
Tools You’ll Need
Fixing a light switch requires some basic tools. These tools make the job safer and easier. Having the right tools helps you work faster and avoid mistakes.
Most tools are easy to find and affordable. Keep them ready before starting the repair. Let’s look at the essential tools you need.
Flathead and Phillips ScrewdriversTwo types of screwdrivers are needed. Flathead fits straight slots. Phillips fits cross-shaped slots. Switch plates and terminals use both types.
Voltage TesterA voltage tester checks if the power is off. It keeps you safe from electric shocks. Always test wires before touching them.
Wire StrippersWire strippers remove insulation from wires. They expose the metal for connections. Good wire strippers avoid damaging the wire.
Needle-Nose PliersNeedle-nose pliers help bend and hold wires. They fit in tight spaces. Use them to shape wires for screws.
Electrical TapeElectrical tape insulates wire connections. It prevents shorts and shocks. Wrap it tightly around exposed wires.
Safety First
Fixing a light switch involves working with electricity. Safety must be the top priority. Taking the right precautions prevents injuries and accidents. Follow clear safety steps before starting any repair.
Turn Off The Power
Locate the circuit breaker for the room. Switch it off to cut power to the light switch. Use a voltage tester to confirm no electricity flows. Never skip this step. It stops electric shocks.
Use Proper Tools
Choose insulated screwdrivers and pliers. These tools protect against electric shock. Avoid using damaged or worn tools. Good tools make the job safer and easier.
Wear Safety Gear
Wear rubber-soled shoes and safety glasses. Rubber soles reduce the risk of electric shock. Glasses protect your eyes from sparks or debris. Dress carefully before handling any wiring.
Check For Damage
Inspect wires and the switch for signs of damage. Look for frayed wires or burn marks. Damaged parts increase the risk of shock or fire. Replace any faulty components before proceeding.
Turn Off Power
Turning off the power is the first step to fix a light switch safely. Electrical work can be dangerous without cutting the power. It stops the risk of electric shock and injury.
Before touching the switch or wires, ensure the power is off. This simple action protects you and your home from accidents.
Locate The Circuit Breaker
Find the circuit breaker panel in your home. It is usually in the basement, garage, or utility room. Look for the breaker labeled for the room or area of the light switch.
Switch Off The Correct Breaker
Flip the breaker switch to the off position. This cuts power to the light switch and the connected wires. Double-check by turning on the light switch to confirm no power flows.
Use A Voltage Tester
Test the wires with a voltage tester. It confirms no electricity is running through the wires. Touch the tester to the wires; no light or sound means power is off.
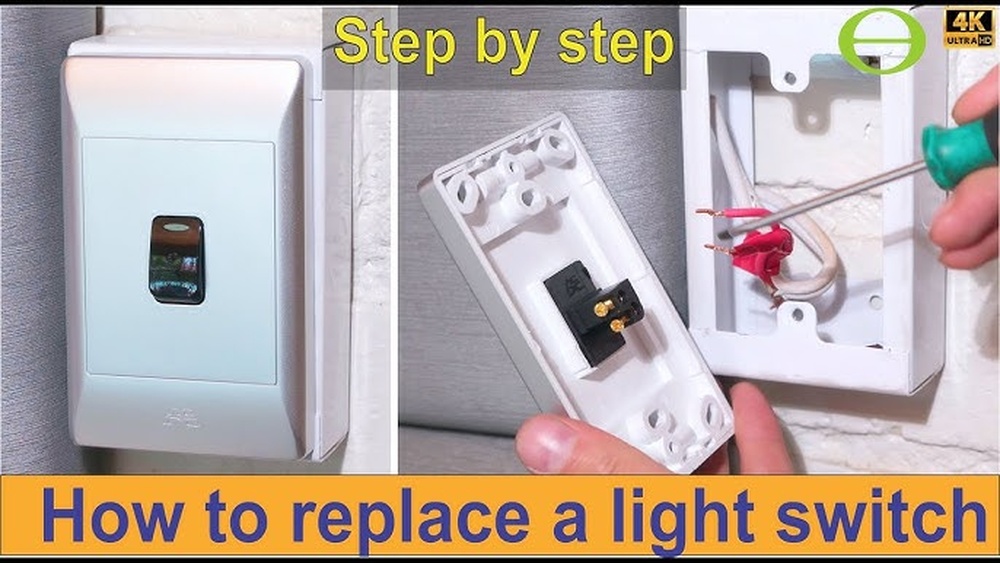
Remove The Switch Cover
Removing the switch cover is the first step in fixing a light switch. It gives you access to the switch and wiring. This step is simple but important for safety and proper repair.
Always turn off the power before touching the switch cover. This prevents electric shock. Use a screwdriver to remove the screws holding the cover in place. Keep the screws safe for later use.
After removing the cover, check for any damage or dirt. Clean the area gently if needed. Now, you are ready to inspect or replace the switch itself.
Gather Your Tools
Before starting, get a flathead or Phillips screwdriver. The type depends on your switch cover screws. Having the right tool makes the job easier and faster.
Switch Off The Power
Find the circuit breaker and turn off the power to the switch. Double-check by flipping the switch to see if the light turns off. Safety first.
Unscrew The Switch Cover
Use the screwdriver to remove the screws. Turn them counterclockwise carefully. Place screws in a safe spot to avoid losing them.
Remove The Cover Plate
Gently pull the cover plate away from the wall. Avoid forcing it to prevent damage. Set the cover aside on a flat surface.
Inspect The Switch
Inspecting the light switch is the first step to fixing it. It helps find the problem quickly and safely. A careful check can show if the switch is broken or dirty. This step saves time and effort later on.
Turn Off The Power
Always turn off the power at the breaker box. This stops electric shock risks. Use a tester to make sure the switch has no power. Safety comes first.
Unscrew the switch cover plate carefully. Set the screws aside so you don’t lose them. This exposes the switch and wiring for inspection.
Look For Visible Damage
Check the switch for cracks or burn marks. Look at the wires for loose ends or breaks. Any damage means the switch needs replacing.
Test The Switch Mechanism
Flip the switch up and down gently. It should move smoothly without sticking. A switch that feels loose or stiff might be faulty.
Check The Wiring Connections
Inspect the screws holding the wires. Make sure wires are tight and not frayed. Loose wires can cause the switch to fail.
Credit: www.youtube.com
Test The Switch With A Voltage Tester
Start by turning off the power to the switch. Use a voltage tester to check if electricity is flowing safely. This helps find if the switch needs repair or replacement.
Why Use A Voltage Tester To Check A Light Switch?
Testing a light switch with a voltage tester helps find electrical problems. It shows if power flows through the switch. This step is important for safety and accurate fixing.
The tester gives a clear sign if the switch works or not. It helps avoid guessing and saves time. Always use a voltage tester before touching wires.
How To Prepare For Testing The Switch
Turn off the main power to the switch. Remove the switch cover plate carefully. Keep your hands dry and use insulated tools. Safety first is very important.
Set your voltage tester to the right setting. Read the tester’s instructions if needed. Make sure the tester works by checking it on a known live wire.
Step-by-step Guide To Test The Switch
Touch one tester probe to the switch terminal. Place the other probe to a ground or neutral wire. Watch the tester for a voltage reading or light.
If the tester shows power when the switch is ON, the switch gets electricity. No power means a wiring or switch problem. Test both terminals for full check.
What To Do After Testing The Switch
Turn off power again before any repair work. Replace the switch if the tester shows no power when ON. Fix loose wires if power is inconsistent.
Always double-check with the tester after repairs. Safe and correct testing prevents accidents and ensures the switch works well.
Disconnect The Old Switch
Disconnecting the old light switch is the first step in fixing it safely and correctly. This process involves turning off the power and carefully removing the switch from the wall. Doing this right helps prevent electric shocks and makes the repair easier. Follow these simple steps to disconnect the old switch with confidence.
Turn Off The Power
Locate your home’s circuit breaker panel. Find the switch that controls the light you want to fix. Flip the breaker to the off position. Test the switch to make sure the power is off. Use a voltage tester on the switch wires. No power means it is safe to proceed.
Remove The Switch Cover Plate
Use a screwdriver to take out the screws holding the cover plate. Gently pull the cover plate away from the wall. Set it aside carefully. This exposes the switch and wiring behind it. Avoid forcing the plate to prevent damage.
Unscrew The Old Switch
Find the screws on the switch itself. Use a screwdriver to loosen and remove them. Pull the switch out of the electrical box slowly. Keep the wires attached until you are ready to disconnect them. Work with care to avoid pulling the wires too hard.
Disconnect The Wires
Look closely at how the wires connect to the switch. Use a screwdriver to loosen the terminal screws. Carefully remove each wire from the switch. Remember or take a photo of which wire goes where. This makes connecting the new switch much easier.
Install The New Switch
Installing a new light switch is the key step after removing the old one. This process connects the wires to the new switch and places it back into the wall box. Careful handling ensures the switch works safely and correctly.
Prepare The New Switch
Start by checking the new switch. Look for screws and terminals on the sides. Identify the common terminal and the traveler terminals if it is a three-way switch. This helps connect wires correctly.
Connect The Wires
Match each wire to its terminal on the switch. Tighten the screws to hold the wires firmly. Avoid loose connections to prevent electrical problems. Use a screwdriver with a comfortable grip for better control.
Secure The Switch In The Box
Push the wires gently back into the wall box. Align the switch with the screw holes on the box. Fasten the switch with screws until it feels stable. Do not over-tighten to avoid damaging the switch or box.
Attach The Switch Cover Plate
Place the cover plate over the switch. Screw it into place using a small screwdriver. The cover plate protects wires and gives a clean look. Make sure it fits snugly without gaps.
Secure The Switch And Cover
Securing the switch and cover is the final step in fixing a light switch. It keeps everything in place and safe. A loose switch can cause flickering lights or even sparks. The cover protects the wires and prevents dust buildup. Properly securing these parts ensures the switch works well for a long time.
Check The Switch Alignment
Make sure the switch fits well inside the box. It should sit flat and not tilt. A crooked switch can break the cover or wires. Adjust the switch position by gently pushing or pulling it.
Tighten The Mounting Screws
Use a screwdriver to tighten the screws holding the switch. Tight screws keep the switch stable. Do not overtighten to avoid cracking the switch plate. Tighten until the switch feels firm and does not move.
Attach The Cover Plate
Place the cover plate over the switch. Align the holes in the cover with the screws on the switch. Hold the cover steady and screw it in carefully. The cover should sit flush against the wall.
Test The Switch Stability
Press the switch gently to check if it moves or feels loose. A well-secured switch stays in place. If it wobbles, tighten the screws more. Ensure the cover does not shift or pop off.

Credit: www.wikihow.com
Restore Power And Test
Restoring power and testing the light switch are the final steps after a repair. These steps confirm if the switch works and the problem is fixed. Safety is very important during this process. Always ensure the wiring is secure and the switch is properly installed before restoring power.
Testing helps catch any remaining issues early. It saves time and effort by preventing further problems. Follow each step carefully for the best results.
Turn On The Circuit Breaker
Locate the circuit breaker for the switch. Flip the breaker to the “on” position. This restores electricity to the switch and the connected light. Wait a few seconds for power to flow fully.
Operate The Light Switch
Flip the switch up and down several times. Check if the light turns on and off correctly. The switch should feel smooth without any stiffness or sparks. Listen for any unusual sounds like buzzing.
Check The Light Fixture
Look at the light bulb and fixture. The bulb should glow steadily without flickering. A steady light means the switch and wiring are working well. Flickering or no light means more work is needed.
Use A Voltage Tester
Test the switch terminals with a voltage tester. This confirms the switch receives power. The tester lights up or beeps when voltage is present. No reading means a wiring problem or faulty switch.
Secure The Switch Plate
Once testing is complete, turn off power again. Attach the switch plate cover firmly. Screw it in place to protect wiring and improve appearance. Finally, turn the circuit breaker back on.
Common Issues And Fixes
Light switches can stop working for a few common reasons. Knowing these issues helps you fix the problem quickly. Most fixes do not need special tools or skills. Just some care and basic steps.
Loose Wiring
Loose wires inside the switch can cause it to fail. Wires may come loose over time or after repairs. Turn off the power before checking the wiring. Tighten any loose wire connections with a screwdriver. Make sure wires are secure and not damaged.
Faulty Switch
Sometimes the switch itself is broken. Faulty switches do not complete the circuit. Replacing the switch is often the best solution. Remove the old switch carefully and note wire positions. Install a new switch and connect wires correctly. Turn power back on and test the switch.
Tripped Circuit Breaker
A tripped breaker can cut power to the switch. This happens when there is an overload or short circuit. Check your breaker box for any tripped switches. Flip the breaker fully off and back on. If it trips again, call an electrician to inspect the problem.
When To Call A Professional
Knowing when to call a professional is important for fixing a light switch safely. Some problems need expert skills and special tools. Trying to fix complex issues without experience can cause injury or damage.
Safety must come first. If you see signs that seem dangerous, do not try to fix the switch alone. A licensed electrician can handle tough problems quickly and correctly.
Signs Of Electrical Issues
Flickering lights or sparks around the switch need expert attention. Burning smells or warm switch plates show serious trouble. These signs mean the wiring may be faulty or damaged.
No Power After Switching
If the switch does not control the light at all, the problem could be deeper. It might involve the circuit breaker or internal wiring. Professionals can diagnose and fix these safely.
Old Or Damaged Switches
Switches that are cracked, broken, or very old should be replaced by a pro. Using damaged switches can cause short circuits or shocks. Experts know the right replacement parts to use.
Uncertainty About Electrical Work
Feeling unsure about how to fix a switch is a clear sign to call help. Electrical work can be tricky and risky. A professional will ensure the job is done right and safe.
Frequently Asked Questions
How Do I Know If My Light Switch Is Faulty?
A faulty light switch often causes flickering or no light. Check for loose connections or a burning smell. Turn off power before inspecting. If unsure, use a voltage tester or call an electrician to confirm the issue safely.
What Tools Do I Need To Fix A Light Switch?
You need a screwdriver, voltage tester, wire stripper, and electrical tape. Always turn off the power before starting. These tools help you safely remove, inspect, and replace the switch or wiring as needed.
How Can I Safely Replace A Light Switch?
Turn off power at the breaker. Use a voltage tester to confirm no current. Remove the switch cover, unscrew the switch, disconnect wires, and connect the new switch. Secure it back and restore power to test functionality.
Why Does My Light Switch Keep Sparking?
Sparking usually indicates loose wiring or a defective switch. It can be dangerous and cause electrical fires. Turn off the power immediately and replace the switch or consult an electrician for repairs.
Conclusion
Fixing a light switch can save time and money. Always turn off power before starting work. Use the right tools and follow safety steps. Check wires carefully and tighten connections. Test the switch after fixing to ensure it works. Simple repairs often solve common problems.
Don’t rush; take your time and stay safe. Small fixes keep your home bright and safe. Now, you can handle a faulty switch with confidence.