Are you unsure if your light switch is working properly? Checking a light switch with a multimeter might sound tricky, but it’s easier than you think.
Knowing how to test your switch can save you time, money, and frustration. In this guide, you’ll learn simple steps to quickly find out if your switch is faulty or just needs a quick fix. Keep reading, and you’ll gain the confidence to handle this common home electrical task safely and effectively.

Credit: www.youtube.com
Tools Needed
Checking a light switch with a multimeter requires a few basic tools. Having the right equipment ensures accurate results and keeps you safe. Knowing what tools to gather before starting makes the process smooth and simple.
Choosing The Right Multimeter
Select a multimeter that can measure voltage, resistance, and continuity. Digital multimeters are easy to read and reliable. Choose one with clear markings and a hold function to keep readings. Make sure the multimeter can handle household voltage levels safely.
Additional Safety Gear
Safety gear protects you from electrical shocks and injuries. Wear insulated gloves to avoid accidental contact with live wires. Use safety glasses to protect your eyes from sparks or debris. Keep a non-contact voltage tester handy to check for live wires before touching anything.
:max_bytes(150000):strip_icc()/testing-single-pole-switches-1152811-03-8b89394a236d499ebee520df31a0ce27.jpg)
Credit: www.thespruce.com
Preparing For The Test
Before testing a light switch with a multimeter, proper preparation is key. This step ensures your safety and helps you get accurate results. Taking time to prepare prevents accidents and damage to your tools or home wiring.
Start by making sure the power is off. This avoids electric shocks and protects your multimeter from damage. Next, you will need to access the switch wiring by removing the cover plate. This gives you clear access to test the switch terminals safely and correctly.
Turning Off Power
Locate the main circuit breaker panel in your home. Find the breaker that controls the switch you want to test. Flip the breaker switch to the OFF position. Double-check that the light switch no longer controls the light. Use a non-contact voltage tester for extra safety.
Removing The Switch Cover
Use a screwdriver to remove the screws holding the switch cover. Gently pull off the cover plate to expose the switch and wires. Avoid pulling hard to prevent damaging the wires. Make sure the power is off before touching any wires. Keep the screws safe to reattach the cover later.
Setting Up The Multimeter
Setting up the multimeter is the first step to test a light switch safely and accurately. Proper setup ensures you get the correct readings. It helps avoid damage to the device or injury. Follow these steps carefully to prepare your multimeter for testing.
Selecting The Correct Mode
Turn on your multimeter. Look for the mode dial on the front. Set it to measure voltage (V) or continuity (Ω), depending on the test. For a light switch, continuity mode often works best. It checks if the circuit is complete when the switch is on. Use voltage mode if you want to measure the power flow. Choose the right mode before testing to get accurate results.
Calibrating The Device
Calibration ensures your multimeter reads zero correctly. Check the user manual for specific calibration steps. Usually, touch the two test leads together. The display should show zero or a very low number in continuity mode. If it does not, adjust the calibration knob or reset the device. Proper calibration avoids false readings and helps you trust the test results.

Credit: www.youtube.com
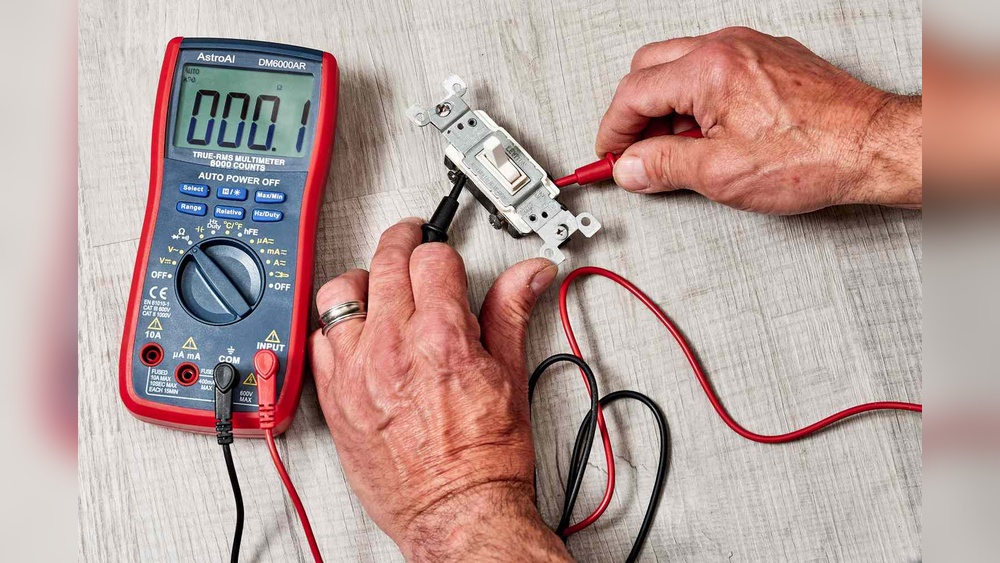
Testing The Light Switch
Testing a light switch with a multimeter helps find electrical problems safely. It shows if the switch works or needs replacement. This step is important before fixing or changing the switch.
Checking For Continuity
Turn off the power to the switch. Remove the switch cover carefully. Set the multimeter to the continuity mode. Touch the probes to the switch terminals. Press the switch on and off. A beep sound means the switch has continuity. No beep means the switch is broken.
Measuring Voltage
Turn the power back on for this test. Set the multimeter to measure AC voltage. Touch one probe to the live wire terminal. Touch the other probe to the neutral terminal. Read the voltage on the multimeter screen. A normal reading shows the switch gets power. No reading means no power reaches the switch.
Interpreting The Results
Continuity means the switch can pass electricity when on. No continuity means the switch is faulty. Voltage reading confirms power at the switch. No voltage means wiring or breaker issues. Use these results to decide the next step in repair.
Common Issues And Fixes
Light switches can stop working properly for different reasons. Some issues are simple to find and fix. Knowing common problems helps save time and keeps your home safe. Use a multimeter to check the switch’s condition before replacing it.
Identifying Faulty Switches
A faulty switch often causes lights to flicker or not turn on. Use the multimeter to test for continuity. Turn off power at the breaker first. Remove the switch cover and set the multimeter to the continuity setting. Place the probes on the switch terminals. If there is no beep or reading, the switch is bad.
Look for signs like cracks, burn marks, or loose wires. These confirm the switch needs replacement. A good switch shows a reading when toggled on and none when off.
Replacing The Switch Safely
Turn off the main power before starting. Use a voltage tester to ensure no electricity flows. Unscrew the switch from the wall box carefully. Note how the wires connect to the old switch. Disconnect wires and attach them to the new switch in the same way.
Secure the switch, replace the cover plate, and turn the power back on. Test the new switch with the multimeter or by turning the light on. Proper wiring and safety steps prevent electrical hazards. Always use tools with insulated handles.
Safety Tips
Working with electrical switches can be risky. Safety is the top priority when checking a light switch with a multimeter. Taking the right precautions helps prevent accidents and injuries. Follow these safety tips closely before starting your test.
Avoiding Electrical Hazards
Turn off the power at the circuit breaker first. Never trust the switch position alone to cut power. Use a non-contact voltage tester to confirm no electricity flows. Wear insulated gloves to protect your hands. Avoid touching metal parts of the multimeter probes. Stand on a dry surface to reduce shock risk. Keep tools and your work area dry and clean. Work in good light so you can see clearly. Never use a damaged or faulty multimeter.
When To Call A Professional
Do not test if you feel unsure or unsafe. Complex wiring or old switches may need expert help. If wires look damaged or burnt, stop immediately. A licensed electrician can diagnose and fix problems safely. Avoid guessing or forcing anything. Call a professional to prevent harm or damage.
Frequently Asked Questions
How Do I Test A Light Switch With A Multimeter?
To test a light switch, set your multimeter to continuity mode. Disconnect power, remove the switch cover, and touch probes to switch terminals. If the meter beeps or shows zero resistance, the switch is working properly.
What Multimeter Setting Is Best For Light Switch Testing?
Use the continuity setting or the lowest resistance (ohms) setting on your multimeter. These settings help detect if the switch allows electrical flow when turned on.
Can I Check A Light Switch Without Removing It?
It’s safer to remove the switch from the wall before testing. This prevents interference from wiring and ensures accurate multimeter readings.
Why Does My Multimeter Show No Reading On The Switch?
No reading usually means the switch is off or faulty. Confirm power is off, then test continuity across switch terminals to verify functionality.
Conclusion
Checking a light switch with a multimeter is simple and safe. Always turn off the power before starting. Use the multimeter to test for continuity and voltage. This helps find problems quickly. Understanding these steps saves time and avoids mistakes.
Now, you can confidently check switches at home. Practice a few times to get comfortable. This skill helps keep your electrical system working well. Easy to learn, useful for many situations. Give it a try and stay safe.