Have you ever wished you could control an outlet with a simple flip of a light switch? Imagine the convenience of turning your lamp, fan, or holiday lights on and off without bending down or unplugging cords.
Connecting an outlet to a light switch is easier than you might think—and it can make your daily routine smoother and safer. In this guide, you’ll discover step-by-step how to do it yourself, even if you’re not an expert. Keep reading, and soon you’ll have full control at your fingertips.

Credit: www.youtube.com
Tools And Materials Needed
Before starting to connect an outlet to a light switch, gather all necessary tools and materials. Having the right equipment makes the job easier and safer. This section breaks down the essential items needed for this task.
Basic Electrical Tools
You need a few simple tools to handle electrical work. A screwdriver set with flathead and Phillips heads is important for removing and securing screws. Wire strippers help remove insulation from wires without damaging them. A voltage tester checks if wires have power. Needle-nose pliers allow precise bending and gripping of wires. These tools form the basic kit for electrical connections.
Safety Gear
Protect yourself with proper safety gear. Insulated gloves prevent electric shocks. Safety goggles shield your eyes from sparks or debris. Wear rubber-soled shoes for extra insulation. Always turn off power at the breaker before starting. Safety gear reduces the risk of injury during wiring work.
Wiring Components
The right wiring parts are crucial for a secure connection. Use electrical wires suitable for your home’s voltage. Wire nuts help join wires safely. Outlet and switch boxes hold the devices firmly in place. Choose outlets and switches rated for the circuit load. Quality components ensure a reliable and long-lasting installation.
Safety Precautions
Safety is the top priority when connecting an outlet to a light switch. Taking the right precautions protects you from electric shock and damage. Always follow these safety steps before starting any electrical work. They help ensure a safe and smooth process.
Power Shutoff
Turn off the power at the main circuit breaker. Do not rely on the switch alone. Confirm the power is off for the area you will work on. This prevents accidental shocks and injuries. Double-check before touching any wires.
Testing For Live Wires
Use a voltage tester to check wires for electricity. Test each wire even after shutting off the power. This step confirms no current is flowing. Handle the tester carefully and follow the instructions. Never assume wires are safe without testing.
Proper Handling Of Tools
Use insulated tools made for electrical work. Keep your tools dry and in good condition. Hold tools by their handles only. Avoid touching metal parts to reduce shock risk. Store tools safely when not in use to prevent accidents.
Planning The Connection
Planning the connection between an outlet and a light switch is the first step. This stage sets the foundation for a safe and efficient installation. Understanding the electrical setup helps avoid mistakes and saves time. Careful planning ensures the circuit works correctly without overloading.
Start by examining the existing wiring and circuit types. Choose the right switch and outlet for your needs. Proper tools and materials are essential. Safety must be your top priority throughout the process.
Identifying Circuit Types
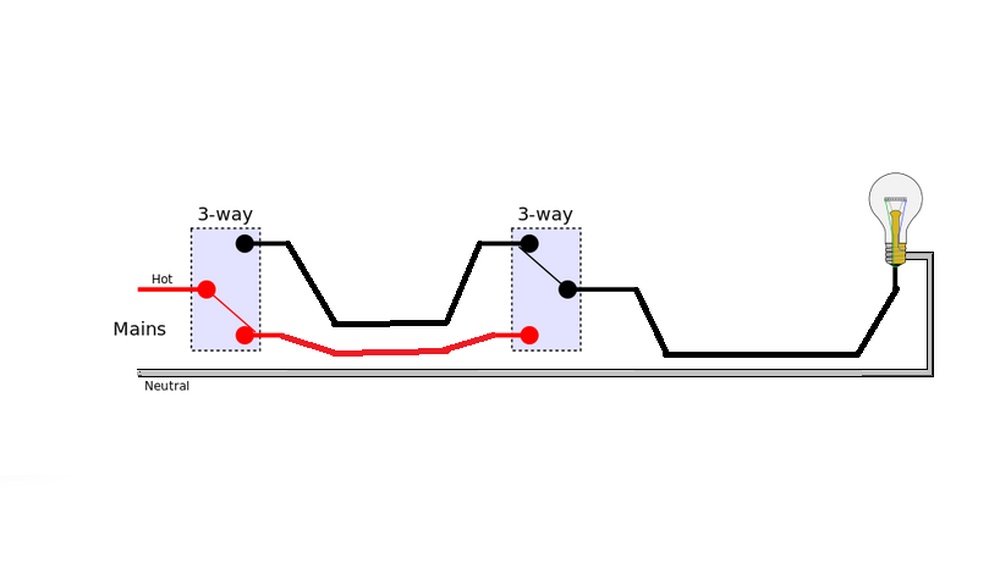
Identify the circuit type before starting. Most homes have either a single-pole or a three-way circuit. Single-pole circuits control one fixture from one switch. Three-way circuits allow control from two different switches.
Check if the circuit is dedicated or shared. Dedicated circuits power one device only. Shared circuits supply power to multiple devices. Knowing this prevents overloading and wiring errors.
Locating Existing Wiring
Find the current wiring before connecting the outlet to the switch. Use a voltage tester to check for live wires. Turn off the power at the breaker panel for safety. Trace wires from the switch to the outlet location.
Look inside the walls or switch boxes. Mark the wires’ colors and positions. This step helps connect wires correctly and avoid shorts or faults.
Choosing The Right Switch And Outlet
Select a switch that matches your needs. Standard switches control lights on or off. Dimmer switches adjust light brightness. Choose an outlet type that fits your devices.
Consider ground-fault circuit interrupter (GFCI) outlets for wet areas. Ensure the switch and outlet ratings match your circuit’s voltage and amperage. This choice guarantees safety and durability.
Wiring The Outlet To The Switch
Wiring an outlet to a light switch allows you to control the power to the outlet. This setup is useful for lamps or appliances you want to turn on and off easily. The process involves working with electrical wiring safely and correctly.
Follow these steps carefully to connect the outlet to the switch. Each step ensures a safe and secure connection.
Turning Off The Circuit Breaker
Always start by turning off the circuit breaker for the room you will work in. This step cuts power and prevents electric shock. Use a voltage tester to confirm the power is off before touching any wires.
Removing Existing Fixtures
Remove the outlet and switch covers using a screwdriver. Gently pull out the outlet and switch from the wall box. Take note of how the wires are connected before disconnecting them. This helps during the reconnection process.
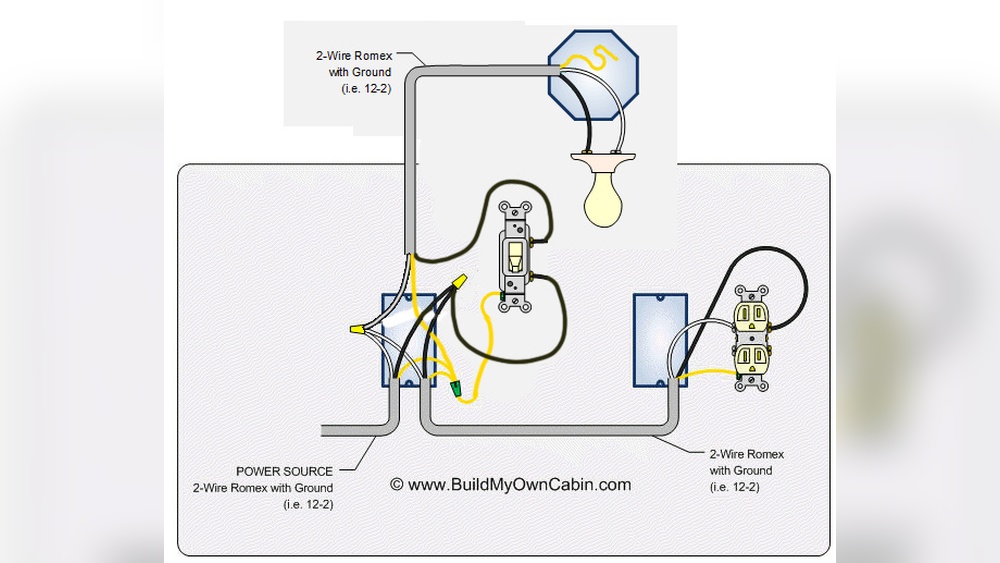
Connecting The Wires
Identify the black (hot), white (neutral), and green or bare copper (ground) wires. Connect the black wire from the power source to the switch’s input terminal. Then, connect another black wire from the switch’s output terminal to the outlet’s hot terminal. Attach the white wires together and connect the ground wires to the green screws on both devices.
Securing The Connections
Use wire nuts to secure all wire connections tightly. Wrap electrical tape around wire nuts for extra safety. Push the connected wires carefully back into the wall box. Screw the outlet and switch back into place and attach the cover plates.
Testing The Setup
Testing the setup is an important step after wiring an outlet to a light switch. This ensures everything works safely and correctly. You can confirm if the power flows as expected. Also, it helps spot wiring mistakes early. Follow these easy steps to check your work.
Restoring Power
Start by turning the circuit breaker back on. This restores electricity to the outlet and switch. Make sure no tools or wires touch live parts. Stand clear and switch on the power carefully. This step prepares your setup for testing.
Using A Voltage Tester
Use a voltage tester to check if the outlet and switch have power. Touch the tester probes to the outlet terminals. The tester lights up if power is present. Test the switch by flipping it on and off. This confirms the switch controls power correctly.
Verifying Switch And Outlet Functionality
Plug a small device like a lamp into the outlet. Turn the light switch on and off. The lamp should light up only when the switch is on. If it does, your wiring works. If not, double-check your connections before trying again.

Credit: www.do-it-yourself-help.com
Troubleshooting Common Issues
Troubleshooting common issues helps fix problems quickly. It saves time and avoids frustration. Many problems happen due to simple mistakes or loose parts. Understanding these issues makes the repair process easier. Below are some common problems and how to check them.
Outlet Not Working
Check if the circuit breaker is on. Sometimes it trips and cuts power to the outlet. Test the outlet with a device to confirm no power. Look for visible damage or burn marks on the outlet. Replace the outlet if it shows signs of wear or damage.
Switch Not Controlling Outlet
Ensure the switch is wired correctly to the outlet. The switch should break the power line to the outlet. Test the switch by turning it on and off while checking the outlet. A multimeter can help verify if the switch controls the power flow. Replace the switch if it does not work properly.
Loose Or Faulty Connections
Turn off power before touching wires. Loose wires cause intermittent power or no power. Tighten all wire connections securely. Look for corrosion or damaged wires. Replace any damaged wires or connectors. Proper connections improve safety and functionality.
Tips For A Professional Finish
Finishing the job with care makes a big difference. A neat and safe connection shows professionalism. It also helps future repairs or upgrades. Follow these tips for a clean, lasting setup.
Organizing Wires Neatly
Keep wires straight and separated. Avoid tangles and overlaps. Use wire ties to bundle cables. Leave enough slack for adjustments. Neat wiring prevents shorts and confusion.
Using Proper Electrical Boxes
Choose boxes that fit the outlet and switch. Use metal or plastic boxes rated for your setup. Secure boxes firmly to studs or walls. Proper boxes protect wires and reduce fire risk.
Labeling Circuits
Mark each wire clearly with labels or tags. Identify which circuit controls the outlet or switch. Labeling speeds up troubleshooting and repairs. It keeps your electrical system organized and safe.

Credit: www.youtube.com
Frequently Asked Questions
How Do I Wire An Outlet To A Light Switch Safely?
Turn off the power before starting. Connect the switch’s hot wire to the outlet’s hot terminal. Use a pigtail wire for proper grounding. Always follow local electrical codes and use appropriate tools to ensure safety.
Can I Control Multiple Outlets With One Switch?
Yes, you can control multiple outlets with one switch. Connect the switch to the hot wires of each outlet in parallel. Ensure the total load does not exceed the switch’s rating for safety and efficiency.
What Tools Are Needed To Connect An Outlet To A Switch?
You need a voltage tester, wire stripper, screwdriver, wire nuts, and electrical tape. These tools help ensure safe wiring, proper connections, and prevent electrical hazards when connecting an outlet to a switch.
Is It Necessary To Use A Gfci Outlet With A Switch?
Yes, use a GFCI outlet in areas prone to moisture. It prevents electrical shocks by cutting power during faults. Combining a GFCI with a switch enhances safety in kitchens, bathrooms, and outdoor spaces.
Conclusion
Connecting an outlet to a light switch can be simple with careful steps. Always turn off the power before starting work. Use the right tools and follow safety rules closely. Double-check your wiring to avoid mistakes. Taking your time helps prevent accidents.
This task saves you trips to an electrician and boosts your home skills. Remember, safety first and work patiently. You can complete this project confidently with these tips.