If your brake lights aren’t working properly, it’s more than just an annoyance—it’s a safety risk. Knowing how to fit a brake light switch can save you time and money while keeping you and others safe on the road.
You don’t need to be a car expert to handle this simple repair. In this guide, you’ll learn clear, step-by-step instructions that anyone can follow. By the end, you’ll have the confidence to fix your brake light switch quickly and get back on the road with peace of mind.
Keep reading to discover how easy it can be to solve this common issue yourself.
Tools And Materials Needed
Fitting a brake light switch requires the right tools and materials. Having these ready makes the job easier and faster. It ensures the switch works properly to keep you safe on the road.
Gather everything before you start. This prevents interruptions and helps you finish the task smoothly.
Basic Hand Tools
You will need simple hand tools like a screwdriver and pliers. A flathead and a Phillips screwdriver are often needed to remove panels and screws. Pliers help to grip and twist small parts.
Replacement Brake Light Switch
Choose the correct brake light switch for your car model. Check the part number or consult your vehicle manual. Using the right switch avoids fitting problems and ensures proper function.
Electrical Tape And Connectors
Electrical tape helps secure wires and prevent shorts. Connectors or wire terminals may be needed to join wires safely. Good connections avoid electrical faults and ensure the brake light works well.
Multimeter For Testing
A multimeter checks if the brake light switch works correctly. It measures voltage and continuity in the circuit. This tool helps find faults before finishing the installation.
Safety Gear
Wear gloves to protect your hands from sharp edges. Safety glasses shield your eyes from dust and debris. Safety gear keeps you safe during the fitting process.

Credit: www.youtube.com
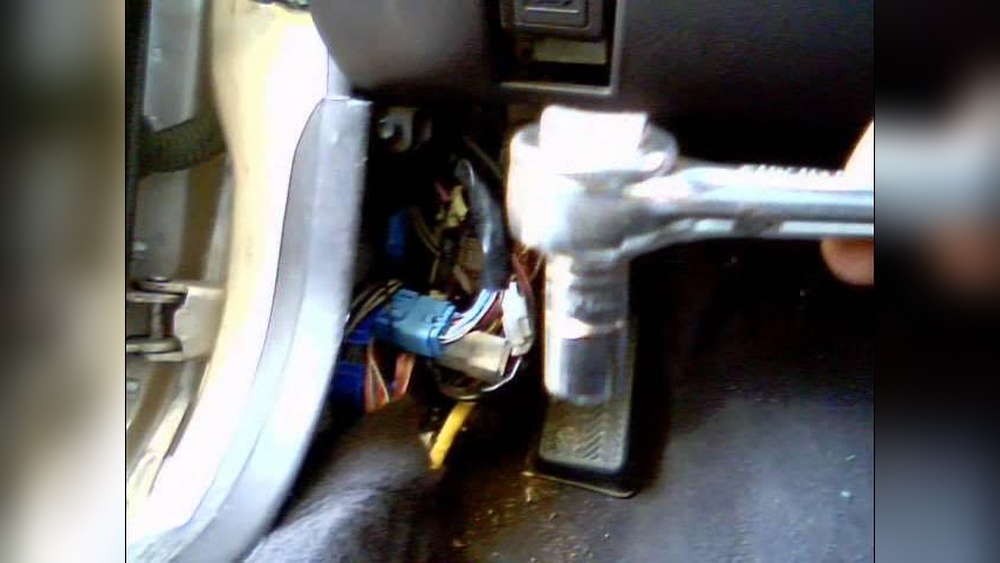
Locate The Brake Light Switch
Start by finding the brake light switch near the brake pedal. It usually sits where the pedal arm moves. Check for a small, rectangular part connected to the pedal.
Understanding The Brake Light Switch Location
The brake light switch is a small but crucial part of your car. It sends a signal to the brake lights to turn on when you press the brake pedal. Finding this switch is the first step to fitting a new one.
Usually, the brake light switch is near the brake pedal. It is attached to the pedal arm or the mounting bracket. This position helps it detect when the pedal moves.
Where To Look Under The Dashboard
Get under the dashboard on the driver’s side. The brake light switch is often near the top of the brake pedal arm. Look for a small cylindrical or rectangular part with wires connected.
Use a flashlight to see clearly. The area can be dark and tight. The switch may be held by clips or a bracket.
Signs Of The Brake Light Switch
The switch has electrical wires plugged into it. These wires connect to the car’s wiring harness. Usually, the switch is near the pedal spring or the pedal stop.
Sometimes, the switch has an adjustment screw or a button. This helps set the right pedal position for the brake lights to work properly.
Remove The Old Switch
Removing the old brake light switch is the first step. This part often sits near the brake pedal. It tells your car to light the brake lights when you press the pedal.
Take your time. Be careful not to damage any parts. Follow these steps to remove the old switch safely.
Look under the dashboard. Find the switch attached to the brake pedal arm. It usually has a small wire connected to it.
Disconnect The Electrical Connector
Press the tab on the connector. Pull it gently from the switch. Avoid pulling the wires directly to prevent damage.
Remove The Switch From The Mount
Turn the switch counterclockwise. It will unscrew from the bracket. Some models may have a clip instead of threads. Release it carefully.
Install The New Brake Light Switch
Installing the new brake light switch is a key step in your repair. This part controls the brake lights, so proper fitting is essential. Follow each step carefully to ensure the switch works correctly.
Position The Switch
Find the mounting point near the brake pedal. Align the new switch where the old one was removed. Make sure the switch plunger touches the brake pedal arm. Proper position allows the switch to activate with pedal movement.
Secure The Switch
Hold the switch firmly in place. Use screws or clips to fasten it tightly. Avoid over-tightening to prevent damage. The switch should not move or wiggle after securing.
Reconnect Wiring
Attach the electrical connector to the switch terminals. Push the connector until it clicks. Check for a firm connection to prevent loose wiring. Proper wiring ensures the brake lights will turn on.
Adjust The Switch Alignment
Adjusting the brake light switch alignment is a key step for proper brake function. The switch must activate exactly when you press the brake pedal. Misalignment can cause brake lights to stay on or not light up at all. Careful adjustment ensures safety on the road and avoids electrical issues.
Find the brake light switch near the top of the brake pedal arm. It is usually attached to a bracket or the pedal assembly. Identify the switch body and the plunger that moves with the pedal.
Check The Switch Position
Press the brake pedal gently. The switch plunger should move in and out smoothly. The switch must be close enough to the pedal arm to press when the pedal is released.
Adjust The Switch Height
Loosen the mounting nut or screws holding the switch. Slide the switch up or down to align the plunger with the pedal arm. Tighten the mounting hardware securely after adjustment.
Have someone press the brake pedal while you watch the rear brake lights. The lights must turn on immediately when the pedal is pressed. Adjust the switch again if the lights delay or stay on continuously.

Credit: forums.pelicanparts.com
Test The Brake Lights
Testing the brake lights is a crucial step after fitting a brake light switch. It ensures the switch works correctly and the lights respond instantly. Faulty brake lights can cause accidents or legal trouble.
Testing is simple and takes only a few minutes. It helps you confirm the installation is correct and the switch activates the brake lights properly. Follow these steps carefully for a safe and effective test.
Gather Necessary Tools
Prepare a few tools before starting the test. You need a helper or a reflective surface like a garage door. A multimeter can help check electrical connections if needed. Keep these ready to avoid delays.
Check The Brake Light Activation
Press the brake pedal gently. Watch the brake lights at the rear of the vehicle. Ask someone to observe or use a mirror. The lights should turn on immediately when the pedal is pressed.
Inspect Light Response Time
The brake lights must switch on quickly. A delay can confuse other drivers. Press and release the pedal several times. Check the lights turn on and off without lag.
Use A Multimeter For Electrical Testing
Set the multimeter to measure voltage. Connect the probes to the brake light switch terminals. Press the brake pedal and watch the reading. Voltage should show only when the pedal is pressed.
Fix Issues If Lights Don’t Work
Check the switch connection and wiring first. Look for loose wires or corrosion. Adjust the switch position if the lights stay on or off. Replace the switch if problems continue.
Troubleshooting Common Issues
Troubleshooting common issues with a brake light switch can save time and money. Problems often arise after installation. Identifying the cause helps fix the issue quickly. This section covers three typical problems and how to solve them.
Brake Lights Not Turning On
Check the brake light switch connection first. Loose or broken wires stop the lights from working. Test the switch with a multimeter for continuity. Replace the switch if it shows no signal. Also, inspect the brake light bulbs. Burnt-out bulbs can mimic switch problems.
Brake Lights Staying On
This issue often means the switch is stuck or damaged. Dirt or debris may block the switch from resetting. Clean the switch and the surrounding area carefully. Make sure the switch plunger moves freely. Adjust or replace the switch if it remains pressed.
Switch Misalignment
The switch must align perfectly with the brake pedal. Misalignment causes erratic light behavior. Loosen the mounting bracket and reposition the switch. Test the pedal action to ensure the switch triggers at the right moment. Tighten the bracket once aligned correctly.
Credit: www.oznium.com
Safety Tips During Installation
Installing a brake light switch is a task that requires care. Safety is the top priority during the process. Taking the right steps can prevent injury and damage. Follow these safety tips to ensure a smooth and safe installation.
Turn Off The Vehicle Power
Always disconnect the car battery before starting. This stops electric shocks and short circuits. Work in a safe, powered-down environment.
Use Proper Tools
Use tools made for automotive work. Avoid makeshift or broken tools. Proper tools help you avoid slipping and damaging parts.
Wear Protective Gear
Wear gloves to protect your hands from sharp edges. Use safety glasses to shield your eyes. Protection reduces the chance of injury.
Work In A Well-lit Area
Good lighting helps you see small parts clearly. It lowers the risk of mistakes. Choose a bright place or use extra lamps.
Follow The Vehicle Manual
Read the car’s manual before starting. Follow the exact instructions for your model. Manuals guide you through safe and correct steps.
Check For Loose Wires
Inspect wiring before reconnecting the battery. Secure any loose wires to avoid sparks. Proper wiring prevents electrical hazards.
Frequently Asked Questions
What Tools Are Needed To Fit A Brake Light Switch?
You need a wrench, screwdriver, and multimeter to fit a brake light switch. These tools help remove the old switch and install the new one accurately.
How To Identify A Faulty Brake Light Switch?
Check if brake lights don’t turn on or stay on constantly. Also, test continuity with a multimeter to confirm if the switch is faulty.
Can I Fit A Brake Light Switch Myself?
Yes, you can fit it yourself with basic tools and safety precautions. Follow the vehicle manual and disconnect the battery before starting.
How To Adjust The Brake Light Switch Properly?
Adjust the switch so it activates when the brake pedal is slightly pressed. Proper adjustment ensures brake lights respond correctly for safety.
Conclusion
Fitting a brake light switch is simple with clear steps. Check your vehicle’s manual before starting the job. Make sure the switch fits tightly and connects well. Test the brake lights after installation to ensure safety. Proper brake light function helps avoid accidents and traffic tickets.
Take your time and follow the guide carefully. You can save money by doing this yourself. Stay safe on the road with working brake lights.