Are you tired of searching for a nearby outlet every time you need to plug in your device? What if you could simply add an outlet right next to your light switch?
It’s easier than you think, and it can save you time and hassle. In this guide, you’ll learn step-by-step how to add an outlet to a light switch safely and quickly. By the end, you’ll have a new power source exactly where you need it—making your space more convenient and functional.
Keep reading to find out how!

Credit: www.do-it-yourself-help.com
Tools And Materials Needed
Before starting to add an outlet to a light switch, gather all tools and materials. Having everything ready makes the work faster and safer. This section covers what you need for the job.
Essential Tools
- Screwdriver set – flathead and Phillips
- Wire stripper and cutter
- Voltage tester to check power
- Drill with bits for wall work
- Measuring tape for precise cuts
- Fish tape to pull wires through walls
- Utility knife for insulation trimming
Required Materials
- Electrical outlet (matching your home’s voltage)
- Outlet box for mounting
- Romex electrical wire, correct gauge
- Wire nuts for secure connections
- Electrical tape for insulation
- Wall plates to cover outlet
- Wire staples to fix wires in place
Safety Gear
- Insulated gloves to protect from shocks
- Safety glasses to shield eyes
- Dust mask for wall dust
- Non-conductive footwear
- Flashlight or headlamp for clear vision
Credit: www.reddit.com
Safety Precautions
Safety is the top priority when adding an outlet to a light switch. Electrical work can be risky without the right steps. Follow these precautions carefully to avoid shocks and accidents.
Turning Off Power
Always switch off the power at the circuit breaker. Do not rely on the light switch alone. This stops electricity from flowing to the wires you will work on. Confirm the breaker is off before starting.
Testing For Live Wires
Use a voltage tester or multimeter to check wires. Touch the tool to each wire to see if electricity is present. Never assume wires are safe. Test all wires before handling them.
Using Insulated Tools
Use tools with insulated handles to protect against shocks. Insulation blocks electricity from passing through the tool to your hand. Avoid metal tools without insulation. Always hold tools by their insulated parts.
Planning The Outlet Addition
Planning the outlet addition is a key step before starting any electrical work. It helps ensure safety and efficiency. Careful planning prevents mistakes and costly fixes later. You will save time by preparing well. This section guides you through important planning tasks.
Choosing Outlet Location
Select a spot near the light switch box for easy wiring. Avoid areas with water or heat sources. Make sure the location is convenient for device use. Check the wall space for studs and obstacles. The outlet should be at a comfortable height for plugging in devices.
Checking Electrical Load
Know the total power the circuit can handle. Add the load of the existing light switch and new outlet. Avoid overloading the circuit to prevent tripped breakers or fire risks. Use a circuit tester or consult a professional if unsure. Balancing the load keeps your home safe.
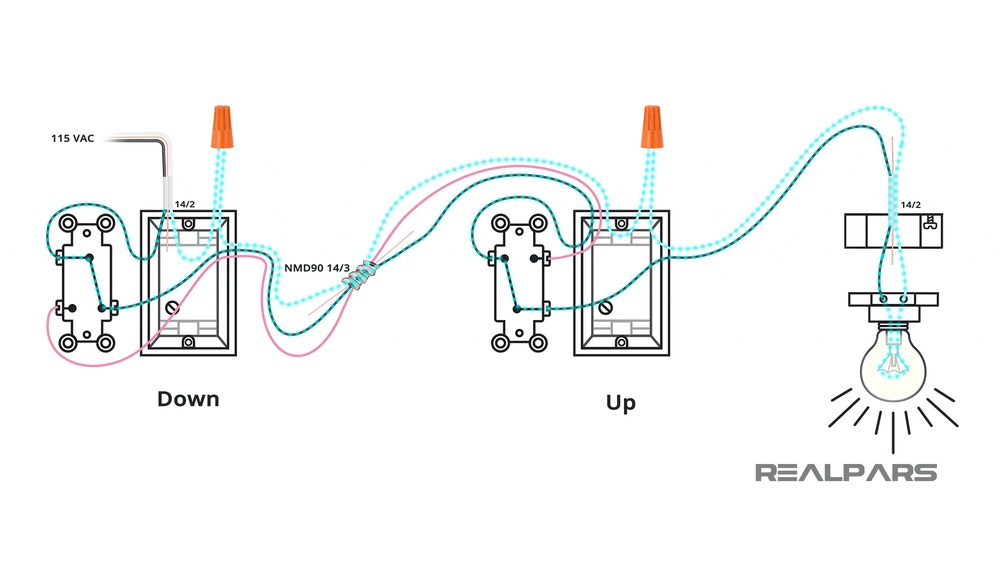
Understanding Wiring Layout
Study the wiring in the light switch box before adding the outlet. Identify the hot, neutral, and ground wires. Know how the switch controls the light. Plan how to connect the outlet without disrupting the switch function. Proper wiring layout avoids electrical faults and ensures code compliance.
Removing The Light Switch Cover
Removing the light switch cover is the first step in adding an outlet to a light switch. This step lets you see the wires behind the switch. You must be careful and gentle to avoid damage.
Turn off the power at the circuit breaker before starting. Safety is very important when working with electricity.
Unscrewing The Cover Plate
Use a screwdriver to remove the screws holding the cover plate. Most covers have two screws, one at the top and one at the bottom. Keep the screws safe for later use. Gently pull the cover plate away from the wall. Sometimes, the plate might stick slightly. Avoid forcing it to prevent cracks.
Exposing The Wiring
After removing the cover plate, you see the light switch and wires. Check the wires for any damage or wear. Take note of how the wires connect to the switch. This helps when adding the new outlet. Do not touch the wires until you confirm the power is off. Use a voltage tester to be sure.
Wiring The Outlet
Wiring the outlet is the key step in adding power to your new socket. This task needs care and focus to ensure safety and proper function. Understanding the wires and connecting them correctly is essential. Follow each step carefully for the best results.
Identifying Wires
First, find the wires inside the box. Usually, you will see three types: hot, neutral, and ground. The hot wire is often black or red. The neutral wire is white. The ground wire is green or bare copper. Use a voltage tester to confirm the hot wire. This helps avoid mistakes and keeps you safe.
Connecting Hot, Neutral, And Ground
Next, connect the wires to the outlet terminals. Attach the hot wire to the brass or gold screw. Connect the neutral wire to the silver screw. Finally, attach the ground wire to the green screw. Tighten all screws firmly. Proper connections stop sparks and electrical issues.
Using Wire Nuts And Electrical Tape
Use wire nuts to join wires securely. Twist the wires together before adding the nut. This holds them tight and prevents loose ends. Wrap electrical tape around the wire nuts for extra safety. Tape protects the connections and keeps wires from slipping. Double-check all connections before closing the box.
Installing The Outlet Box
Installing the outlet box is the next step after planning your new outlet near the light switch. The box holds the outlet securely and protects the wires inside. Choosing and mounting the right box ensures safety and a neat finish.
Selecting The Right Box
Pick a box that fits the wall type and space available. Plastic boxes are common and easy to work with. Metal boxes offer extra durability and are best for older homes with metal wiring. Make sure the box is deep enough for the wires and outlet.
Mounting The Box Securely
Mark the spot on the wall where you want the outlet. Cut the wall carefully to fit the box size. Insert the box and use screws or clamps to fix it tightly. The box should sit flush with the wall surface. A secure box keeps the outlet stable and safe to use.
Mounting The Outlet
Mounting the outlet is a key step in adding a new power source to your light switch. It ensures the outlet stays secure and works safely. Follow these simple steps to attach the outlet properly and cover it neatly.
Attaching Outlet To Box
First, place the outlet into the electrical box carefully. Align the screw holes of the outlet with those in the box. Use a screwdriver to tighten the screws firmly. Do not over-tighten to avoid cracking the outlet. Make sure the outlet sits flush with the wall. This keeps the outlet stable and ready for use.
Securing Outlet Cover
Next, position the outlet cover over the outlet. The cover protects the wires and gives a clean look. Insert the cover screws into the holes on the outlet. Tighten the screws evenly to avoid tilting the cover. Check that the cover fits snugly against the wall. A well-secured cover adds safety and finishes the installation.
Testing The New Outlet
Testing the new outlet is an important step after installation. It ensures safety and proper function. This section shows how to check the outlet correctly. Follow each step carefully to avoid any risks.
Restoring Power
First, turn the power back on at the circuit breaker. Check the switch that controls the outlet. Make sure the switch is in the ON position. This allows electricity to flow to the outlet. Be cautious and do not touch wires while restoring power.
Using A Voltage Tester
Use a voltage tester to check if the outlet works. Insert the tester probes into the outlet slots. The tester lights up or beeps if power is present. Test both slots and the ground hole for safety. This confirms the outlet is properly wired and live.
Troubleshooting Common Issues
If the outlet does not have power, check the connections again. Loose wires often cause problems. Tighten all screws and ensure wires are in the right place. Verify the circuit breaker did not trip. Replace the outlet if it still does not work.

Credit: diy.stackexchange.com
Frequently Asked Questions
How Do I Add An Outlet To A Light Switch Box?
To add an outlet, first turn off the power. Then, run a new cable from the switch box to the outlet location. Connect the wires properly, matching hot, neutral, and ground. Finally, install the outlet and switch, then restore power and test.
Can I Install An Outlet Next To A Light Switch?
Yes, you can install an outlet next to a switch if the electrical box is large enough. Ensure the box can accommodate the additional wiring and devices. Follow local electrical codes and safety guidelines for proper installation.
What Tools Are Needed To Add An Outlet To A Switch?
You will need a voltage tester, wire stripper, screwdriver, drill, electrical tape, and wire nuts. These tools help safely cut, strip, and connect wires, test power, and secure the outlet and switch in place.
Is It Safe To Add An Outlet To An Existing Switch Circuit?
Yes, it is safe if done correctly. Turn off power at the breaker, use proper wiring methods, and ensure connections are secure. Follow local electrical codes or consult a professional electrician for safety and compliance.
Conclusion
Adding an outlet to a light switch can be simple and useful. Follow safety steps and use the right tools. Take your time and check all connections carefully. This small change can make your space more functional. Always turn off power before starting any work.
If unsure, ask a professional for help. This guide helps you add an outlet safely and clearly. Now you can power more devices with ease.