Have you noticed your old house floor sagging or feeling uneven? This can be more than just an eyesore—it might be a sign that your floor needs to be jacked up to restore its strength and stability.
But how do you do this safely and effectively without causing more damage? You’ll discover simple, step-by-step guidance on how to jack up the floor in your old house. By the end, you’ll feel confident to tackle this project and bring your floors back to solid, level ground.
Keep reading to learn the secrets that can save you time, money, and stress.
Credit: taylorjacob.com
Assess Floor Conditions
Before you start jacking up the floor in an old house, assess the floor conditions carefully. This step helps you understand the problems and plan the repair work. Checking the floor’s current state also keeps the project safe and effective.
Pay close attention to the structure beneath the floor. Look for signs of damage and measure how much the floor level varies. These details guide you on how to lift the floor properly.
Check For Sagging And Damage
Look closely at the floor surface for sagging areas. Sagging shows where the floor has weakened over time. Also, inspect for cracks, rot, or insect damage. These signs tell you which parts need support or replacement.
Identify Floor Joists
Find the floor joists under the floor. Joists are long wooden beams that hold the floor up. Knowing their location helps you place jacks correctly. Use a stud finder or tap on the floor to locate them.
Measure Floor Level Differences
Check how much the floor level changes across the room. Use a level or a laser level tool for accuracy. Mark the high and low points. This measurement helps you plan how much to lift each area.
Gather Necessary Tools
Gathering the right tools is the first step to jack up the floor in an old house. The correct equipment makes the job easier and safer. Without proper tools, you risk damaging the floor or hurting yourself. Prepare everything before starting the work to avoid delays and frustration.
List Essential Equipment
Start with a strong hydraulic floor jack. It lifts heavy floor sections smoothly. Use sturdy wooden blocks to support the floor once lifted. A pry bar helps to loosen floorboards carefully. Have a tape measure to check the height and level. Keep a hammer and nails ready for minor fixes. A flashlight can reveal hidden problems under the floor. These tools are must-haves to complete the job well.
Safety Gear To Use
Protect your eyes with safety goggles from dust and debris. Wear thick gloves to avoid splinters and cuts. Use a dust mask to stop inhaling old dust and mold. Steel-toe boots protect feet from falling objects. Knee pads make working on hard floors more comfortable. Dress in long sleeves and pants to shield your skin. Safety gear helps prevent injuries and keeps you safe.
Prepare The Work Area
Preparing the work area is a crucial first step in jacking up the floor of an old house. A clean and protected space helps avoid accidents and damage. It makes the job smoother and safer.
Take time to organize the room and shield nearby surfaces. This preparation saves effort and repairs later.
Clear The Room
Remove all furniture and items from the room. Empty shelves, closets, and corners as well. This gives you plenty of space to work freely.
Clear floors prevent tripping hazards. They also stop damage to your belongings.
Use sturdy boxes or plastic bins to store smaller items. Label them for easy finding after the job.
Protect Surrounding Surfaces
Cover walls, baseboards, and floors near the work area. Use drop cloths or old sheets to shield these surfaces.
Secure coverings with painter’s tape to keep them in place. This guards against dust, dirt, and accidental scratches.
Pay special attention to delicate or painted surfaces. Protecting them avoids costly repairs later on.
Support The Floor Joists
Supporting the floor joists is a key step in jacking up an old house floor. Proper support keeps the structure safe and stable. Without strong support, the floor can shift or collapse during the process.
This section explains how to locate joist positions and install temporary supports. Follow these steps carefully to protect your home and yourself.
Locate And Mark Joist Positions
Start by finding the floor joists under the floorboards. Joists run parallel and provide support to the floor. Use a stud finder or tap the floor to hear solid wood sounds. Mark the joist locations on the floor with chalk or pencil. Accurate marks help place jacks and supports in the right spots.
Install Temporary Supports
Place strong temporary supports under each marked joist. Use adjustable steel columns or sturdy wooden posts. Position supports close to the joists to hold the weight evenly. Check that each support stands firm and straight. This setup keeps the floor steady during lifting.
Lift The Floor Safely
Lifting the floor in an old house takes care and attention. Safety is the top priority. This process needs the right tools and steady work. Avoid rushing or forcing the floor up too fast. Doing it safely stops damage and keeps everyone protected.
Use Floor Jacks Correctly
Choose strong floor jacks made for lifting house floors. Place jacks on solid ground or sturdy blocks. Position each jack under key support points like beams or joists. Turn the jack handle slowly to lift. Check the floor and jack often for shifts or cracks. Never lift from weak spots or drywall.
Raise Floor Gradually
Lift the floor little by little, about a quarter inch at a time. Pause between lifts to let the structure settle. Watch for signs of stress in wood or nails. Slow lifting prevents cracks and keeps beams steady. Repeat the process until the floor reaches the desired height.

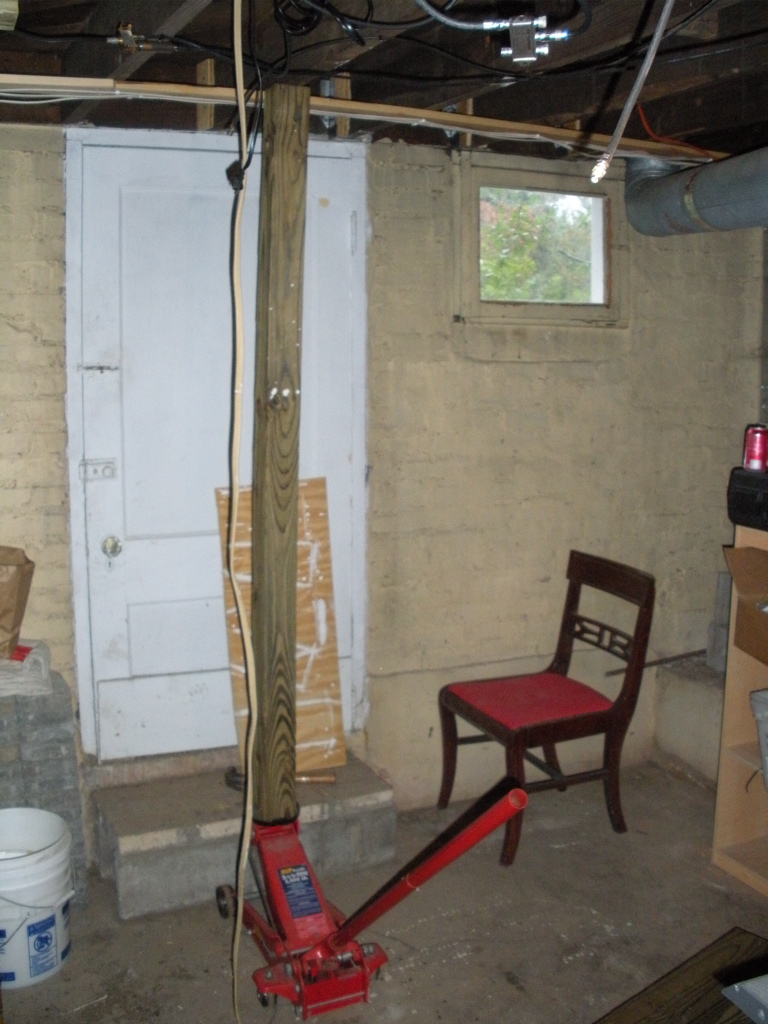
Credit: www.youtube.com
Secure Raised Floor
Securing the raised floor is a crucial step after lifting an old house floor. This step ensures the floor stays stable and safe for use. Without proper support, the floor can shift or sink again. Careful installation of permanent supports makes the floor solid and reliable.
Take time to check the floor level again after installing supports. Small adjustments may be necessary to keep the floor even. This process guarantees a smooth and steady surface that lasts for years.
Install Permanent Supports
Start by placing strong beams or posts under the raised floor. Use treated wood or steel for long-lasting support. Position these supports at regular intervals to spread the weight evenly. Secure them firmly to the foundation and floor joists. Make sure each support stands straight and tight. This prevents any movement or settling over time.
Check Floor Level Again
Use a level tool to test the floor height across the entire area. Check corners, sides, and the center for evenness. Mark any spots that are higher or lower than others. Adjust the supports by tightening or adding shims as needed. Repeat the leveling check until the floor is flat and steady. A well-leveled floor improves comfort and protects walls and furniture.
Repair And Reinforce
Repairing and reinforcing the floor is a key step in jacking up an old house. Over time, wooden joists can weaken or get damaged. Fixing these parts strengthens the floor and prevents future problems. Careful repair helps the house stay stable and safe.
Sometimes, fixing old joists is not enough. Adding extra support can make the floor stronger. This support comes from sister joists, which are added next to the old beams. Together, they carry the weight better and last longer.
Fix Damaged Joists
Start by checking all joists for cracks or rot. Use a flashlight to see dark spots or splits in the wood. Remove any soft or broken parts carefully. Replace damaged sections with new wood that matches the size of the old joists. Secure the new pieces with nails or screws to hold them tight. This repair stops the damage from spreading and makes the floor safe again.
Add Sister Joists If Needed
Measure the length of the damaged joist to find the right size for the sister joist. Cut a new joist to match this length. Place the sister joist right next to the old one. Use wood glue and screws to join them firmly. This doubles the support and reduces floor bounce. Sister joists work well when joists are too weak to hold weight alone.
Final Checks
After jacking up the floor in an old house, final checks are essential. These checks ensure safety and long-lasting results. Skipping this step can cause issues later.
Inspect For Stability
Check every support beam and jack for firmness. Gently shake the floor to detect any movement. Look for cracks or gaps in the foundation. Make sure all jacks are tight and secure. Stability means the floor will stay level and safe.
Clean Up Work Area
Remove all tools and debris from the floor space. Sweep dust and dirt thoroughly to avoid slipping. Organize leftover materials for future use or disposal. A clean area helps prevent accidents. It also makes the space ready for the next step.

Credit: oldhousecrazy.com
Frequently Asked Questions
How Do You Safely Jack Up An Old House Floor?
Start by placing strong support beams under key floor areas. Use hydraulic jacks carefully to lift slowly. Ensure temporary supports hold the weight. Work incrementally to avoid damage. Safety gear and expert help are recommended for stability and injury prevention.
What Tools Are Needed To Jack Up An Old Floor?
You need hydraulic jacks, support beams, a jack stand, and a level. Also, use pry bars, a measuring tape, and protective gear. These tools help lift, stabilize, and measure the floor accurately during the process.
How To Prevent Damage When Jacking Up A Floor?
Lift slowly and evenly to avoid structural strain. Use sturdy support beams and check for cracks. Monitor the floor’s movement constantly. Avoid rushing to reduce risk of damage or collapse during lifting.
When Should You Consider Jacking Up An Old Floor?
Consider jacking up when floors sag, have uneven spots, or show signs of rot. It’s essential before major repairs or foundation work. Early intervention prevents further structural damage and maintains safety.
Conclusion
Raising the floor in an old house takes care and patience. Follow each step carefully for safety and success. Use strong tools and check your work often. Small fixes now can stop big problems later. You can make your old floor level and sturdy again.
Keep your home safe and comfortable. Take your time and do it right. Your effort will pay off in a solid floor.