Want to change the keys to your Kwikset Smart Key deadbolt without calling a locksmith? You’re in the right place.
Rekeying your lock yourself saves time and money, and gives you control over your home’s security. In this guide, you’ll learn simple, step-by-step instructions that anyone can follow—even if you’ve never done it before. By the end, you’ll have a fresh key that works perfectly with your deadbolt, keeping your home safe and giving you peace of mind.
Ready to take charge? Let’s get started!
Credit: www.homedepot.com
Tools Needed
Rekeying a Kwikset Smart Key Deadbolt requires a few simple tools. These tools help you change the lock’s pins to work with a new key. Having the right tools makes the process easier and faster.
Most tools are easy to find at home or a local hardware store. Prepare them before starting to avoid interruptions. Here are the essential tools needed for rekeying your Kwikset Smart Key Deadbolt.
Flathead Screwdriver
A flathead screwdriver helps remove the screws from the lock. It is useful to open the lock cover carefully. Choose a screwdriver that fits the screws well to prevent damage.
Kwikset Rekey Tool
The Kwikset rekey tool is designed for this specific lock. It helps pull out the lock pins safely. You can buy this tool online or at hardware stores. Using this tool makes rekeying much simpler.
New Kwikset Smart Key
You need a new Kwikset Smart Key to set your lock. This key will work with the rekeyed lock pins. Make sure the key matches your lock model for a perfect fit.
Small Container
A small container keeps the lock pins safe during rekeying. It prevents losing tiny parts. Use a clean container to organize all pieces while working.
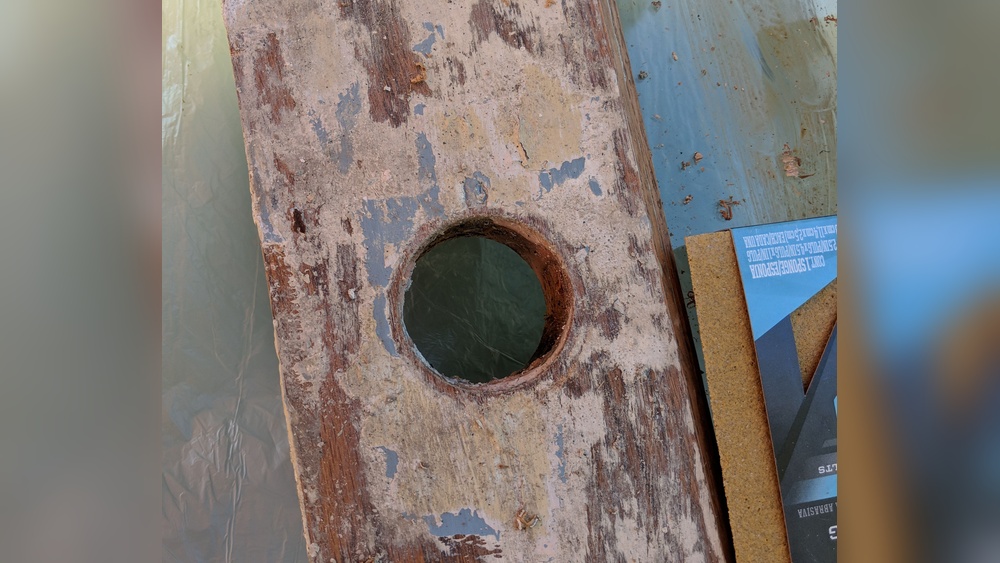
Remove The Deadbolt
Removing the deadbolt is the first step in rekeying a Kwikset Smart Key deadbolt. This step gives you access to the internal parts. Handle the pieces carefully to avoid damage. Follow the steps below to remove the deadbolt safely and easily.
Gather The Necessary Tools
Prepare a screwdriver, usually a Phillips head. Have a flat tool ready to help pry if needed. Clear a workspace to place the removed parts.
Unscrew The Interior Plate
Open the door for easy access. Find the screws on the interior side of the deadbolt. Use the screwdriver to remove all screws. Keep screws safe for reassembly.
Remove The Interior Assembly
Gently pull the interior plate away from the door. The assembly may be snug, so pull slowly. Avoid forcing it to prevent damage.
Take Out The Deadbolt Mechanism
Look inside the door edge for the deadbolt. Slide the deadbolt mechanism out carefully. Set it aside on your workspace.
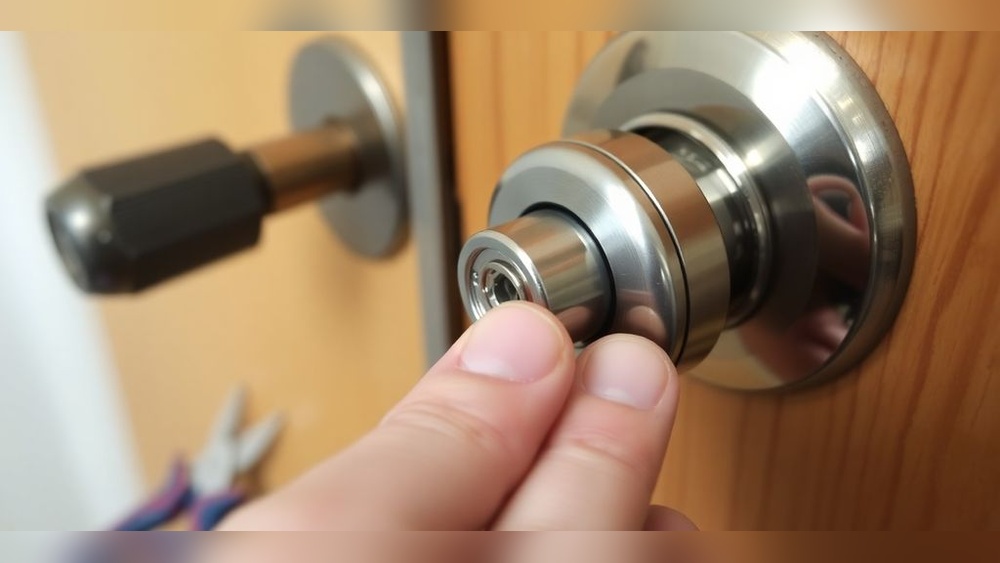
Locate The Smart Key Cylinder
Finding the Smart Key cylinder is the first step in rekeying your Kwikset Smart Key deadbolt. This part holds the keyhole and is essential for the rekey process. Knowing its exact location makes the job easier and faster.
The Smart Key cylinder looks like a small round piece on the outside of your door. It is where you insert your key to lock or unlock. Identifying it correctly helps avoid mistakes during rekeying.
Check The Exterior Side Of The Door
Look at the side of the door that faces outside. The Smart Key cylinder is usually placed there. It is a round component with a small keyhole in the center.
Do not confuse it with the thumb turn on the inside of the door. The cylinder is only on the outside side.
Identify The Keyhole Shape
The Smart Key cylinder has a unique keyhole shape. It is different from traditional locks. This shape helps you confirm you found the right part.
Look closely at the keyhole. It has a small rectangular slot with a rounded bottom. This slot fits the Kwikset Smart Key.
Note The Cylinder’s Position
The cylinder sits in the middle of the deadbolt assembly. It is centered vertically on the door. This position helps with smooth key insertion and turning.
Remember this spot. It will guide you through the rekeying steps ahead.
Credit: www.kwikset.com
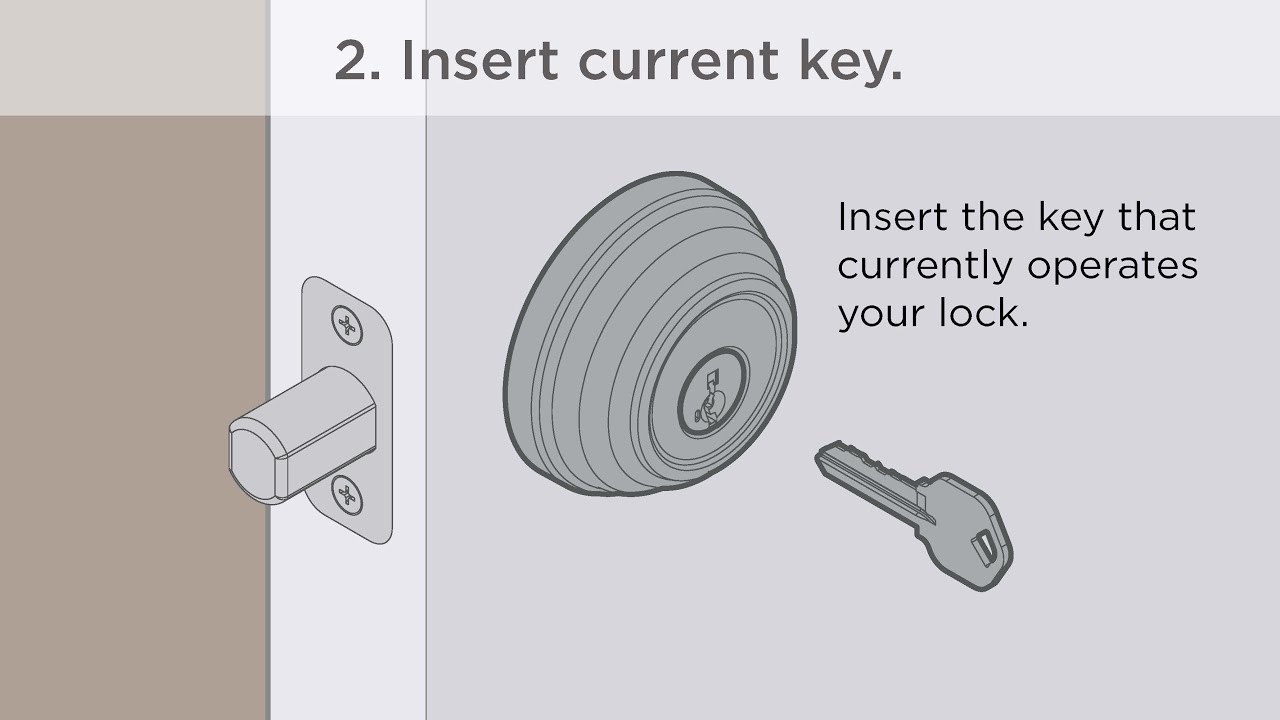
Insert The Current Key
Inserting the current key is the first important step in rekeying your Kwikset Smart Key deadbolt. This step prepares the lock for changes and ensures the process goes smoothly.
Make sure you have the correct key that fits the lock. Without the right key, you cannot proceed to rekey the deadbolt. The key must slide in easily and turn without force.
Locate The Keyhole
Find the keyhole on the deadbolt’s exterior side. It is usually below the thumb turn or knob. This is where you will insert the current key.
Insert The Key Fully
Insert the key all the way into the keyhole. Push it gently but firmly until it cannot go in further. This ensures the lock is ready for the next step.
Turn The Key To Unlock Position
Turn the key to the unlock position. This usually means turning it clockwise. The lock must be in the unlocked state for rekeying to work.
Keep The Key Steady
Hold the key steady in the unlock position. Do not remove or move it while you work on the lock. This keeps the lock’s pins aligned properly.
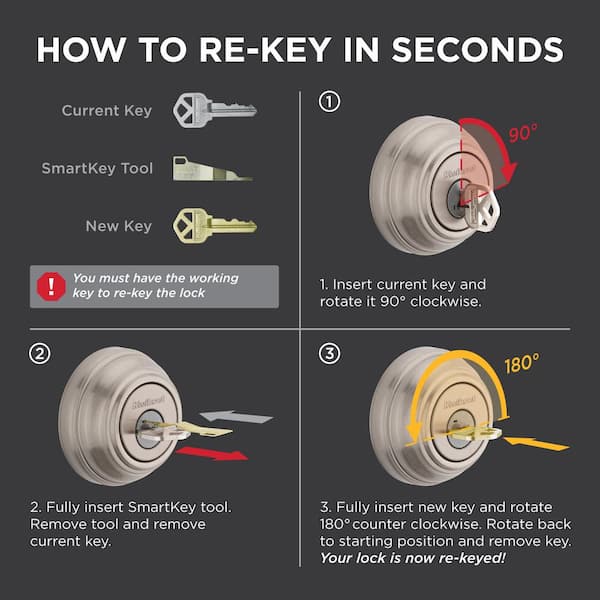
Use The Smart Key Tool
The Smart Key Tool is essential for rekeying a Kwikset Smart Key deadbolt. It helps reset the lock quickly and safely. This tool fits into the lock and allows you to change the key without removing the lock.
Using the Smart Key Tool makes the process easier and faster. You do not need special skills or extra tools. Just follow simple steps to use it correctly.
Insert The Smart Key Tool
Hold the Smart Key Tool and insert it into the small hole on the side of the lock. Push it gently but firmly until it clicks. This unlocks the lock’s rekeying mechanism.
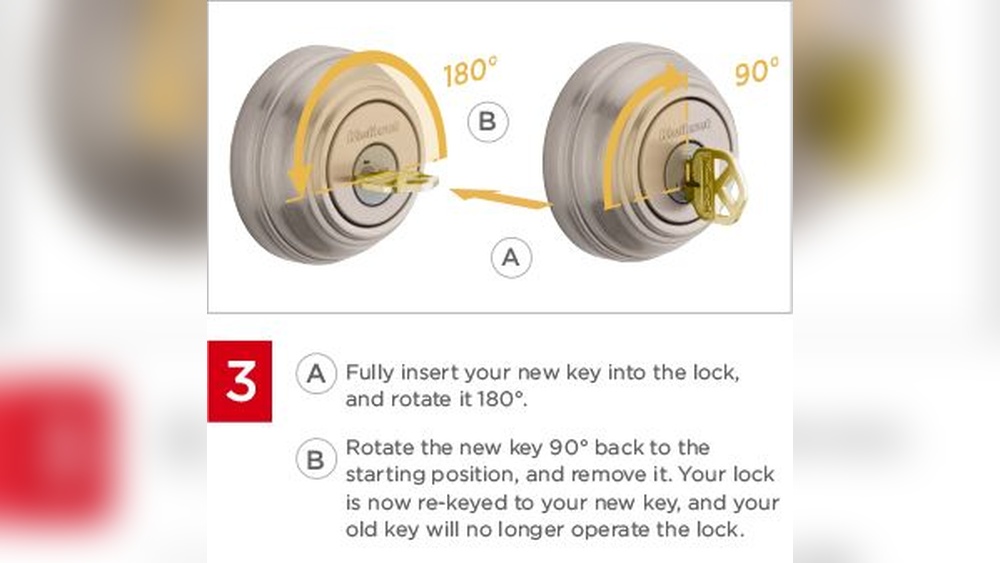
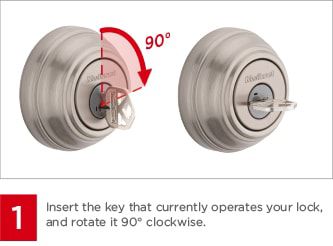
Turn The Tool To Reset
Once inserted, turn the Smart Key Tool 90 degrees. This action resets the lock pins inside. The lock is now ready to accept a new key.
Remove The Tool And Insert New Key
Take out the Smart Key Tool carefully. Then, insert the new key fully into the lock. Turn the key to complete the rekeying process.
Remove The Cylinder
Removing the cylinder is the first step in rekeying a Kwikset Smart Key deadbolt. The cylinder holds the pins and springs that control the lock’s key pattern. Taking it out carefully allows you to change the pins inside. Follow these clear steps to remove the cylinder safely.
Prepare The Lock For Cylinder Removal
Start by making sure the lock is in the unlocked position. Use the original key to turn the cylinder fully to the open side. This aligns the internal parts for easy removal.
Remove The Screws Holding The Lock
Locate the screws on the interior side of the door. Use a screwdriver to take them out. Keep the screws in a safe place for later use.
Pull Out The Cylinder Carefully
Gently pull the cylinder out from the door’s exterior side. Avoid forcing it. If it resists, check if the key is fully turned and try again.
Set The Cylinder On A Clean Surface
Place the removed cylinder on a flat, clean surface. This prevents dirt from entering. It also makes the next steps easier and organized.
Insert The New Key
Inserting the new key into your Kwikset Smart Key deadbolt is a simple but important step. This action completes the rekeying process and ensures your lock works only with the new key. Follow the steps carefully to avoid any issues with your lock.
Prepare The New Key For Insertion
Hold the new key firmly by its head. Make sure the key is clean and free from dirt. This helps the key slide smoothly into the lock. Avoid forcing the key if it feels stuck.
Insert The New Key Into The Keyway
Place the new key into the keyhole gently. Push it straight in without twisting. The key should fit easily into the lock’s keyway. If it does not, check the key’s cuts and alignment.
Turn The Key To Test The Lock
Once the key is fully inserted, turn it slowly. The lock should turn smoothly to lock and unlock. If the key does not turn, remove it and try again. Make sure the key is fully inserted before turning.
Reinstall The Cylinder
Reinstalling the cylinder is a key step in rekeying a Kwikset Smart Key deadbolt. This process puts the new pins and keys into place. It makes sure your lock works smoothly and securely again.
Follow these steps carefully. Take your time. A proper reinstall will keep your door safe and your lock strong.
Insert The Cylinder Back Into The Lock
Hold the cylinder with the key inserted. Slide it gently into the lock housing. Align it carefully with the lock’s internal parts. Push until it fits snugly without forcing.
Secure The Cylinder With The Retaining Screw
Find the small screw hole on the side of the lock. Use a screwdriver to fasten the retaining screw. Tighten it just enough to hold the cylinder firmly. Avoid over-tightening to prevent damage.
Test The Key And Lock Function
Turn the key slowly in both directions. Check if the deadbolt moves smoothly. Make sure the lock engages and releases correctly. Repeat if you feel any resistance or sticking.
Test The New Key
Testing the new key is an important step after rekeying your Kwikset Smart Key deadbolt. It ensures the lock works smoothly with the new key. This step helps avoid lockouts and saves time later.
Try the new key several times. This confirms the pins inside the lock align perfectly. A well-tested key means your door locks and unlocks easily every time.
Insert The New Key Gently
Place the new key into the keyhole carefully. Push it in slowly to avoid damaging the pins. The key should slide in without force. If it feels stuck, do not push hard.
Turn The Key Smoothly
Turn the key to lock and unlock the deadbolt. The motion should be smooth and effortless. Any resistance or sticking means the key or lock needs adjustment. Turn it several times to check.
Test From Both Sides
Use the new key on both the inside and outside locks. Both sides must work well. This confirms the rekeying is complete and correct. Try locking and unlocking multiple times.
Check For Key Removal
Remove the key after locking and unlocking. It should slide out easily without sticking. Stuck keys can damage the lock or key over time. Ensure smooth removal every time.
Troubleshooting Tips
Troubles may arise while rekeying a Kwikset Smart Key deadbolt. Simple fixes often solve the problem quickly. This section offers clear tips to help troubleshoot common issues. Follow these steps to keep your lock working well.
Check The Key Insertion Direction
Insert the key carefully. The Smart Key works only one way. Try flipping the key if it feels stuck. Use gentle pressure to avoid damage.
Ensure The Rekey Tool Fits Properly
Use the correct rekey tool for your lock model. A loose or wrong tool can cause problems. Confirm it fits snugly before turning.
Align The Lock Cylinder Correctly
Turn the knob or key to the correct position before rekeying. Misalignment blocks the process. Check the lock cylinder moves freely.
Clear Debris From The Lock Mechanism
Dirt inside the lock can cause jams. Blow air or use a soft brush to clean. Keep the lock dry to avoid rust.
Apply Light Lubrication
Use graphite powder or a dry lubricant. Avoid oil-based products; they attract dirt. Lubricate the keyhole for smoother operation.
Verify New Keys Work Smoothly
Test each new key after rekeying. They should turn easily without force. If keys stick, repeat the rekeying steps.
Credit: www.youtube.com
Frequently Asked Questions
How Do I Start Rekeying A Kwikset Smart Key Deadbolt?
Begin by removing the lock from the door. Use the Smart Key tool to insert into the keyhole. Turn the tool to reset the lock pins. This prepares the lock for a new key.
Can I Rekey Kwikset Smart Key Without Special Tools?
No, you need the Kwikset Smart Key tool. This tool allows you to reset the lock pins. Without it, you cannot change the lock’s key code safely.
How Long Does Rekeying A Kwikset Smart Key Take?
Rekeying typically takes about 5 to 10 minutes. It is a quick process once you have the right tool. Practice makes the process even faster.
Is Rekeying Better Than Replacing The Entire Lock?
Yes, rekeying is cost-effective and faster than replacement. It improves security without the need for new hardware. Plus, you keep your existing lock’s style and finish.
Conclusion
Rekeying a Kwikset Smart Key deadbolt is simple and quick. You can do it yourself with just a few tools. This skill saves money and improves home security. Remember to follow each step carefully for best results. Practice makes the process easier and faster.
Keep your new keys safe and test the lock before finishing. Taking control of your locks gives peace of mind. Try it today and feel confident in your safety.