Are you tired of forgetting to turn off your lights or wasting electricity when you don’t need to? Learning how to adjust your timer light switch can solve this problem quickly and easily.
With just a few simple steps, you can control when your lights turn on and off, saving energy and making your home more convenient. Keep reading, and you’ll discover how to set up your timer switch perfectly—no confusion, no hassle.
Your home will thank you for it.
Choosing The Right Timer Switch
Choosing the right timer switch is important for controlling your lights effectively. The right switch makes your home safer and saves energy. It must match your needs and fit your fixtures well. Understanding different types and their features helps you pick the best one.
Types Of Timer Switches
There are several types of timer switches. Mechanical timers use a dial to set time. Digital timers offer precise control with buttons. Some have random mode to mimic presence at home. Choose the type that suits your lifestyle and preferences.
Compatibility With Fixtures
Check if the timer switch works with your light fixtures. Some switches are made for LED bulbs, others for incandescent or fluorescent lights. Using the wrong switch can cause flickering or damage. Always verify compatibility before buying a timer switch.
Energy Efficiency Benefits
Timer switches help reduce electricity use by turning off lights automatically. They prevent lights from staying on unnecessarily. This lowers your energy bills and reduces waste. Using a timer switch is a simple way to save energy daily.
Tools Needed For Installation
Before you start adjusting a timer light switch, gather the right tools. Having the correct tools makes the job easier and safer. It also helps avoid damage to the switch or wiring.
Below is a list of basic tools and safety gear you need for installation. These items suit most timer light switch adjustments.
Basic Tools List
- Flathead screwdriver for removing switch plates
- Phillips screwdriver for securing screws
- Voltage tester to check power status
- Wire stripper for preparing wires
- Needle-nose pliers to hold and twist wires
- Electrical tape to cover wire connections
- Level to ensure the switch is straight
Safety Equipment
- Insulated gloves to protect against electric shock
- Safety glasses to shield your eyes
- Rubber-soled shoes to reduce shock risk
- Flashlight for better visibility in dark areas
- Non-contact voltage detector for quick power checks
Preparing For Installation
Preparing for installation is the first step to adjust your timer light switch safely. Proper preparation helps avoid accidents and ensures smooth work.
Gather all tools like a screwdriver, voltage tester, and wire stripper. Have your new timer switch ready to install. Clear the workspace around the switch for easy access.
Turning Off Power
Safety starts by turning off the power to the switch. Find your home’s circuit breaker panel. Switch off the breaker connected to the room where you will work.
Double-check the power is off using a voltage tester on the switch wires. Confirm no electricity flows before starting any work. This step prevents electric shocks.
Removing Existing Switch
Remove the cover plate of the old switch carefully with a screwdriver. Unscrew the switch from the electrical box. Gently pull the switch out to expose the wires.
Note how the wires connect to the switch. Take a picture or label them for easy reinstallation. Disconnect the wires by loosening the screws or pulling the wire connectors.
Installing The Timer Switch
Installing a timer light switch is a simple task that can save energy and add convenience. The process involves a few key steps to ensure safety and proper function. Follow these instructions carefully to install the timer switch correctly.
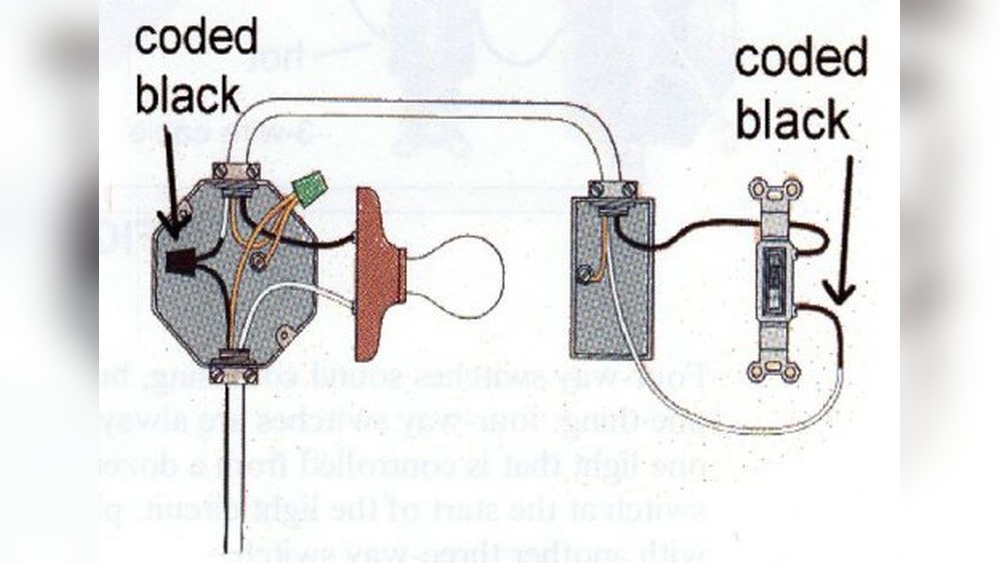
Wiring Connections
Turn off the power at the circuit breaker before starting. Remove the old switch by unscrewing it from the wall. Identify the wires: usually black (live), white (neutral), and green or bare (ground). Connect the timer switch wires to the matching wires in the wall. Use wire nuts to secure each connection. Make sure no bare wire is exposed. Tighten all connections firmly to avoid loose contacts.
Securing The Switch
Push the wires gently back into the electrical box. Align the timer switch with the mounting holes. Use screws to fasten the switch tightly to the box. Check that the switch sits flush on the wall. Attach the faceplate over the switch. Turn the power back on and test the timer switch for correct operation.
Setting The Timer
Setting the timer on your light switch helps save energy and adds convenience. It allows your lights to turn on and off automatically. This way, you don’t have to remember to switch them manually. Understanding how to set the timer correctly is important for getting the most benefit.
The process varies depending on the type of timer you have. Some timers are manual, while others are digital. Each type has simple steps to follow. Let’s explore the differences and learn how to adjust the timer effectively.
Manual Vs Digital Settings
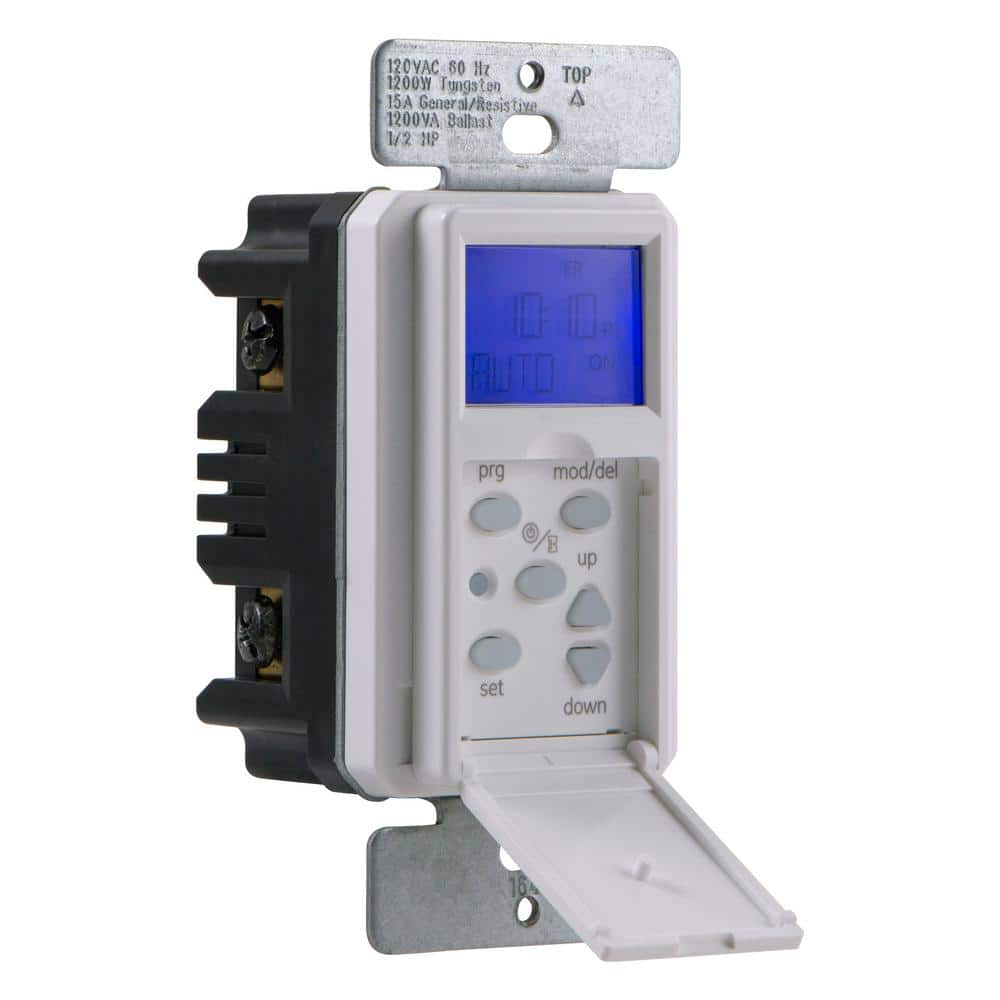
Manual timers use physical dials or switches to set times. They are simple and easy to use. You turn the dial to choose when lights turn on and off. Digital timers have buttons and a screen. They offer more precise control and options. Digital models can store multiple on/off times.
Adjusting On And Off Times
For manual timers, rotate the dial to set the desired on time. Move the dial again to set the off time. Make sure the pins or segments match your chosen times. For digital timers, press buttons to enter on and off times. Use the display to check your settings. Double-check the AM and PM settings to avoid errors.
Testing The Timer
After setting the timer, test it to confirm it works. Switch the timer to the “auto” or “timer” mode. Observe if the lights turn on and off at the set times. Adjust the settings if the lights do not follow the schedule. Testing ensures your timer functions as expected.

Credit: www.reddit.com
Troubleshooting Common Issues
Troubleshooting common issues with your timer light switch can save time and frustration. Many problems have simple fixes. Knowing these fixes helps keep your lights working as planned.
Start by checking basic settings and connections. Most issues come from small mistakes or power problems. Use this guide to find quick solutions.
Timer Not Working
Check if the timer switch is properly connected to power. Loose wires can stop it from working. Make sure the switch is turned on and the breaker is not tripped.
Reset the timer by turning it off and on again. Sometimes, a quick reset solves the problem. Replace batteries if your timer uses them.
Incorrect Timing
Verify the current time is set correctly on the timer. Incorrect time causes lights to turn on or off at wrong hours. Adjust the timer dial or digital setting to match the actual time.
Double-check the program settings. Remove any extra on/off commands that may cause confusion. Use the manual to confirm proper setup.
Power Fluctuations
Power surges can disrupt timer operation. Install a surge protector to keep the timer safe. Avoid using the timer with faulty wiring or unstable power sources.
Check for flickering lights or dimming. These signs indicate power issues. Contact an electrician if the problem persists after testing the timer switch.
Maintaining Your Timer Switch
Maintaining your timer light switch helps it work properly for a long time. Regular care prevents problems and saves energy. Simple steps keep your timer switch reliable and efficient.
Regular Checks
Check your timer switch regularly to spot any issues early. Make sure the display is clear and buttons respond well. Look for any signs of damage or wear on the switch. Clean the surface gently with a dry cloth to avoid dust build-up. Regular checks help avoid sudden failures and keep your lights on schedule.
Battery Replacement
Some timer switches use batteries to keep time during power outages. Replace these batteries every year or as recommended by the manufacturer. Use the correct battery type to avoid damage. A fresh battery ensures your timer does not reset and lose settings. Test the timer after replacing batteries to confirm it works properly.
Software Updates For Digital Models
Digital timer switches may need software updates to fix bugs or add features. Check the manufacturer’s website or app for update notices. Follow instructions carefully to install updates safely. Updates improve performance and security of your timer switch. Keep your digital timer switch up to date for best operation.

Credit: www.youtube.com
Credit: www.homedepot.com
Frequently Asked Questions
How Do I Set The Timer On A Light Switch?
To set the timer, first turn off the power. Then, press the timer button and adjust the duration using the dial or digital controls. Follow the manufacturer’s instructions for exact steps. Finally, restore power and test the timer to ensure it works correctly.
Can I Adjust A Timer Light Switch Without Tools?
Yes, many timer switches allow adjustments without tools. You usually press buttons or turn a dial on the switch face. However, some models may require a screwdriver to access settings. Always check your switch manual for specific instructions before adjusting.
Why Isn’t My Timer Light Switch Working Properly?
Common issues include incorrect settings, power interruptions, or faulty wiring. Check the timer settings and ensure power is on. If problems persist, inspect wiring or consult an electrician. Sometimes, replacing the timer switch may be necessary if it’s defective.
How Often Should I Adjust My Timer Light Switch?
Adjust your timer switch whenever your lighting needs change. This might be seasonally or if you alter your daily routine. Regular adjustments optimize energy savings and convenience. Check settings every few months to ensure your timer matches your lifestyle.
Conclusion
Adjusting a timer light switch saves energy and adds convenience. Set the timer to match your daily routine. Check the instructions to avoid mistakes. Test the switch after setting it up. Small changes make your home smarter and safer. Keep the switch clean and dry for best performance.
Enjoy the ease of automated lighting every day.