Are you ready to give your clothing, bags, or DIY projects a professional touch? Attaching metal snap fasteners is a simple skill that can make your creations more functional and stylish.
Whether you want to replace old snaps or add new ones, knowing the right steps will save you time and frustration. In this guide, you’ll discover clear, easy-to-follow instructions that anyone can master—even if you’ve never worked with snaps before.
Keep reading, and you’ll soon have the confidence to snap fasteners on like a pro!

Credit: www.amazon.com
Choosing Snap Fasteners
Choosing the right snap fasteners is important for a strong and neat finish. Snap fasteners come in different styles and sizes. Selecting the correct type ensures your project works well and lasts long. Consider the material you will attach the snaps to for best results.
Types Of Metal Snaps
Metal snaps vary in design and use. Some snaps have visible caps, while others are hidden. Common types include sew-on snaps and press-on snaps. Sew-on snaps need stitching, offering a secure hold. Press-on snaps use tools to clamp them on quickly. Choose a type that fits your skill and project needs.
Selecting The Right Size
Snap fasteners come in small, medium, and large sizes. Small snaps suit lightweight fabrics like cotton or silk. Medium sizes work well on denim or canvas. Large snaps fit thick materials like leather or heavy coats. Using the right size prevents damage and ensures the snap stays closed.
Materials Compatibility
Match the snap material with your fabric type. Brass or stainless steel snaps resist rust and work well outdoors. Aluminum snaps are light but less strong. Avoid snaps that can corrode on delicate fabrics. Test snaps on scrap fabric before attaching to your final piece.

Credit: www.youtube.com
Tools Needed
Attaching metal snap fasteners requires a few basic tools. These tools help secure snaps firmly to fabric or leather. Using the right tools makes the process easier and the snaps last longer. Below are the essential tools needed for this task.
Snap Pliers And Setting Tools
Snap pliers are designed to hold and press snaps together. They fit different snap sizes for a perfect grip. Setting tools work with a hammer to attach snaps precisely. These tools keep snaps aligned and prevent damage during installation.
Hammer And Anvil
A hammer is necessary to apply force when using setting tools. The anvil provides a solid surface to support the snap during attachment. Using both ensures the snap parts join tightly without bending or breaking.
Punch Or Awl For Fabric
A punch or awl makes a small hole in the fabric before placing the snap. This helps the snap prongs go through easily without tearing the material. It also ensures the snap sits flat and secure on the fabric.
Preparing Fabric
Preparing the fabric correctly ensures your metal snap fasteners stay secure. Proper preparation avoids fabric damage and snap failure. Focus on precise marking, careful hole creation, and fabric reinforcement for lasting results.
Marking Snap Placement
Use a fabric marker or chalk to mark snap positions. Measure carefully to align snaps evenly. Mark both fabric layers to match snap parts perfectly. Clear markings help avoid mistakes during attachment.
Making Holes For Snaps
Create small holes where you marked snap placements. Use a sharp tool like an awl or small scissors. Make holes just big enough for snap prongs. Avoid making holes too large to prevent fabric tearing.
Reinforcing Fabric For Durability
Strengthen fabric areas where snaps attach. Apply fusible interfacing or extra fabric patches behind snap spots. Reinforcement prevents fabric from stretching or ripping. This step is vital for heavy or thin fabrics.
Attaching Snap Components
Attaching snap components is a key step in using metal snap fasteners. It joins the two parts firmly to the fabric. Proper attachment ensures durability and easy use later.
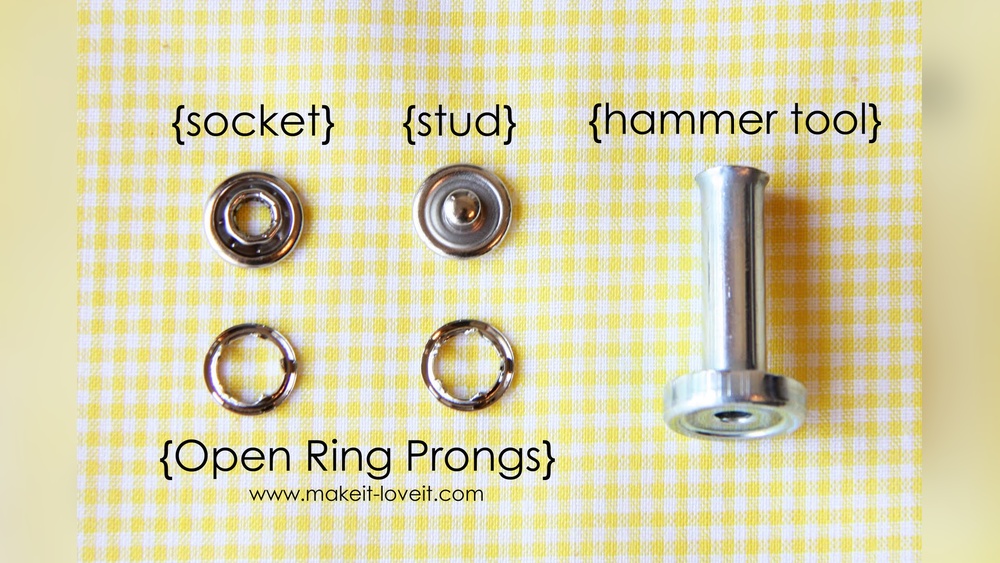
Each snap fastener has two main parts: the cap with a decorative top and the socket that holds the cap in place. These parts must be attached carefully for a strong hold.
Positioning The Cap And Socket
Start by placing the cap on the fabric surface where you want the snap. The prong side should face down, piercing the fabric.
Next, align the socket on the opposite side of the fabric. Its hollow side must face the prongs of the cap to lock tightly.
Securing With Pliers Or Hammer
Use snap fastener pliers or a hammer with a snap-setting tool. These tools press the cap and socket together firmly.
Hold the fabric steady. Squeeze the pliers or tap gently with the hammer to avoid damage.
Ensuring Alignment And Fit
Check if the cap and socket snap together smoothly. They should fit without forcing or looseness.
Test the snap by pressing it open and closed a few times. Proper alignment guarantees lasting use.
Handling Different Fabrics
Attaching metal snap fasteners requires care, especially with different fabric types. Each fabric has unique traits that affect snap placement and strength. Understanding these traits helps secure snaps firmly and prevent damage. Below are tips for handling thick materials, leather, and stretch fabrics.
Working With Thick Materials
Thick fabrics like denim or canvas need strong snaps. Use heavy-duty snap fasteners designed for thick layers. Pre-punch holes with an awl or strong needle to ease insertion. Press snaps firmly with a hammer or pliers to ensure a tight fit. Avoid forcing snaps, which can damage fabric or fastener.
Attaching Snaps To Leather
Leather is tough and requires special care. Choose snaps with longer posts made for leather. Mark snap positions clearly before punching holes. Use a leather punch tool to create neat holes. Secure snaps gently but firmly to avoid tearing. Work on a hard surface for best results.
Tips For Stretch Fabrics
Stretch fabrics like spandex or jersey need flexible snaps. Use lightweight, low-profile snaps that won’t pull the fabric. Place snaps where the fabric is stable, avoiding highly stretched areas. Stabilize fabric with interfacing or backing before attaching snaps. Attach snaps slowly to keep fabric smooth.

Credit: www.youtube.com
Troubleshooting Common Issues
Troubleshooting common issues helps ensure your metal snap fasteners work well. Problems can cause snaps to loosen, misalign, or damage fabric. Fixing these issues saves time and frustration. Below are solutions to common snap fastener problems.
Loose Snaps
Loose snaps do not hold fabric securely. Tighten snaps by pressing firmly with a snap setting tool. Use a hammer gently if needed to secure the snap. Check that the snap parts fit correctly. Replace snaps that are worn or bent.
Misaligned Fasteners
Misaligned fasteners make snapping difficult. Mark the snap positions carefully before attaching. Use a ruler or measuring tape to align both sides. Attach the male and female parts directly opposite each other. Remove and reattach if alignment is off.
Damaged Fabric Around Snaps
Damaged fabric weakens the hold of snaps. Reinforce fabric with interfacing or extra layers before attaching snaps. Avoid hammering too hard to prevent tearing. Trim frayed edges and sew around the snap area for strength. Replace fabric if damage is severe.
Maintaining Snap Fasteners
Maintaining snap fasteners ensures they work smoothly and last longer. Regular care prevents rust and keeps snaps looking good. Simple steps help avoid damage and keep snaps functional. Proper upkeep saves time and money on repairs.
Cleaning Metal Snaps
Use a soft cloth to wipe dirt and dust. Mild soap and water remove stubborn grime. Dry snaps completely to stop rust forming. Avoid harsh chemicals that can damage the metal.
Replacing Worn Snaps
Check snaps for cracks or weak points often. Remove broken snaps carefully with pliers or a seam ripper. Attach new snaps using the right tools and pressure. Test snaps to ensure they close and open easily.
Storage Tips To Prevent Damage
Store items with snaps in a dry place. Avoid piling heavy objects on top to prevent bending. Keep snaps away from moisture and direct sunlight. Use small bags or boxes to organize snapped items safely.
Frequently Asked Questions
How Do You Attach Metal Snaps?
Mark fabric, make a small hole, insert snap parts through fabric layers. Align and press firmly using a snap tool or hammer. Ensure parts fit snugly for secure attachment.
How To Use A Metal Snap Clip?
To use a metal snap clip, push the clip’s claws through fabric layers. Then, press the claws into the snap’s other half to secure.
Which Part Of Snap Goes On Top?
The snap part with the protruding stud goes on top. The socket with the hole attaches underneath. Align and press firmly.
How To Apply Snap Fasteners With Hammer?
Place snap fastener parts on fabric layers, align carefully. Use a hammer to firmly tap the center tool over the snap until secure. Ensure the snap’s prongs pierce the fabric and lock tightly for a strong hold.
Conclusion
Attaching metal snap fasteners is simple with the right steps. Start by choosing the correct snap size for your fabric. Position the snap carefully and use a hammer or tool to secure it tightly. Check that both parts align and snap together smoothly.
Practice on scrap fabric to gain confidence. This method saves time and adds durability to your projects. With patience, anyone can attach metal snaps neatly and effectively. Keep tools handy and enjoy creating strong, stylish fastenings for clothes or bags.