Are your cabinet handles and knobs looking worn out or outdated? You don’t need to replace the entire cabinet to give your kitchen or bathroom a fresh new look.
Refurbishing your cabinet hardware is a simple, budget-friendly way to transform your space instantly. Imagine turning those dull, scratched pieces into eye-catching details that make your cabinets stand out. In this guide, you’ll discover easy steps and expert tips to bring your hardware back to life.
Ready to see your cabinets in a whole new light? Let’s dive in and get started!
Tools And Materials Needed
Refurbishing cabinet hardware requires the right tools and materials. Having these ready makes the process smooth and efficient. This section lists what you need for a successful project.
Basic Tools
Start with basic tools like a screwdriver and pliers. These help remove old hardware easily. A small wrench may be useful for tight screws. A soft cloth is good for cleaning pieces before work.
Cleaning Supplies
Use mild soap and warm water to clean hardware. For tougher grime, try vinegar or baking soda. Soft brushes help reach small details without damage. Dry everything well before the next step.
Refinishing Materials
Choose paint or metal polish depending on your style. Spray paint works well for quick coverage. Metal polish restores shine to brass or chrome. Clear sealant protects the finish and keeps it fresh.
Safety Gear
Wear gloves to protect your hands from chemicals. Use a mask when sanding or spraying paint. Work in a well-ventilated area to avoid inhaling fumes. Safety first for a smooth project.
Removing Old Hardware
Removing old hardware is the first step in refurbishing cabinets. It allows you to start fresh and prepare the surface for new or cleaned pieces. Taking off handles, knobs, and hinges carefully prevents damage to the cabinet itself. This step sets the tone for a smooth refurbishment process.
Gather The Right Tools
Use a screwdriver that fits the screws perfectly. This helps avoid stripping them. A flathead or Phillips screwdriver works for most hardware. Keep a cloth nearby to protect the cabinet surface. You might also need pliers for stubborn screws.
Work Slowly And Carefully
Turn screws counterclockwise to loosen them. Do not rush or force the screws. Tight or rusty screws need gentle wiggling. Use light pressure to avoid scratching the cabinet wood. Take your time to keep everything intact.
Handle Stubborn Screws
Apply a small amount of lubricant on rusty screws. Let it sit for a few minutes. This loosens rust and makes removal easier. Use pliers to grip and twist tight screws. If a screw is stuck, try tapping gently with a hammer.
Keep Hardware Organized
Place screws and hardware in a small container. Label them if needed for easy sorting later. This keeps parts from getting lost. Organized hardware saves time during reassembly or cleaning. It also helps check if any pieces need replacement.
Cleaning And Preparing Hardware
Cleaning and preparing cabinet hardware is the first step in refurbishing. It helps remove dirt and old finishes. Clean hardware looks better and holds new paint or polish well.
Proper preparation makes sure your work lasts longer. It also helps reveal any damage or wear. This lets you decide if you need repairs or replacements.
Start by taking off all knobs, handles, and hinges. Use a screwdriver to avoid damage. Keep screws and small parts in a container. This keeps everything organized and easy to find.
Soaking And Cleaning Hardware
Fill a bowl with warm water and mild soap. Soak the hardware for 10 to 15 minutes. This softens grime and grease. Use a soft brush or cloth to scrub gently. Avoid harsh tools that can scratch surfaces.
Removing Rust And Stains
For rusty spots, use a mix of vinegar and baking soda. Apply it on rust and let it sit for 10 minutes. Scrub with a soft brush to remove rust. Rinse well and dry completely to stop rust from returning.
Sanding And Smoothing Surfaces
Lightly sand metal or wooden hardware with fine-grit sandpaper. This removes old paint and smooths rough areas. Wipe off dust with a clean cloth before painting or polishing. Sanding helps new finishes stick better.

Credit: www.youtube.com
Choosing The Right Finish
Choosing the right finish for cabinet hardware can change the look of your entire space. It affects style, durability, and how well the hardware matches your cabinets. The finish should fit your room’s theme and your personal taste. It also needs to hold up to daily use. Here are some common finish options to consider.
Paint Options
Paint is an easy way to update hardware. You can choose any color you like. Use spray paint designed for metal for the best results. Matte, glossy, or satin finishes give different looks. Paint can cover scratches and old finishes well. It may need touch-ups over time if the hardware is used often.
Metal Plating
Metal plating adds a thin layer of metal on hardware. Popular plating types include chrome, brass, and nickel. This finish looks smooth and shiny. It is very durable and resists rust. Plated hardware often looks more expensive and polished. It works well for classic or modern designs.
Spray Finishes
Spray finishes offer quick and even coverage. They come in many styles, like metallic, matte, or textured. These finishes dry fast and create a smooth surface. Choose spray finishes made for metal for long-lasting results. They protect hardware from moisture and wear. Spray finishes suit many decorating styles.
Applying The New Finish
Applying the new finish is the key step in refurbishing cabinet hardware. It changes old, dull pieces into bright, fresh accents. The right finish protects the hardware and gives it a new look. Take time to apply the finish well. This step can make or break your project’s success.
Priming And Painting
Start with a clean surface. Use a metal primer to help paint stick better. Spray primers work best for even coverage. Let the primer dry completely before painting.
Choose paint made for metal surfaces. Spray paint gives a smooth finish without brush marks. Apply thin, light coats. Wait a few minutes between coats to avoid drips. Two to three coats usually work well.
Polishing And Buffing
Polishing adds shine and smooths imperfections. Use a soft cloth and metal polish or rubbing compound. Rub gently in small circles.
Buffing helps the finish look bright and clean. Use a clean cloth to buff the hardware after polishing. This step makes the hardware look new and high-quality.
Reattaching Hardware
Reattaching cabinet hardware is the final step in giving your cabinets a fresh look. This process requires care to ensure the hardware fits well and stays secure. Proper reattachment improves both the appearance and function of your cabinets.
Take your time to align everything correctly. Loose or crooked handles can spoil the entire look. Follow simple steps for a neat, lasting result.
Preparing The Cabinet Surface
Clean the cabinet surface where the hardware will go. Remove dust, grease, and old residue. A clean surface helps screws grip tightly. Use a mild cleaner and a soft cloth. Let it dry completely before moving on.
Aligning The Hardware Properly
Match the hardware holes with cabinet holes carefully. Check the fit by holding the hardware in place. Use a pencil to mark new holes if needed. Ensure handles or knobs sit straight and even. Proper alignment prevents damage and looks better.
Securing Screws Firmly
Use the right screws for your hardware and cabinet type. Insert screws gently to avoid stripping the hole. Tighten screws until snug but not too tight. Over-tightening can crack the wood or damage hardware. Use a screwdriver, not a drill, for better control.
Testing The Hardware
Open and close the cabinet doors or drawers several times. Check if the hardware feels secure and works smoothly. If loose, tighten screws a bit more. Make sure handles and knobs do not wobble or shift.
Tips For Long-lasting Results
Refurbishing cabinet hardware can breathe new life into your kitchen or bathroom. To keep your hardware looking fresh and working well for years, use some simple but effective tips. These help protect your work and make the hardware last longer.
Clean Thoroughly Before Starting
Remove all dirt and grease from the hardware. Use warm soapy water and a soft brush. This helps paint or finish stick better. Rinse well and dry completely to avoid rust.
Use Quality Paints And Finishes
Choose paints and finishes made for metal surfaces. They resist chips and scratches. Look for rust-resistant or waterproof options. These protect your hardware from damage over time.
Apply Multiple Thin Coats
Apply paint or finish in thin layers. Let each coat dry before adding the next. This prevents drips and uneven surfaces. Thin coats create a smooth, strong finish that lasts longer.
Seal With A Clear Topcoat
Use a clear sealant after painting. It adds extra protection against wear and tear. A topcoat also keeps the color bright and shiny. Choose a product that matches your paint type.
Handle Hardware With Care
Be gentle when installing or cleaning hardware. Avoid harsh chemicals and abrasive tools. Use soft cloths and mild cleaners. This keeps the finish intact and hardware looking new.
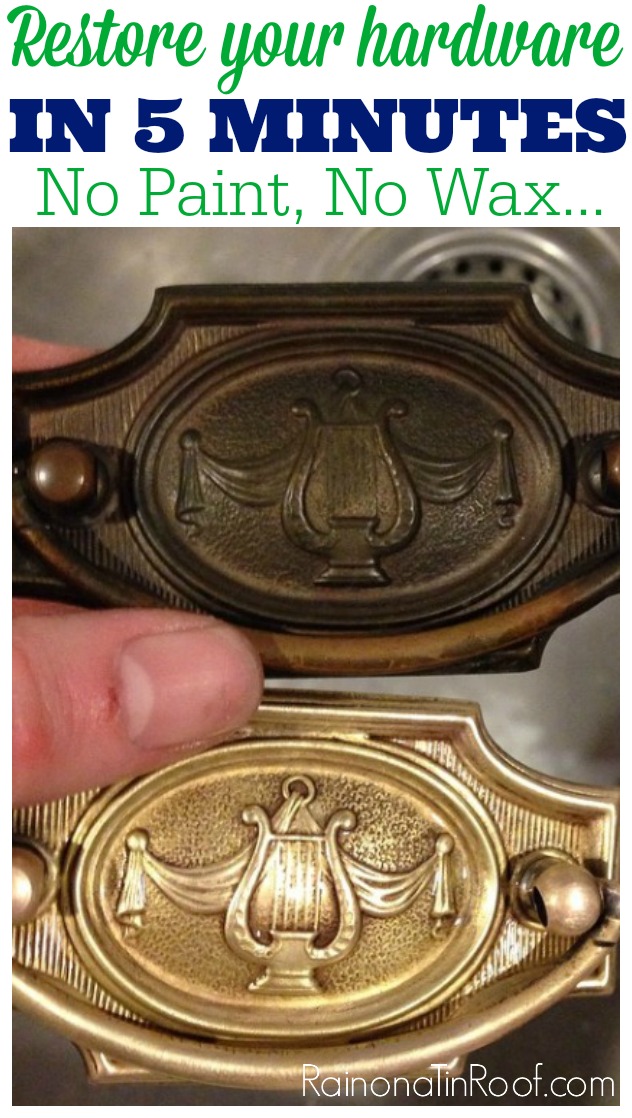
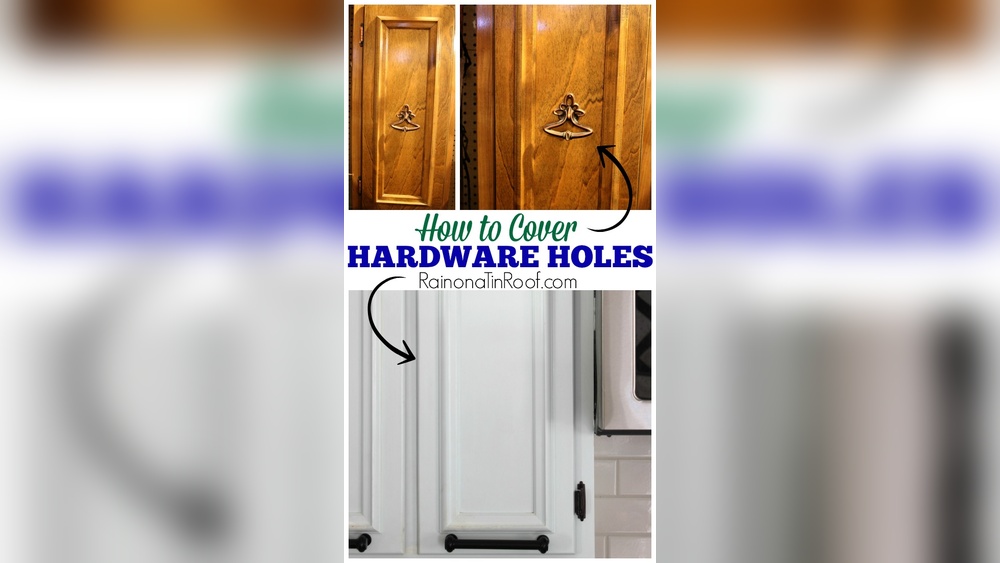
Credit: rainonatinroof.com
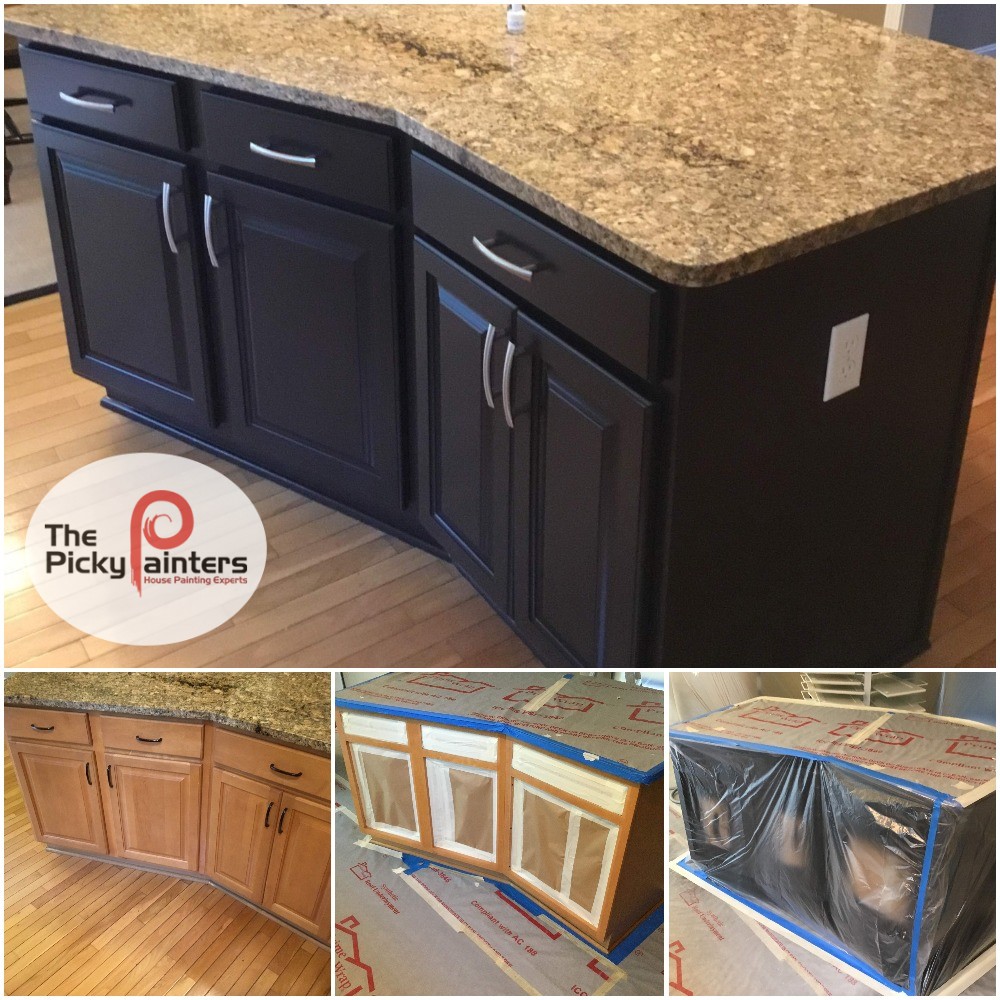
Credit: thepickypainters.com
Frequently Asked Questions
How Do I Clean Old Cabinet Hardware Before Refurbishing?
Start by soaking hardware in warm, soapy water to remove dirt. Use a soft brush for crevices. Dry thoroughly before refinishing to ensure paint or polish adheres well.
What Materials Are Best For Refurbishing Cabinet Hardware?
Use spray paint designed for metal, metal polish, or electroplating kits. Choose materials suited to the hardware’s metal type for a durable, professional finish.
Can I Refurbish Cabinet Hardware Without Removing It?
It’s best to remove hardware before refurbishing. This prevents damage to cabinets and ensures even coverage of paint or polish on all surfaces.
How Long Does It Take To Refurbish Cabinet Hardware?
Refurbishing typically takes a few hours, including cleaning, sanding, painting, and drying. Drying times vary by product, so follow manufacturer instructions for best results.
Conclusion
Refurbishing cabinet hardware can refresh any room quickly. Small changes bring big improvements to your space. Choose the right tools and take your time. Clean, paint, or polish to restore the original shine. Enjoy the satisfaction of doing it yourself.
A little effort makes old hardware look new again. Try it and see how simple the process really is. Your cabinets will thank you with a fresh, new look.