Are you ready to give your cabinets a fresh, polished look? Installing hardware like handles and knobs can transform the entire feel of your space—and it’s easier than you think.
Whether you’re updating old cabinets or fitting new ones, knowing the right steps will save you time and frustration. In this guide, you’ll discover simple, clear instructions that help you install hardware quickly and perfectly every time. Keep reading, and you’ll gain the confidence to tackle this project like a pro.
Choosing The Right Hardware
Choosing the right hardware for your cabinets affects both function and style. The right pieces make your cabinets easier to use. They also improve the room’s look. Take time to pick hardware that fits your needs and tastes. This step ensures your project looks great and lasts long.
Types Of Cabinet Hardware
Cabinet hardware comes in many forms. Knobs are small and round or square handles. Pulls are longer and easier to grip. Handles come in various shapes and sizes. Hinges connect cabinet doors to the frame. Choose the type that suits your cabinet design and use.
Selecting Materials And Finishes
Hardware materials vary from metal to plastic. Common metals include brass, stainless steel, and zinc. Each material offers strength and style. Finishes change the look and feel. Popular finishes are chrome, bronze, and matte black. Pick a finish that matches your room’s decor.
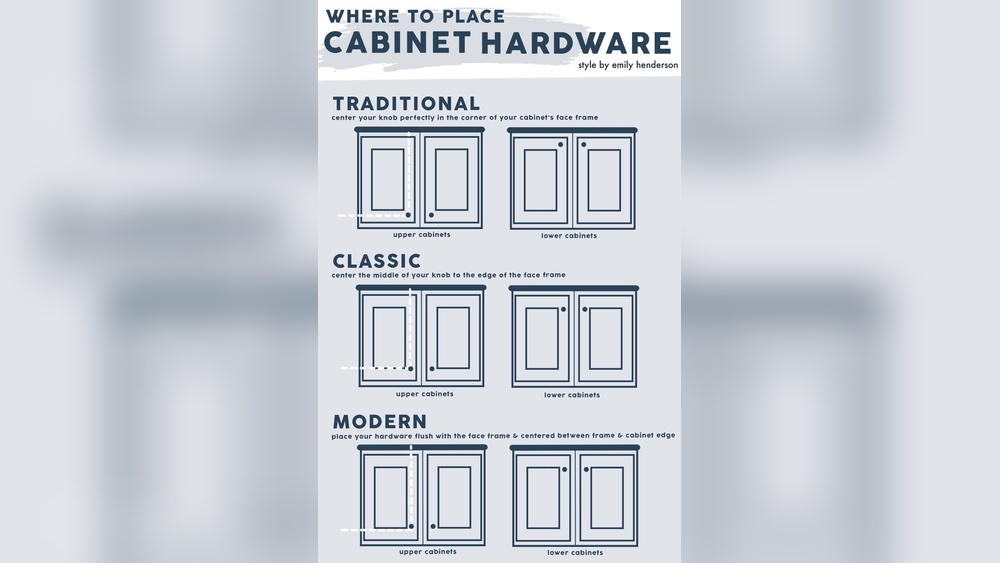
Measuring For Fit And Style
Measure your cabinet doors before buying hardware. Check the hole spacing if replacing old hardware. Ensure new pieces fit without extra drilling. Consider the size and shape to match your cabinet style. Proper measurement avoids damage and saves time.
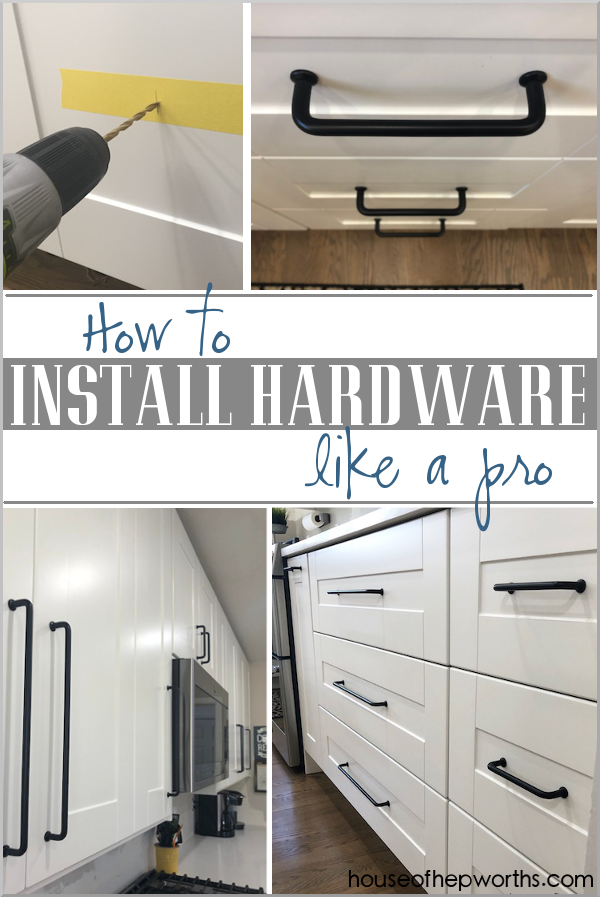
Credit: www.houseofhepworths.com
Gathering Tools And Supplies
Gathering the right tools and supplies is the first step in installing hardware on cabinets. Proper preparation saves time and avoids frustration. It ensures the project goes smoothly and the hardware fits perfectly.
Knowing what tools to use and how to prepare your workspace helps maintain safety. It also protects the cabinets from damage during installation.
Essential Tools Checklist
Start with a drill for making holes and driving screws. Use a screwdriver set with both flathead and Phillips heads. A tape measure helps check measurements accurately. A pencil marks drilling spots clearly. Level tools keep hardware straight. A stud finder locates solid support behind the cabinet wall. Safety glasses protect your eyes from dust and debris. Sandpaper smooths edges after drilling. Have masking tape to prevent wood splitting. Lastly, use a work glove to protect your hands.
Preparing Your Workspace
Clear the area around the cabinet for easy movement. Lay down a drop cloth or cardboard to catch dust. Make sure good lighting is available to see small details. Organize all tools within arm’s reach to avoid unnecessary trips. Keep the cabinet doors open for better access. Remove any fragile or valuable items nearby. Ensure the workspace is dry to prevent slipping. Double-check that power tools are charged or plugged in. Proper setup creates a safe and efficient work environment.
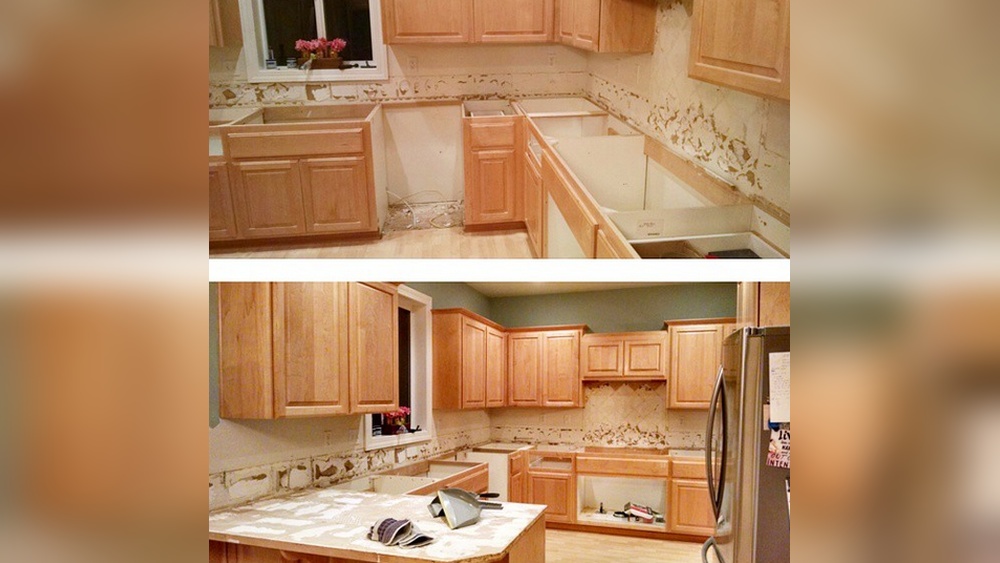
Preparing The Cabinets
Preparing the cabinets is the first step to a successful hardware installation. It ensures the hardware fits well and stays secure. Taking time here saves effort later.
Cleaning And Inspecting Surfaces
Start by cleaning the cabinet surfaces. Remove dust, grease, and dirt. Use a mild cleaner and a soft cloth. Clean surfaces help hardware stick better.
Next, inspect the cabinet for damage. Check for cracks, holes, or loose panels. Fix these issues before installing hardware. A solid surface prevents problems later.
Marking Hardware Placement
Measure carefully before marking. Use a ruler or tape measure. Mark the exact spots for screws and handles.
Double-check the marks for even spacing. Mark both sides if installing handles on doors. Clear marks guide you during drilling and prevent mistakes.
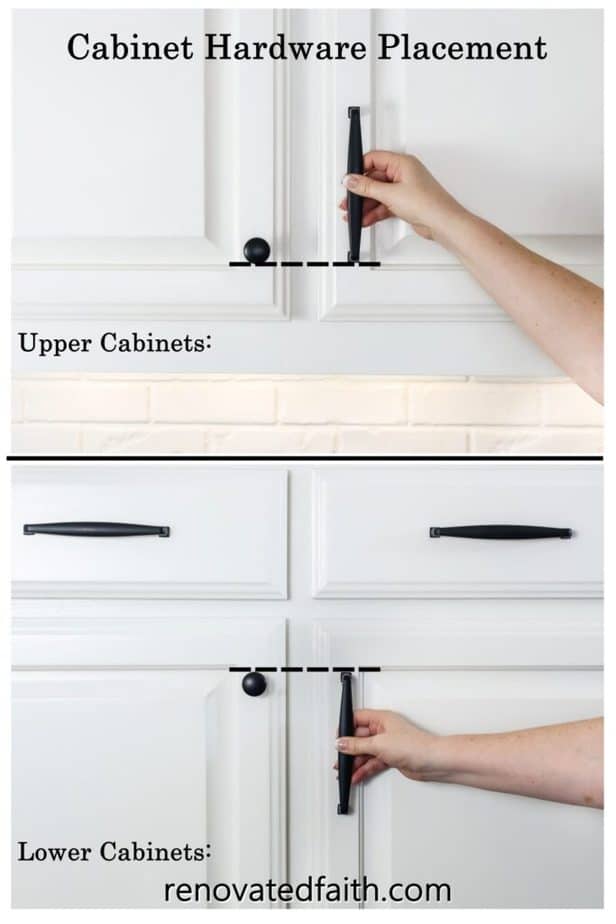
Credit: renovatedfaith.com
Installing Handles And Knobs
Installing handles and knobs on cabinets is a simple way to improve both function and style. These small pieces make opening doors easier. They also add a decorative touch to your kitchen or bathroom. Proper installation ensures the hardware stays secure and looks great for years.
Drilling Pilot Holes
First, mark the spot for each handle or knob. Use a measuring tape to find the center or desired position. A pencil helps to make a small mark on the cabinet surface. Next, select a drill bit slightly smaller than the screw size. This helps to prevent wood from splitting. Drill straight and steady to create a clean pilot hole. Avoid pressing too hard to keep the hole smooth.
Attaching Hardware Securely
Place the handle or knob over the pilot hole. Insert the screw through the back of the cabinet door. Use a screwdriver to tighten the screw carefully. Stop tightening when the hardware feels firm and does not move. Check that the handle or knob aligns properly and sits flush. Loose hardware can cause damage and feel unstable. Tightening correctly ensures long-lasting use.
Mounting Hinges And Slides
Mounting hinges and slides is a key step in installing hardware on cabinets. Proper mounting ensures doors open and close smoothly. It also helps the cabinet last longer.
Correct hinge and slide placement keeps the cabinet functional and neat. It improves the look and usability of your furniture. Follow simple steps to align and adjust these parts easily.
Aligning Hinges Correctly
Start by marking where the hinges go on the cabinet and door. Use a pencil for light marks. Hold the hinge against the door edge. Make sure it sits flush and straight.
Drill pilot holes before screwing in hinges. This stops wood from splitting. Attach hinges loosely at first. Check the door fits the frame well. Adjust hinge position if needed.
Adjusting For Smooth Operation
After mounting, open and close the door several times. Notice any sticking or gaps. Use the hinge screws to move the door slightly. Tighten screws only after the door moves smoothly.
For slides, check if drawers glide in and out easily. Adjust the screws on the slides to fix any tightness or looseness. Test often during adjustment to get the right fit.
Credit: truepositiontools.com
Troubleshooting Common Issues
Troubleshooting common issues during hardware installation can save time and frustration. Small problems often cause big delays. Knowing how to fix these helps keep your project smooth. The two most frequent problems are misaligned hardware and loose screws. Both are easy to correct with simple steps.
Fixing Misaligned Hardware
Misaligned hardware makes doors and drawers hard to use. Check the position of handles and hinges first. Use a level or measuring tape for accuracy. Loosen screws slightly to move the hardware. Adjust until it lines up with the cabinet edges. Tighten screws carefully to keep the new position. Test the hardware by opening and closing the door or drawer. Repeat if it still feels off.
Dealing With Loose Screws
Loose screws cause hardware to wobble or fall off. Tighten screws with the correct screwdriver. If screws don’t hold, remove them and check the hole. Fill the hole with wood filler or toothpicks dipped in glue. Let it dry completely. Reinsert the screws and tighten firmly. This creates a stronger hold. Check all screws regularly to avoid future loosening.
Maintaining Cabinet Hardware
Maintaining cabinet hardware helps keep your cabinets looking fresh. It also extends the life of handles, knobs, and hinges. Regular care prevents damage and saves money on repairs or replacements.
Cleaning Tips
Use a soft cloth to wipe hardware gently. Avoid abrasive cleaners that can scratch surfaces. Mild soap and warm water work well for most finishes. Dry hardware fully to stop water spots and rust. Clean hardware often to avoid buildup of dirt and grease.
Preventing Wear And Tear
Check screws and tighten them regularly. Loose hardware can cause damage to cabinets. Avoid using excessive force when opening or closing doors. Use gentle motions to protect hinges and handles. Replace worn parts quickly to prevent bigger problems.
Frequently Asked Questions
What Tools Do I Need To Install Cabinet Hardware?
You need a drill, screwdriver, measuring tape, pencil, and hardware kit. These tools ensure precise and secure installation of cabinet handles and knobs.
How Do I Measure For Cabinet Hardware Placement?
Measure the cabinet door or drawer width and height. Mark the center or preferred position with a pencil for accurate hardware alignment.
Can I Install Hardware On Existing Cabinets?
Yes, you can install hardware on existing cabinets. Just measure carefully, mark drilling points, and use proper screws to avoid damage.
What Type Of Screws Work Best For Cabinet Hardware?
Use screws provided with the hardware or choose 8 wood screws. They ensure a strong hold without damaging the cabinet surface.
Conclusion
Installing hardware on cabinets is simple with clear steps and care. Start by measuring and marking the right spots. Use the right tools to drill and attach handles or knobs securely. Take your time to align everything evenly for a neat look.
Small details make a big difference in your kitchen or room. Enjoy the fresh, updated style you create yourself. Keep practicing, and these tasks will feel easier each time. Your cabinets will look great and work well with new hardware.