Are you facing a damaged Trex board on your deck and wondering how to replace it without ruining the clean, fastener-free look? You’re not alone.
Using hidden fasteners keeps your deck looking sleek and smooth, but swapping out a board can feel tricky if you don’t know the right steps. In this guide, you’ll discover simple, clear instructions to replace your Trex board with hidden fasteners quickly and safely.
By the end, you’ll have the confidence to restore your deck’s beauty without calling in a pro. Keep reading to learn how easy it can be to make your deck look like new again.
Tools And Materials Needed
Replacing a Trex board with hidden fasteners needs the right tools and materials. Preparing all items before starting saves time and avoids interruptions. Each tool has a specific role in the process.
Having quality materials ensures the repair lasts longer and looks good. This section lists everything required for a smooth and safe replacement.
Basic Hand Tools
Start with a tape measure to check board length. Use a utility knife to cut and trim edges. A pry bar helps remove old boards carefully. A rubber mallet taps boards into place without damage.
Power Tools
A drill with a screwdriver bit is essential for fasteners. A circular saw or miter saw cuts boards to exact size. A jigsaw works well for curved or irregular cuts.
Hidden Fasteners And Screws
Use Trex-compatible hidden fasteners for a clean look. Stainless steel screws resist rust and hold boards firmly. Check fastener quantity matches the board length.
Replacement Trex Boards
Choose boards matching your deck’s color and style. Trex boards come in various lengths and thicknesses. Inspect boards for defects before installation.
Safety Gear
Wear safety glasses to protect your eyes from debris. Use gloves to avoid splinters and sharp edges. Hearing protection guards your ears from loud tools.

Credit: www.trex.com
Preparing The Deck Surface
Preparing the deck surface is an important step before replacing a Trex board with hidden fasteners. A clean and even surface helps the new board fit well. It also ensures the hidden fasteners work properly and hold the board securely.
Taking time to prepare the surface prevents issues later. It makes the replacement process smoother and keeps the deck looking good.
Remove Old Debris And Dirt
Start by clearing away leaves, dirt, and dust from the deck. Use a broom or blower to clean the surface. This step helps you see any damage or uneven spots.
Inspect The Joists
Check the joists under the board carefully. Look for signs of rot, cracks, or loose nails. Strong joists support the new board well and keep it safe.
Level The Surface
Make sure the deck surface is flat and even. Use a level tool to check the area. Fix any high or low spots before installing the new board.
Clear Old Fasteners
Remove old screws, nails, or clips from the deck. Hidden fasteners need a clean surface to fit properly. Old fasteners can block installation or cause damage.
Removing The Damaged Trex Board
Removing the damaged Trex board is the first step to restoring your deck. This process requires care to avoid harming nearby boards or the hidden fasteners. Proper removal ensures the new board fits well and stays secure.
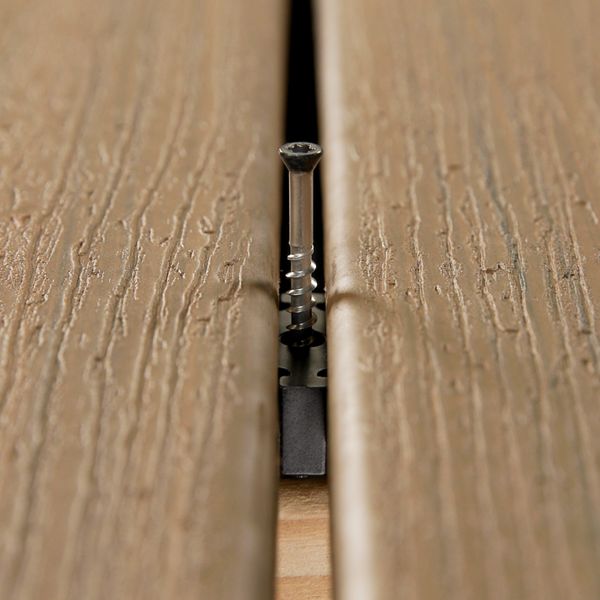
Accessing Hidden Fasteners
Trex boards with hidden fasteners have clips placed along the edges. These clips hold the boards tightly in place without visible screws. To access them, look for the small gap between boards. Use a flat tool like a putty knife to gently pry the board’s edge. This exposes the fasteners without breaking the clips.
Sometimes, you may need to remove trim or fascia boards to reach the fasteners easily. Take your time and avoid forcing the tool, which can damage the deck. Clear debris and dirt from the gaps for better access and visibility.
Releasing The Board Safely
After exposing the fasteners, use a specialized Trex removal tool or a flat pry bar. Insert the tool under the board near the fasteners. Slowly lift the board, releasing each clip one by one. Avoid pulling the board too hard to prevent breaking it or damaging clips.
If the board is stuck, tap gently with a rubber mallet to loosen it. Work along the board’s length evenly. Once all clips are released, lift the board off the deck carefully. Store the clips safely if they will be reused with the new board.

Credit: www.fastenmaster.com
Inspecting The Joists And Fasteners
Inspecting the joists and fasteners is a key step before replacing a Trex board with hidden fasteners. This check helps ensure the deck’s structure is safe and ready for the new board. It prevents future problems and keeps your deck strong.
Start by examining the joists under the board. Look for any signs of damage, rot, or weakness. Joists should be solid and free from cracks or soft spots. Strong joists hold the boards firmly and keep the deck stable.
Next, check the fasteners that attach the hidden clips to the joists. Make sure these fasteners are not loose or rusted. Tight and clean fasteners keep the boards in place and avoid movement or noise. Replace any damaged fasteners before installing the new board.
How To Identify Damaged Joists
Look closely for dark spots or soft areas on the wood. These may show water damage or rot. Tap the joist with a tool; a hollow sound means the wood is weak. Also, check for cracks or splits that can reduce strength.
Checking The Condition Of Hidden Fasteners
Inspect the fasteners for rust or corrosion. Rust weakens the metal and can cause fasteners to break. Pull gently on each fastener to see if it is loose. Loose fasteners need tightening or replacement for a secure hold.
Preparing Joists And Fasteners For Replacement
Remove any debris or dirt on the joists and fasteners. Clean surfaces help new fasteners grip better. Replace any joists that show serious damage. Use new corrosion-resistant fasteners for best results.
Cutting The Replacement Board To Size
Cutting the replacement Trex board to the correct size is a key step. The board must fit perfectly into the space left by the old one. This ensures a smooth, clean finish and avoids gaps or uneven surfaces.
Measure twice, cut once. Accurate measurements help prevent mistakes. Use a tape measure to check the length and width carefully.
Preparing The Board For Cutting
Place the replacement board on a flat surface. Mark the exact cut line with a pencil. Use a straight edge or ruler for a clean, straight mark.
Choosing The Right Saw
A circular saw works best for cutting Trex boards. It makes straight, clean cuts quickly. Set the blade depth to just a little deeper than the board thickness.
Making The Cut Safely
Wear safety glasses and gloves before cutting. Hold the board firmly to stop it from moving. Cut slowly along the marked line to avoid splinters.
Sanding The Cut Edges
After cutting, smooth the edges with sandpaper. This removes rough spots and sharp edges. It helps the board fit better and looks neat.
Credit: www.trex.com
Installing Hidden Fasteners On The New Board
Start by aligning the new Trex board with the deck frame. Insert hidden fasteners into the board grooves, then secure them tightly. This method keeps screws out of sight for a clean, smooth surface.
Preparing The New Trex Board
Start by cleaning the new Trex board. Remove any dust or debris. This step helps the fasteners grip properly. Check the board edges for any damage. Smooth rough spots with sandpaper. Proper preparation ensures a strong and neat installation.
Aligning The Hidden Fasteners
Place the hidden fasteners along the board groove. Space them about 12 inches apart. Use a measuring tape for accuracy. Make sure fasteners sit flush inside the groove. Proper alignment keeps the board secure and even.
Securing The Fasteners To The Joists
Position the board on the deck frame. Drive screws through the fastener holes into the joists. Use a drill with the right bit size. Tighten screws until the fastener holds firmly. Avoid over-tightening, which can damage the board or fastener.
Sliding The Board Into Place
Slide the new board into the fasteners on the previous board. Push firmly to lock it in place. Check for gaps or misalignment. Adjust the board slightly if needed. Proper engagement of fasteners keeps the deck surface smooth and stable.
Securing The Replacement Board
Securing the replacement Trex board properly is important for a strong, lasting deck. This step keeps the board in place and prevents movement or damage. Use the right tools and methods to fit the board snugly.
Hidden fasteners give a clean look and protect the deck’s surface. Follow each step carefully to ensure the board fits well and stays secure.
Preparing The Replacement Board
Check the board for any damage or dirt. Clean it to ensure fasteners grip well. Measure the board length to match the deck space exactly. Trim if needed. Dry fit the board before fastening to avoid mistakes.
Aligning Hidden Fasteners
Place the hidden fasteners in the groove on the board edge. Space them evenly, about 12 inches apart. Make sure the fasteners fit tightly against the board and joist. This alignment keeps the board stable and flush with others.
Securing Fasteners To Joists
Use the right screws for your fasteners and joists. Screw each fastener firmly but avoid overtightening. Tight screws hold boards firmly without cracking. Check fastener placement to prevent any gaps between boards.
Final Board Placement
Slide the replacement board into the fasteners’ slots gently. Press the board down to lock it into place. Check the board is level and even with the deck surface. Make small adjustments if needed to maintain a smooth deck.
Finishing Touches And Maintenance Tips
Finishing touches and maintenance are key after replacing a Trex board with hidden fasteners. These steps keep your deck safe and looking great for years. Proper care prevents damage and extends the life of your deck.
Small details in finishing help the board fit perfectly. Maintenance keeps the hidden fasteners working well and protects the wood from wear.
Cleaning The Deck Surface
Start by removing dirt and debris. Use a soft brush or broom for gentle cleaning. Avoid harsh chemicals that can damage Trex boards. Mild soap and water work best. Clean regularly to stop mold and stains from building up.
Inspecting For Loose Boards
Check the replaced board and nearby areas for movement. Hidden fasteners may loosen over time. Press down on the board to feel if it shifts. Tighten any loose fasteners to keep the deck safe. Do this inspection twice a year.
Protecting The Deck From Damage
Keep sharp objects away to avoid scratches. Place furniture pads under heavy items. Avoid dragging furniture across the deck surface. Cover the deck during harsh weather to reduce wear. Use a sealant recommended for Trex if needed.
Dealing With Stains And Spills
Clean spills quickly to prevent staining. Use a soft cloth and mild soap. Avoid bleach or strong cleaners that harm the material. For tough stains, use a cleaner made for composite decks. Test cleaners on a small area first.
Frequently Asked Questions
How Do You Remove A Trex Board With Hidden Fasteners?
To remove a Trex board, first unscrew the hidden fasteners using a special tool. Then gently lift and slide the board out. Avoid damaging adjacent boards by working slowly and carefully.
What Tools Are Needed To Replace Trex Hidden Fastener Boards?
You need a hidden fastener removal tool, a drill, replacement fasteners, and a pry bar. These tools help safely remove and install Trex boards with hidden fasteners.
How Do You Install A New Trex Board With Hidden Fasteners?
Place the new board in position, align it with the joists, and insert hidden fasteners. Secure fasteners with a drill to ensure a tight fit. Check that the board is level and properly spaced.
Can I Reuse Hidden Fasteners When Replacing Trex Boards?
Reusing hidden fasteners is not recommended. Old fasteners may lose grip and cause instability. Always use new hidden fasteners for a secure and lasting installation.
Conclusion
Replacing a Trex board with hidden fasteners is easier than it seems. Follow each step carefully to avoid mistakes. Use the right tools to make the job smooth. Take your time and check your work often. A well-done repair keeps your deck safe and looking good.
Now, you can enjoy your outdoor space with confidence. Simple steps lead to great results. Keep practicing, and this task will become second nature.