Have you ever tried hanging something important on your wall, only to find the anchor is crooked? It’s frustrating, isn’t it?
A crooked wall anchor can ruin the look of your space and make your item feel unsafe. But don’t worry—you don’t need to call a professional or start from scratch. You’ll discover simple, effective steps to fix that crooked wall anchor quickly.
By the end, you’ll have the confidence to make your walls look straight and strong again. Keep reading, and let’s get your wall looking perfect!

Credit: www.permaseal.net
Identify The Problem
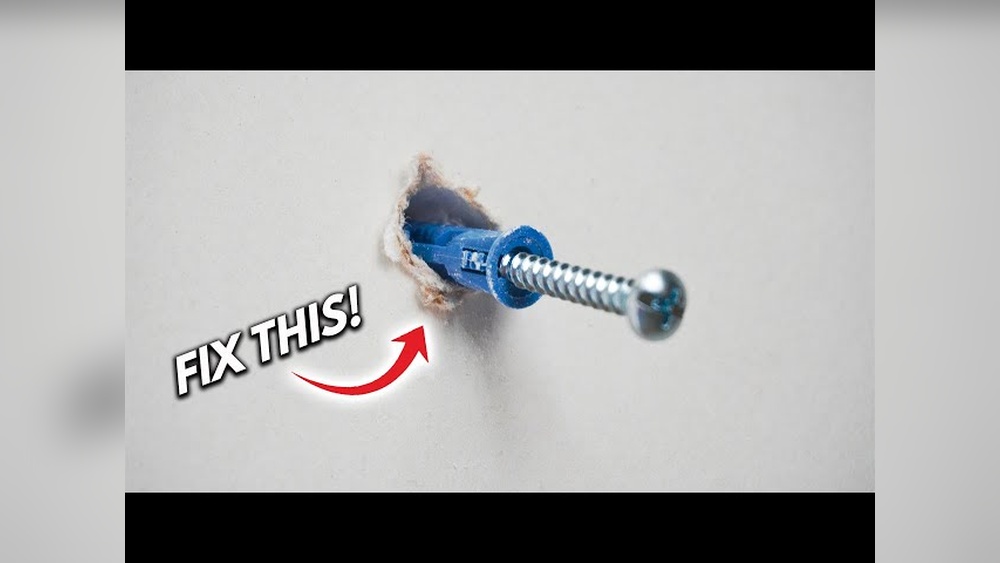
Before fixing a crooked wall anchor, you must identify the problem. This step helps you know what caused the issue and how to fix it properly. A crooked anchor can weaken the hold on your wall and cause damage. Knowing the signs and causes will save you time and effort in repair.
Signs Of A Crooked Wall Anchor
Look closely at the anchor in your wall. Is it leaning to one side? Does it stick out unevenly? These are clear signs of a crooked anchor. Sometimes, you may notice the screw is hard to turn or feels loose. Another sign is damage around the anchor, like cracks or holes in the wall. These clues show the anchor is not installed correctly.
Common Causes
Several reasons can make a wall anchor crooked. One cause is drilling the hole at the wrong angle. This mistake makes the anchor tilt inside the wall. Using the wrong size drill bit can also cause problems. If the hole is too big, the anchor won’t fit tightly. Poor quality anchors may bend or break during installation. Lastly, pushing the anchor in with too much force can misalign it.
Credit: stratumrepair.com
Remove The Crooked Anchor
Preparing the wall is a crucial step before fixing a crooked wall anchor. It ensures the surface is ready for a secure and stable anchor placement. Taking time to prepare the wall prevents future damage and holds the anchor firmly.
Cleaning The Hole
Start by removing loose debris inside the hole. Use a small brush or a vacuum cleaner to clear dust. A clean hole helps the new anchor grip better. Avoid pushing dirt further into the wall.
Filling Damaged Areas
Inspect the hole for cracks or large gaps. Fill any damaged spots with a wall filler or spackle. Smooth the surface with a putty knife for evenness. Let the filler dry completely before moving on.
Prepare The Wall
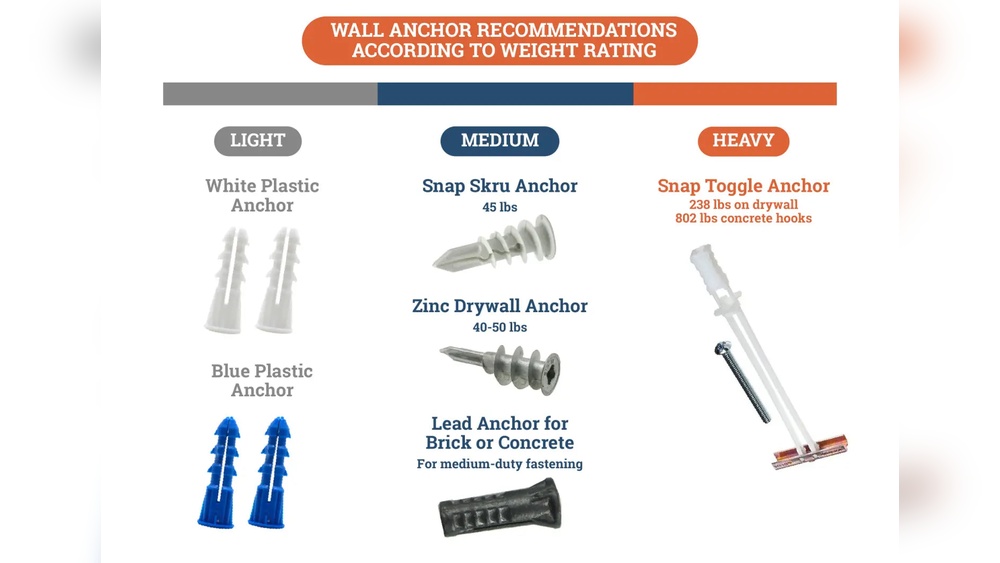
Choosing the right wall anchor is key to fixing a crooked wall anchor. A proper anchor holds weight firmly and stays straight. Using the wrong type can cause damage and make the anchor slip. Understanding different anchors and matching them to your wall type helps you get the best hold.
Types Of Wall Anchors
There are several wall anchors for different jobs. Plastic expansion anchors fit light loads and drywall. Molly bolts expand behind the wall for medium weight. Toggle bolts have wings that open inside the wall for heavy items. Self-drilling anchors screw directly into drywall without pre-drilling. Each type suits specific weight and wall conditions.
Matching Anchor To Wall Type
Knowing your wall material ensures a solid anchor hold. Drywall needs anchors that spread weight, like toggle bolts or molly bolts. Concrete or brick walls require heavy-duty anchors like sleeve anchors. Plaster walls need gentle anchors to avoid cracks. Match the anchor size to the hole and load. Use anchors made for your exact wall type to avoid crooked or loose fixes.
Choose The Right Anchor
Reinstalling a crooked wall anchor takes careful steps. You must prepare the wall and place the anchor correctly. This process helps the anchor hold firmly and keeps your items secure. Follow these steps to fix the anchor with ease and precision.
Marking The Spot
Start by choosing the right spot for the anchor. Use a pencil to mark the exact place. Check the mark twice to avoid mistakes. A clear mark guides your drill and keeps the anchor straight.
Proper Drilling Technique
Use a drill bit that matches the anchor size. Hold the drill steady and drill slowly. Keep the drill straight to make a clean hole. Stop drilling once you reach the right depth.
Securing The Anchor
Insert the anchor gently into the hole. Tap it lightly with a hammer if needed. Push the anchor until it fits flush with the wall. Tighten the screw carefully to avoid bending the anchor.
Reinstall The Anchor
Testing the stability of a crooked wall anchor is important. It ensures the anchor holds well and safely supports weight. This step helps avoid damage or accidents later.
Weight Capacity Check
Start by checking the weight the anchor can hold. Use a scale or known weight to test it gently. Apply pressure slowly to see if the anchor stays firm. Do not overload it beyond its limit. A stable anchor should not move or loosen under pressure.
Adjustments If Needed
If the anchor feels loose or shifts, make adjustments. Tighten the anchor screw carefully to improve grip. For plastic anchors, try pushing it deeper or using a bigger size. If the wall material is weak, consider using a different type of anchor. Repeat the weight test after adjusting to confirm stability.
Test The Anchor Stability
Preventing future issues with wall anchors saves time and effort. Fixing a crooked anchor is easier when you avoid common mistakes. Proper steps help keep anchors secure and walls intact. Follow simple tips for better installation and care.
Tips For Accurate Installation
Mark the spot clearly before drilling. Use a level to keep holes straight. Choose the right size anchor for the weight. Drill slowly and steadily to avoid wall damage. Insert the anchor straight, not at an angle. Check the fit before tightening screws.
Maintenance Advice
Check anchors regularly for looseness or damage. Tighten screws gently if they feel loose. Avoid overloading anchors beyond their weight limit. Replace damaged anchors immediately to prevent wall harm. Keep walls dry to stop anchor rusting or weakening.

Credit: www.frontierbasementsystems.com
Frequently Asked Questions
How Do I Fix A Crooked Wall Anchor Easily?
To fix a crooked wall anchor, remove it gently first. Then, drill a new hole at the right angle. Insert a new anchor carefully, ensuring it is straight before tightening. This prevents damage and ensures a secure hold for your fixture.
What Tools Are Needed To Straighten A Wall Anchor?
You need a drill, screwdriver, pliers, and a level. These tools help remove the crooked anchor and insert a new one straight. Using a level ensures the anchor is perfectly aligned for proper support and stability.
Can A Crooked Wall Anchor Hold Heavy Items Safely?
No, a crooked wall anchor cannot hold heavy items safely. It compromises the anchor’s grip and may cause it to loosen or pull out. Always fix or replace crooked anchors before hanging heavy objects to avoid accidents.
Why Do Wall Anchors Become Crooked During Installation?
Wall anchors become crooked due to improper drilling angle or uneven wall surfaces. Using the wrong size drill bit or rushing the process also causes misalignment. Correct drilling techniques and the right tools prevent crooked anchors.
Conclusion
Fixing a crooked wall anchor takes patience and the right steps. Start by removing the anchor carefully. Then, fill the hole and let it dry. Drill a new hole straight and insert a proper anchor. Tighten the screw gently to avoid damage.
This method keeps your wall strong and safe. Small fixes like this save time and money later. Try these tips for a neat, sturdy wall. Simple actions can make a big difference.