Are you ready to upgrade your home lighting but unsure how to connect a Leviton light switch? You’re not alone, and this guide is made just for you.
Whether you’re a beginner or have some DIY experience, understanding the simple steps to install your Leviton switch can save you time and money. Imagine turning on your lights with a smooth, reliable switch that you installed yourself—no electrician needed.
Keep reading, and you’ll discover easy, clear instructions that make the process stress-free and even enjoyable. Let’s get started and make your lighting work exactly the way you want it.
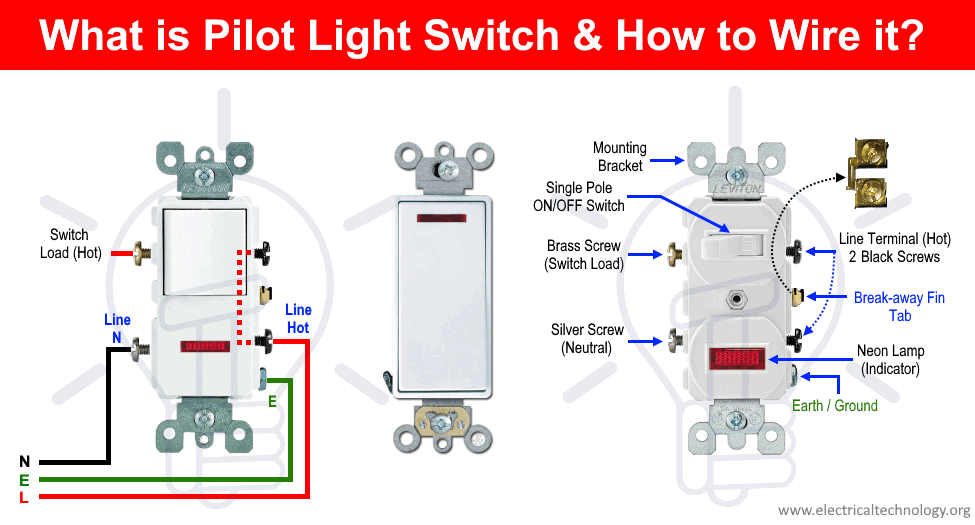
Credit: www.electricaltechnology.org
Tools And Materials Needed
Before starting to connect a Leviton light switch, gather the right tools and materials. Having them ready makes the process smooth and safe. This list covers everything needed for a basic installation. Simple tools and parts will help you finish the job quickly.
Tools Required
- Screwdriver (flathead and Phillips)
- Wire stripper
- Voltage tester
- Needle-nose pliers
- Electrical tape
- Flashlight or work light
Materials Needed
- Leviton light switch
- Wire connectors (wire nuts)
- Electrical box (if replacement needed)
- Wire (if existing wire is damaged)
Safety Equipment
- Insulated gloves
- Safety goggles

Credit: diy.stackexchange.com
Safety Precautions
Safety is the first step before connecting a Leviton light switch. Working with electricity can be dangerous. Taking precautions protects you and your home. Follow these simple safety tips to avoid accidents and damage.
Turn Off Power At The Circuit Breaker
Always switch off the power at the main breaker. Do not rely on the light switch itself. Use a tester to check if the wires are live. No electricity means safer work conditions.
Use Insulated Tools
Choose tools with insulated handles. They reduce the risk of electric shock. Avoid using metal tools without insulation. This small step can save your life.
Wear Protective Gear
Wear rubber gloves and safety glasses. Gloves protect your hands from shocks. Glasses keep debris and dust out of your eyes. Safety gear adds extra protection.
Read The Instructions Carefully
Follow the Leviton switch manual step-by-step. Each model may have specific requirements. Clear understanding helps avoid mistakes. Do not skip any instructions.
Check For Damaged Wires
Inspect wires before connecting the switch. Look for cracks, burns, or frays. Replace damaged wires to prevent hazards. Safe wiring ensures long-lasting installation.
Identify Existing Wiring
Start by turning off the power to the switch at the breaker box. Check the wires connected to the old switch to know their colors and positions. This helps you connect the new Leviton switch safely and correctly.
Turn Off Power At The Circuit Breaker
Safety is the first step. Switch off the power to the light switch circuit. This stops any electric shock risk. Use a circuit breaker or fuse box to cut power. Confirm the power is off by testing the switch or light.
Remove The Existing Switch Cover
Unscrew the faceplate covering the switch. Gently pull the cover away from the wall. This reveals the wiring behind the switch. Keep the screws safe for later use.
Observe The Wire Types And Colors
Look closely at the wires. Usually, black or red wires are hot wires. White wires are neutral. Green or bare wires are ground wires. Note how many wires connect to the switch.
Take A Photo Or Draw A Diagram
Document the wiring setup. Use a phone to take a clear photo. Or draw a simple sketch. This helps during the new switch installation. It prevents confusion and errors.
Identify The Line And Load Wires
The line wire brings power from the breaker. The load wire leads to the light fixture. Knowing these helps connect the Leviton switch correctly. Test wires with a voltage tester if unsure.
Turn Off Power
Before starting any electrical work, always turn off the power. It keeps you safe from shocks and accidents. This step protects you and your home wiring.
Turning off power is simple. It takes just a few minutes but is very important. Never skip this step when connecting a Leviton light switch.
Locate The Circuit Breaker Panel
Find your home’s circuit breaker panel. It is usually in a basement, garage, or utility room. The panel has switches that control power to different parts of the house.
Identify The Correct Breaker
Look for the breaker that controls the light switch you want to replace. It might be labeled by room or area. If not, turn off breakers one by one to find the right one.
Switch Off The Breaker
Flip the correct breaker to the OFF position. This stops electricity from flowing to the switch. Double-check that the power is off before touching wires.
Test The Power Is Off
Use a voltage tester or a simple light bulb to check the switch wires. If no power is detected, it is safe to proceed. Never assume power is off without testing.
Remove Old Switch
Removing the old switch is the first step in installing your new Leviton light switch. It is important to do this safely and carefully. This step helps prepare the wiring for the new device. Follow each step closely to avoid any electrical issues.
Turn Off Power At The Circuit Breaker
Start by turning off the power to the switch. Find the correct circuit breaker in your panel. Flip the switch to the off position. This stops electricity from flowing to the switch. Use a voltage tester to confirm no power is present.
Unscrew The Switch Cover Plate
Remove the screws holding the cover plate. Use a flathead or Phillips screwdriver. Set the screws and plate aside safely. This exposes the switch and wiring behind it. Be gentle to avoid cracking the plate.
Remove Switch Mounting Screws
Locate the screws securing the switch to the electrical box. Unscrew them carefully. Keep these screws for use with the new switch. Pull the switch out slowly to access the wires. Avoid pulling too hard on the wires.
Disconnect The Wiring
Identify the wires connected to the old switch. Note their positions or take a photo. Loosen the terminal screws or release wire connectors. Gently remove the wires from the switch. Keep wires separated and straight for the next step.
Connect Leviton Switch Wires
Connecting the wires on your Leviton light switch is a key step. It ensures the switch works safely and correctly. Take your time and follow these simple steps. Clear and secure wire connections prevent future problems.
Understanding wire colors and how to join them helps you avoid mistakes. Use the right tools and be careful. This guide makes the process easy and safe.
Match Wire Colors
Start by identifying the wires in your wall and on the switch. Usually, black wires are hot, white are neutral, and green or bare copper is ground. Match each wire color from the wall to the switch’s wires. Keep colors consistent to avoid confusion and danger. This step is important to make sure the switch controls the light properly.
Secure Wire Connections
After matching colors, twist wires together tightly. Use a wire connector or wire nut to cover the exposed wire ends. Make sure the connection feels firm and does not pull apart. Secure connections stop sparks and shorts. Finally, tuck the wires neatly into the electrical box before attaching the switch. This keeps everything safe and clean inside the wall.
Mount The New Switch
Mounting the new Leviton light switch is a key step. It ensures the switch fits securely in the wall box. This process requires care and attention to avoid damage. Follow clear steps for a safe and neat installation.
Take your time to position the switch correctly. A well-mounted switch looks good and works perfectly.
Align The Switch With The Wall Box
Hold the switch close to the wall box. Check that the wires do not get pinched. The switch must sit flat inside the box. Align the screw holes on the switch with those in the box.
Secure The Switch With Screws
Use the screws that came with the switch. Insert them into the holes carefully. Tighten the screws until the switch is firm. Avoid over-tightening to prevent cracking the switch.
Check The Switch Position
Make sure the switch is straight and flush with the wall. Adjust slightly if needed. A crooked switch can look bad and might cause problems.
Attach The Wall Plate
Place the wall plate over the switch. Line up the screw holes. Use the small screws to fix the plate in place. Tighten screws gently for a clean finish.
Restore Power And Test
Restoring power and testing your Leviton light switch is the final step. It confirms the switch works correctly and safely. Take care to follow the steps carefully. This ensures no damage or electrical issues occur.
Turn The Circuit Breaker Back On
Locate your home’s circuit breaker panel. Find the breaker you turned off earlier. Flip the switch back to the “on” position. This restores power to the light switch. Wait a few seconds for the electricity to flow.
Test The Leviton Light Switch
Press the switch to turn the light on. Check if the light responds immediately. Press the switch again to turn the light off. Repeat this a few times to confirm consistent operation. If the light does not work, double-check your connections.
Check For Any Issues
Look for flickering lights or unusual sounds. Make sure the switch feels firm and clicks properly. If you notice problems, turn off the circuit breaker again. Inspect the wiring and connections carefully. Correct any mistakes before restoring power again.
Troubleshooting Tips
Troubleshooting a Leviton light switch can be simple with the right steps. Problems often happen due to wiring or power issues. This section helps identify common problems and offers easy fixes. Follow these tips to get your switch working again quickly.
Check The Power Supply
Start by confirming the power is on at the breaker. A tripped breaker can stop the switch from working. Use a voltage tester on the switch wires to see if power is present. No power means checking your circuit breaker box next.
Verify Proper Wiring
Loose or wrong wires cause many problems. Turn off the power before inspecting wires. Make sure each wire matches the switch terminals as per the instructions. Tighten any loose wire connections carefully to avoid poor contact.
Test The Switch Function
Press the switch several times to check for mechanical issues. A switch that feels stuck or loose may need replacement. Use a continuity tester to see if the switch completes the circuit when on.
Look For Faulty Components
Sometimes the switch itself is defective. Test with a known working switch if possible. Replace the switch if testing shows no continuity or power flow.
Confirm Grounding And Neutral Connections
Ground and neutral wires must be connected properly. Check for loose or missing ground wires. A missing neutral can cause the switch to fail or flicker.
Use The Correct Tools
Using a voltage tester and screwdriver helps avoid mistakes. These tools make it easier to find wiring errors or power issues. Always use insulated tools for safety.
Credit: www.youtube.com
Frequently Asked Questions
How Do I Safely Connect A Leviton Light Switch?
Turn off the power at the circuit breaker first. Use a voltage tester to confirm no current flows. Connect the wires to the switch terminals as per the instructions. Secure the switch and restore power to test functionality.
What Tools Are Needed To Install A Leviton Switch?
You need a screwdriver, wire stripper, voltage tester, and electrical tape. These tools help you safely connect and secure the wires. Having them ready makes installation efficient and safe.
Can I Replace Any Switch With A Leviton Light Switch?
Most standard switches can be replaced with Leviton switches. Ensure the new switch matches your wiring and voltage type. Check the switch specifications before installation for compatibility.
How Do I Identify Wires For Leviton Switch Connection?
Typically, black is the hot wire, white is neutral, and green or bare is ground. Use a voltage tester to confirm wire functions. Follow the switch’s wiring diagram for proper connection.
Conclusion
Connecting a Leviton light switch is simple with clear steps. Always turn off power before starting any work. Take your time and follow the instructions carefully. Double-check your wiring to avoid mistakes or hazards. Once installed, test the switch to ensure it works correctly.
This small task can improve your home’s lighting easily. Enjoy the satisfaction of completing a DIY project yourself. Safety first, and don’t rush the process. You can handle this with basic tools and patience.