Looking for a simple way to organize your garage and free up valuable space? Installing garage wall hooks is one of the easiest and most effective solutions you can try right now.
Imagine having all your tools, bikes, and gear neatly hung and easy to find whenever you need them. In this guide, you’ll learn exactly how to install garage wall hooks quickly and securely—even if you’ve never done it before. Ready to transform your cluttered garage into a tidy, functional space?
Let’s get started!

Credit: www.amazon.com
Choosing The Right Hooks
Choosing the right hooks for your garage walls is key to keeping things neat. The right hooks hold your tools and gear safely. They help you use space smartly and keep your garage tidy.
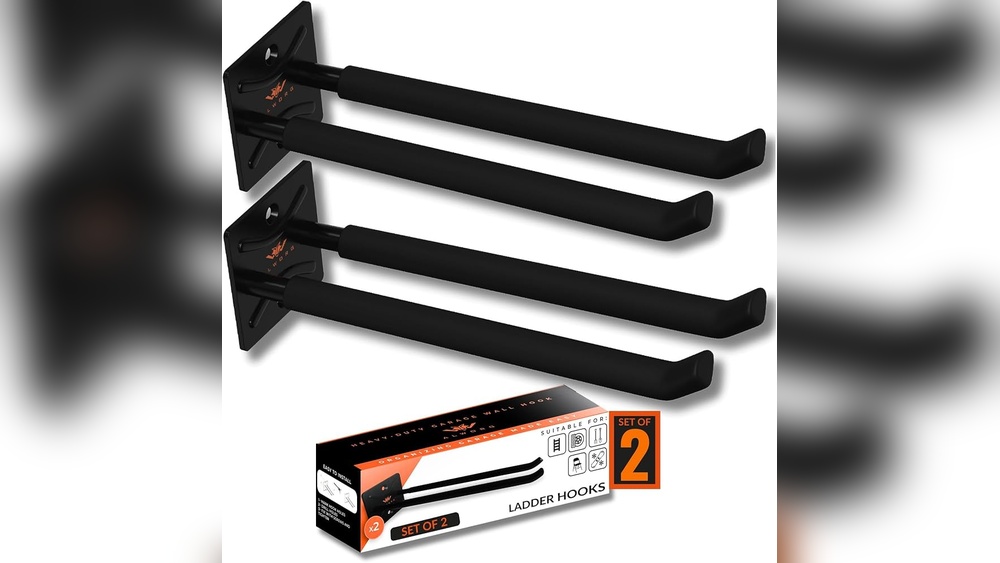
Types Of Garage Wall Hooks
Wall hooks come in many styles. Some hooks have a single prong, good for hanging bikes or ladders. Double hooks hold bigger items like shovels or cords. Specialty hooks fit garden tools or sports gear. Pick hooks that match what you need to hang.
Material And Weight Capacity
Hooks must be strong enough for your items. Metal hooks hold heavy tools well. Plastic hooks work for light items like cords or small tools. Check the weight limit on the hook package. Use hooks that can carry the weight without bending or breaking.
Sizing And Design Considerations
Size matters for your hooks. Big hooks fit large tools or bulky items. Small hooks suit lighter or compact things. Look at the hook shape too. Curved hooks keep items from slipping off. Flat hooks work for hanging flat objects like boards or panels.
Preparing The Wall
Preparing the wall is an important step before installing garage wall hooks. A well-prepared wall ensures the hooks hold heavy items securely. It also makes installation easier and faster. Follow these steps to prepare your garage wall properly.
Locating Wall Studs
Wall studs are the wooden beams behind the drywall. Hooks attached to studs hold more weight. Use a stud finder to locate the studs. Move the finder slowly along the wall. Mark the spots where it signals a stud. Avoid placing hooks only on drywall.
Cleaning The Surface
Clean the wall surface before installation. Dust and dirt reduce hook adhesion and screw grip. Use a damp cloth to wipe the area. Allow the wall to dry completely. A clean surface prevents damage and keeps hooks firm.
Gathering Necessary Tools
Collect all tools before starting. You will need a stud finder, drill, screws, screwdriver, and a pencil. Having tools ready saves time and effort. Choose screws suitable for wall type and hook weight. Proper tools make installation safe and smooth.
Marking Hook Positions
Marking the positions for your garage wall hooks is an important step. It helps to place the hooks evenly and at the right height. This step makes your garage look neat and ensures hooks hold items securely.
Take your time to mark where each hook will go. Clear marks guide you during drilling and installation. Correct placement prevents damage to walls and makes your garage organized.
Measuring Height And Spacing
Start by deciding the height for your hooks. Think about what you will hang. For heavy items, place hooks lower for easy reach. For brooms or tools, higher hooks work well.
Use a tape measure to mark the height on the wall. Next, measure the distance between hooks. Space hooks to fit the size of your items. Leave enough room so items don’t overlap.
Using A Level For Accuracy
A level keeps your hooks straight and even. Hold the level against the wall where you marked. Adjust the marks until the bubble is centered.
Mark the final spots with a pencil. Double-check with the level before drilling. Straight hooks make your garage look tidy and help items hang properly.
Installing The Hooks
Installing garage wall hooks is a simple task that makes your space organized. Follow clear steps to fix hooks safely and securely. Proper installation helps hooks hold heavy items without falling.
Drilling Pilot Holes
Start by marking where you want the hooks. Use a pencil for clear spots on the wall. Choose a drill bit slightly smaller than the screw size. Drill pilot holes carefully at each mark. These holes guide screws and prevent wall damage.
Securing Hooks With Screws
Place the hook over the pilot hole. Insert screws through the hook holes into the wall. Tighten screws using a screwdriver or drill with a driver bit. Make sure screws are snug but avoid over-tightening. This keeps hooks firm and stable.
Using Anchors For Drywall
Drywall often needs anchors for strong hold. Insert a drywall anchor into each pilot hole. Tap gently with a hammer until flush with the wall. Then, screw the hooks into the anchors. Anchors stop screws from pulling out under weight.
Organizing Your Items
Organizing your items on garage wall hooks helps keep the space neat and accessible. Proper organization saves time when searching for tools and gear. It also protects items from damage and clutter.
Using wall hooks wisely turns empty walls into useful storage areas. Here are some tips for organizing your items effectively.
Grouping Similar Items
Group items by type to find them quickly. Hang gardening tools like rakes and shovels together. Keep sports equipment in one spot. This makes your garage look tidy and helps you know where each item belongs.
Maximizing Space Efficiency
Place frequently used items at eye level for easy reach. Use higher hooks for seasonal or rarely used gear. Arrange items vertically to save floor space. This method keeps the garage open and easy to move around.
Safety Tips For Heavy Items
Use strong hooks designed for heavy loads. Secure them into wall studs for extra support. Avoid hanging very heavy items too high. This prevents accidents and protects your belongings from falling.

Credit: www.walmart.com
Maintenance And Adjustments
Maintaining your garage wall hooks keeps them strong and safe. Regular checks help avoid accidents and keep your garage neat. Small adjustments make a big difference in how well hooks work. Follow these simple steps to care for your hooks and keep them in top shape.
Checking Hook Stability
Test each hook by gently pulling on it. If it moves or feels loose, tighten the screws. Use a screwdriver to secure hooks firmly to the wall. Loose hooks can cause items to fall and break. Regular checks ensure your hooks hold heavy tools safely.
Replacing Or Adding Hooks
Replace hooks that show signs of rust or damage. Choose hooks that fit the weight of your tools. Add extra hooks for new items or storage needs. Use the right tools and anchors for a strong hold. Changing hooks keeps your garage organized and prevents clutter.
Cleaning And Upkeep
Wipe hooks with a damp cloth to remove dust and dirt. Avoid using harsh chemicals that can damage the finish. Keep the wall around hooks clean to prevent mold and stains. Regular cleaning helps hooks last longer and look good. A tidy space makes it easier to find your tools.

Credit: www.gladiatorgarageworks.com
Frequently Asked Questions
What Tools Are Needed To Install Garage Wall Hooks?
You need a drill, screws, anchors, a stud finder, a pencil, and a level. These tools ensure secure and accurate hook installation.
How Do I Find The Best Spot For Wall Hooks?
Use a stud finder to locate studs for strong support. Mark spots evenly spaced for balanced weight distribution.
Can I Install Garage Hooks On Drywall Alone?
Yes, but use heavy-duty anchors for drywall. Hooks on studs provide better strength for heavier items.
What Weight Can Garage Wall Hooks Support?
Weight capacity depends on hook type and mounting method. Hooks on studs typically support 50-100 pounds safely.
Conclusion
Installing garage wall hooks saves space and keeps your garage neat. Choose the right hooks for your needs and follow the steps carefully. Mark the spots, drill holes, and secure the hooks firmly. This small effort makes a big difference in organization.
Enjoy easy access to your tools and gear every day. A tidy garage feels better and works better. Start your project today and see the benefits quickly. Simple steps, great results.