Are your floor joists not quite level, causing uneven floors or squeaky spots? Knowing how to raise or lower a floor joist L jack can save you time, money, and frustration.
Whether you’re fixing a sagging floor or adjusting joists during a renovation, this simple technique puts you in control. You’ll discover clear, step-by-step instructions that make the process easy—even if you’ve never done it before. Keep reading, and you’ll learn how to tackle this common problem with confidence and get your floors feeling solid and smooth again.
Tools And Materials Needed
Preparing the right tools and materials is key to raising or lowering a floor joist L jack safely and efficiently. Having everything ready helps the work go smoothly. It also reduces the chance of mistakes or delays.
This section lists all essential items needed for this task. Each tool and material plays a specific role in the process. Knowing what to have on hand makes the job easier and safer.
Basic Tools
Start with a strong set of hand tools. A hammer, tape measure, and carpenter’s pencil are necessary. A level ensures the joist sits perfectly straight. A pry bar helps remove old nails and boards.
Power Tools
A cordless drill with various drill bits is important for making holes. A circular saw or reciprocating saw cuts wood to size. An impact driver works well for heavy-duty screws.
Materials Needed
Use quality lumber that matches existing joists in size and type. Joist hangers and L jacks provide stable support. Nails, screws, and metal connectors hold everything securely in place.
Safety Gear
Wear protective gloves to guard your hands. Safety glasses shield eyes from flying debris. Knee pads help when working low to the floor. A dust mask is good for cutting wood indoors.
Assessing Floor Joist Height
Assessing floor joist height is the first step in raising or lowering an L jack. It helps you understand the current structure and plan adjustments. Accurate assessment prevents problems during installation and ensures a level floor.
Measuring Joist Elevation
Start by measuring the height of the floor joists. Use a tape measure from the bottom of the joist to the subfloor or finished floor surface. Take several measurements along the joist to check for unevenness. Record these numbers carefully. This data shows where the floor is high or low.
Identifying Adjustment Needs
Compare your measurements to the desired floor level. Look for joists that are too high or too low. Mark these spots clearly. Joists higher than the target need to be lowered. Joists lower than the target require raising. This step guides your next moves with the L jack.
Preparing The Work Area
Preparing the work area is the first step in raising or lowering a floor joist L jack. A clean and safe space helps the job go smoothly. It also protects you and your tools from damage. Take time to set up your area before starting any work.
Clearing The Space
Remove all furniture and objects near the joist. This gives you plenty of room to work. Clear dust and debris from the floor and joist. A tidy area helps you see what you are doing. It also stops things from falling or breaking.
Ensuring Safety Measures
Wear protective gear like gloves and safety glasses. Check that your tools are in good shape. Make sure the floor is stable and not slippery. Use supports or braces to hold the joist steady. Keep children and pets out of the work area. Safety comes first to avoid accidents and injuries.
Raising Floor Joist L Jack
Raising a floor joist L jack is a useful skill for adjusting floor height or fixing uneven floors. This process helps support the joist better and prevent sagging. It involves careful steps to make sure the jack is stable and secure.
Loosening Existing Supports
Start by loosening the bolts or screws holding the L jack. Use a wrench or screwdriver for this. Loosening allows the jack to move freely. Do not remove the bolts completely. Just loosen enough to adjust the height.
Adjusting To Desired Height
Next, raise the L jack to the height needed. Lift slowly and check the floor level as you go. Use a level tool for accuracy. Stop when the floor feels even and stable. Small adjustments are better than big jumps.
Securing The Jack
After adjusting, tighten the bolts or screws firmly. This locks the L jack in place. Double-check the floor level again. Make sure the jack does not move. Proper securing keeps the floor safe and strong.
Lowering Floor Joist L Jack
Lowering a floor joist L jack is a task that requires care and precision. This process helps adjust the joist height to ensure a level floor. It involves careful handling to avoid damage or injury. Follow these steps to lower the L jack safely and accurately.
Releasing Pressure Safely
Start by checking the pressure on the L jack. Use a wrench or handle to slowly turn the screw. Do not rush. Let the pressure release gradually. This prevents sudden drops or damage to the joist. Wear gloves for better grip and safety. Always keep your hands clear from pinch points.
Lowering To Correct Level
Lower the L jack slowly to the right height. Use a level tool to check the joist position. Small adjustments help you reach the perfect level. Stop lowering once the joist is aligned with nearby beams. Avoid lowering too far to prevent instability. Take your time to ensure accuracy.
Locking In Position
Once at the correct height, secure the L jack. Tighten the screw firmly to lock the position. Double-check the joist level again. Proper locking stops the joist from moving later. This keeps the floor stable and safe. Inspect the jack and joist for any signs of stress or wear before finishing.

Credit: oldhousecrazy.com
Checking For Proper Support
Checking for proper support is a key step when raising or lowering a floor joist L jack. Proper support keeps the floor strong and safe. It stops movement and prevents damage. You must be sure the L jack holds the weight correctly before finishing the job. This step helps avoid future problems.
Testing Stability
Start by gently shaking the L jack. It should not move or wobble. Press down on the joist above to check for any shifts. Use a level to see if the floor is even. If the L jack feels loose, it needs more support. Tighten bolts or add shims to fix this. Stability ensures the joist stays steady over time.
Making Final Adjustments
Adjust the height of the L jack slowly and carefully. Use a wrench to raise or lower the jack in small steps. Check the level after each change. Make sure the joist is aligned with nearby joists. Once aligned, tighten all bolts firmly. Double-check for any movement or gaps. Final adjustments make sure the floor is balanced and safe.
Common Mistakes To Avoid
Raising or lowering a floor joist L jack requires care and skill. Mistakes can cause damage or unsafe conditions. Avoiding common errors saves time and money. It also keeps your floor strong and stable.
Focus on the right tools, measurements, and support. Small errors can lead to big problems. Below are common mistakes to avoid during this process.
Using Incorrect Support Materials
Choosing the wrong materials weakens the joist support. Use sturdy wood or metal designed for joist work. Avoid scraps or damaged pieces. Proper materials ensure safety and durability.
Failing To Measure Properly
Incorrect measurements cause uneven floors or gaps. Measure twice and cut once. Check joist height and length carefully before installation. Precise measurements help the L jack fit perfectly.
Ignoring Weight Distribution
Uneven weight can cause joists to shift or crack. Make sure the load spreads evenly across the L jack. Use additional supports if needed. Balanced weight keeps the floor steady and safe.
Not Securing The L Jack Firmly
Loose L jacks lead to instability and noise. Tighten bolts and screws properly. Check all fasteners after installation. Firm attachment prevents movement and future repairs.
Skipping Safety Precautions
Working without safety gear risks injury. Wear gloves, goggles, and a mask. Use proper lifting techniques. Safety protects you during the job and avoids accidents.
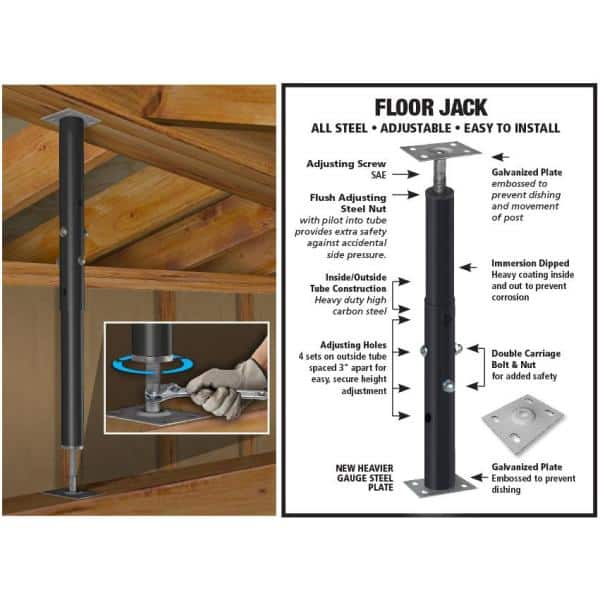
Credit: www.homedepot.com
Maintenance Tips For Longevity
Maintaining floor joist L jacks ensures they last longer and stay strong. Regular care prevents damage and keeps your floor safe. Simple steps can extend the life of these supports.
Inspect For Rust And Corrosion
Check the L jack regularly for any rust spots. Rust weakens the metal and can cause failure. Use a wire brush to remove small rust patches. Apply a rust-resistant paint or coating to protect the metal.
Keep The Area Dry
Moisture causes wood and metal damage. Ensure good ventilation under the floor to reduce dampness. Fix leaks in pipes or roofing near the joists. Use a dehumidifier if the area is very humid.
Tighten Loose Bolts And Screws
Vibrations and weight can loosen fasteners over time. Check all bolts and screws on the L jack. Use a wrench or screwdriver to tighten them firmly. Replace any that are stripped or damaged.
Remove Debris And Dirt
Debris can trap moisture and cause rust. Sweep or vacuum the area around the L jack. Avoid piling wood or trash nearby. Keeping the space clean helps prevent damage.
Monitor Weight Load
Do not overload the floor joists and L jacks. Excess weight can bend or break the supports. Know the weight limits and avoid heavy storage above. Spread weight evenly to reduce pressure.

Credit: www.amazon.ae
Frequently Asked Questions
What Is A Floor Joist L Jack?
A floor joist L jack is a steel bracket used to support floor joists. It helps transfer load to beams or posts. This hardware ensures structural stability and allows for height adjustments in floor framing.
How Do You Raise A Floor Joist L Jack?
To raise a floor joist L jack, first loosen its fasteners. Then, lift the joist to the desired height carefully. Finally, retighten all bolts and screws securely to maintain stability and alignment.
When Should You Lower A Floor Joist L Jack?
Lower a floor joist L jack if the floor is uneven or sagging. Adjusting the jack corrects the level and prevents structural damage. Always check for proper support before lowering.
What Tools Are Needed To Adjust An L Jack?
You need a wrench or socket set to loosen and tighten bolts. A pry bar may help lift the joist slightly. A level is essential to ensure accurate height adjustments.
Conclusion
Raising or lowering floor joist L Jacks helps keep your floor level and strong. Always check measurements twice before making changes. Use the right tools and follow safety steps carefully. Small adjustments can make a big difference in your floor’s stability.
Take your time and work step-by-step. This way, your floor will stay safe and last longer. Simple work done well saves future repairs and costs. Keep these tips in mind for any joist adjustments you face.