Is your hydraulic floor jack feeling weak or struggling to lift like it used to? You rely on your jack to keep your car safe and steady, so a failing one can be frustrating and even dangerous.
The good news is, you don’t have to rush out and buy a new one just yet. With a few simple steps, you can repair your weakened hydraulic floor jack and bring it back to full strength. Keep reading to discover easy, effective fixes that will save you time, money, and hassle—so your jack works smoothly every time you need it.

Credit: www.pirouette-editions.fr
Signs Of A Weak Hydraulic Jack
Hydraulic floor jacks are strong tools that lift heavy loads easily. Over time, these jacks can weaken and stop working well. Recognizing signs of a weak hydraulic jack helps avoid accidents and costly repairs. Watch for small changes in how your jack works. These changes show the jack needs fixing soon.
Slow Lifting Or Lowering
One sign of a weak hydraulic jack is slow lifting or lowering. The jack may take longer to raise your load. It might also drop slowly instead of smoothly. This delay means the hydraulic system is losing pressure. Dirt or air might block the fluid flow inside the jack.
Hydraulic Fluid Leaks
Look for any hydraulic fluid leaks around the jack. Fluid leaks cause low pressure and weak lifting power. You might see wet spots or puddles under the jack. Leaks often come from worn seals or cracks in the cylinder. Fixing leaks early prevents bigger problems.
Unusual Noises
Listen for strange sounds when using the jack. Squeaks, hisses, or grinding noises are bad signs. These sounds may mean parts inside the jack are damaged or dry. Lack of lubrication or worn components can cause noises. Regular checks keep your jack running quietly.
Jack Fails To Hold Load
The most serious sign is when the jack cannot hold the load. The jack may slowly sink or drop under weight. This means the hydraulic system is not sealing correctly. It is unsafe to use a jack that cannot hold weight firmly. Repair or replace it immediately to stay safe.
Credit: www.martinispa.com
Tools And Materials Needed
Repairing a weakened hydraulic floor jack requires the right tools and materials. Having everything prepared makes the process easier. It saves time and avoids frustration. Here is a list of what you need to gather before starting your repair.
Basic Hand Tools
Start with simple hand tools. A set of wrenches helps loosen and tighten bolts. Screwdrivers are essential for removing covers and parts. Pliers assist with gripping and pulling small components. A hammer may be needed for gentle taps. A clean cloth helps wipe away dirt and oil.
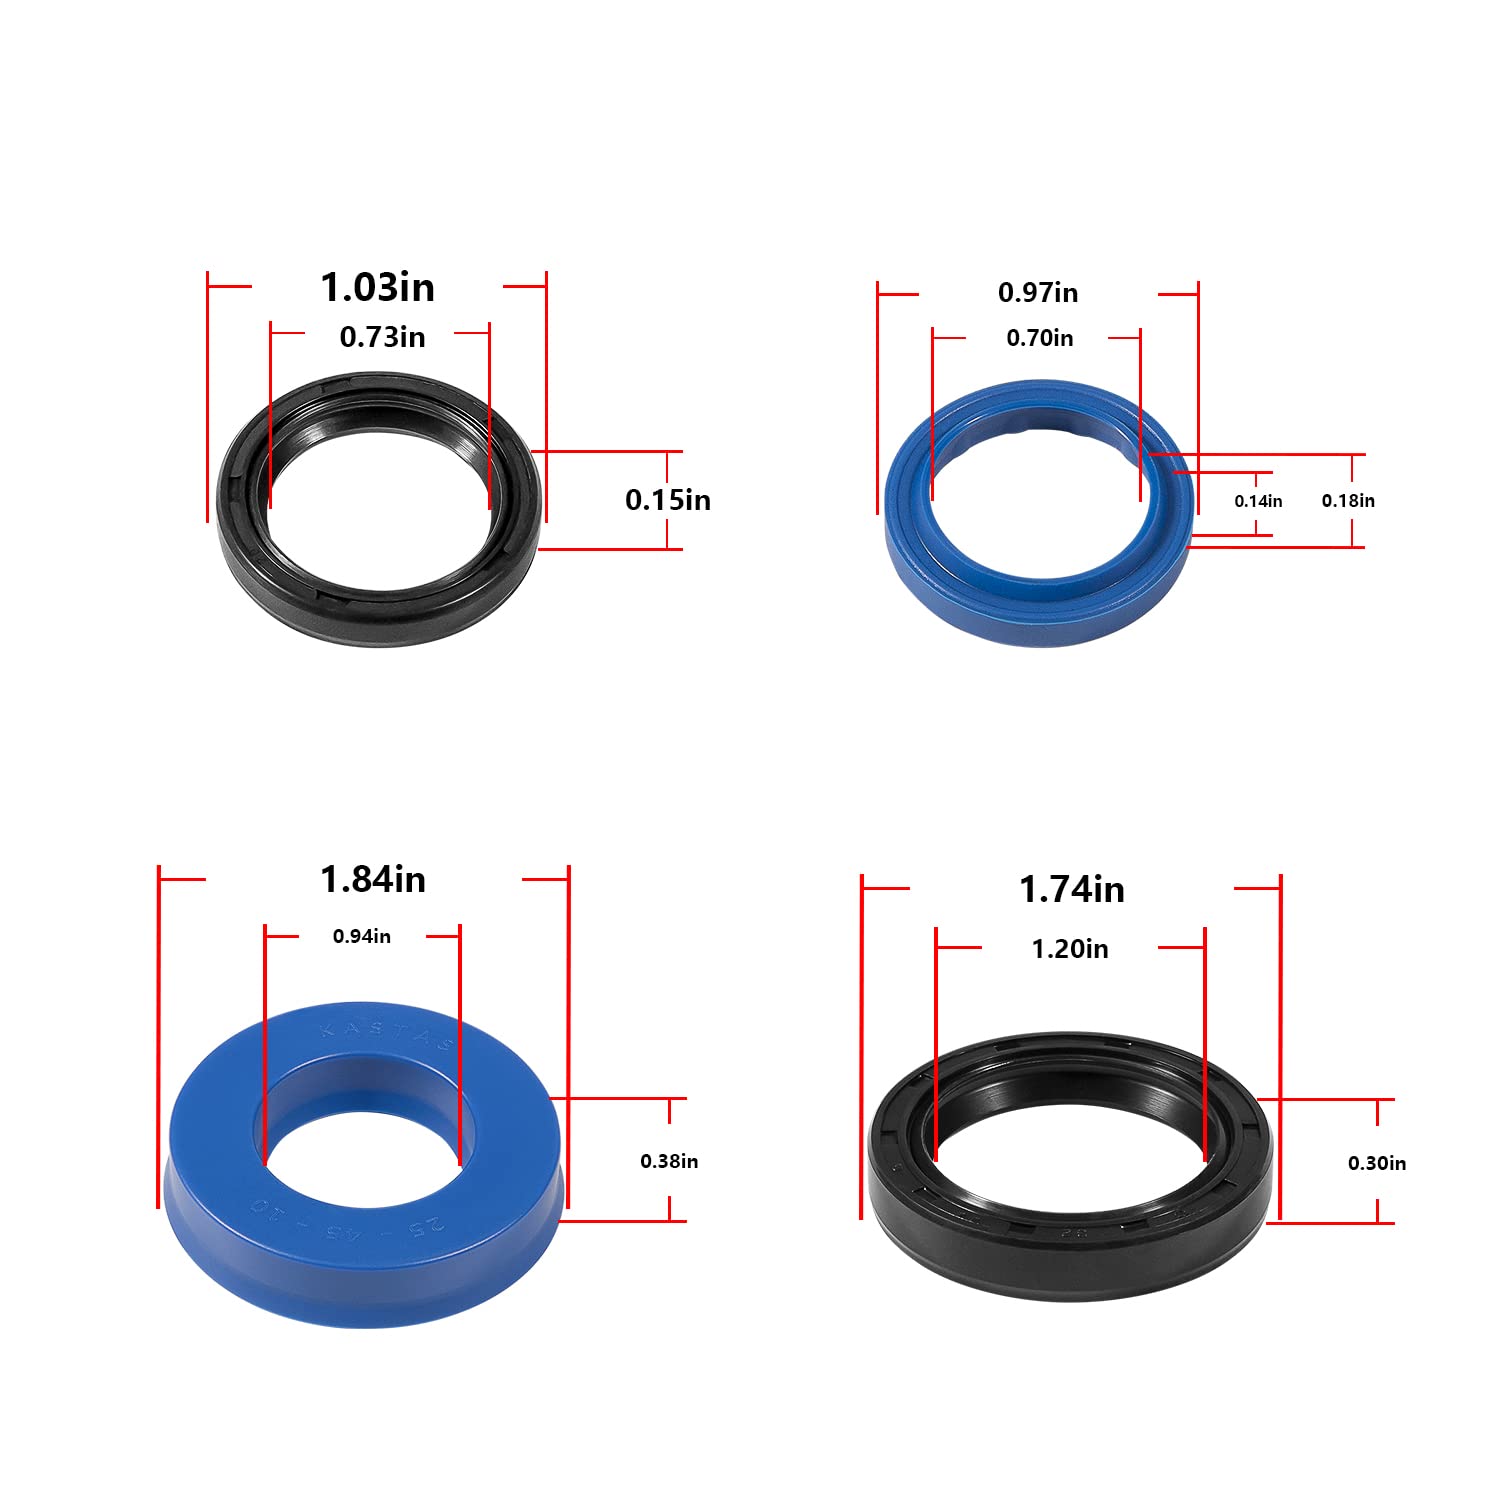
Replacement Parts
Identify the parts that need replacement. Common parts include seals, O-rings, and valves. These wear out and cause leaks or loss of pressure. Keep spare parts matching your jack’s model. Using the correct parts ensures a proper fix and longer life for your jack.
Hydraulic Fluid
Your jack uses hydraulic fluid to lift heavy loads. Choose the right type recommended by the manufacturer. Old fluid may be dirty or low, affecting performance. Drain the old fluid and refill with new. Fresh hydraulic fluid restores smooth operation and strength.
Safety Gear
Safety is crucial during repairs. Wear gloves to protect your hands from oil and sharp parts. Safety goggles shield your eyes from splashes and debris. Work in a well-ventilated area to avoid breathing fumes. Keep a clean workspace to prevent accidents.
Preparing The Jack For Repair
Preparing a hydraulic floor jack for repair is a key step. This stage ensures the jack is safe to work on and ready for fixing. Proper preparation helps spot issues and prevents accidents during repair. Follow these steps carefully to get the best results.
Cleaning The Jack
Start by cleaning the jack thoroughly. Use a cloth to wipe off dirt and grease. Remove any debris around moving parts. Clean surfaces make it easier to see damage and work on the jack. Avoid using water directly; use a light solvent if needed. Dry the jack completely before moving on.
Inspecting For Damage
Check the jack carefully for any visible damage. Look for cracks, bends, or leaks in the hydraulic system. Inspect the handle and wheels for wear or looseness. Check the lifting arm and saddle for signs of strain or rust. Early damage detection helps plan the repair steps well.
Positioning For Maintenance
Place the jack on a flat, stable surface. Ensure it is secure and won’t move during repair. Lower the jack fully to release hydraulic pressure. Keep tools and parts nearby for easy access. Good positioning makes the repair process safer and faster.
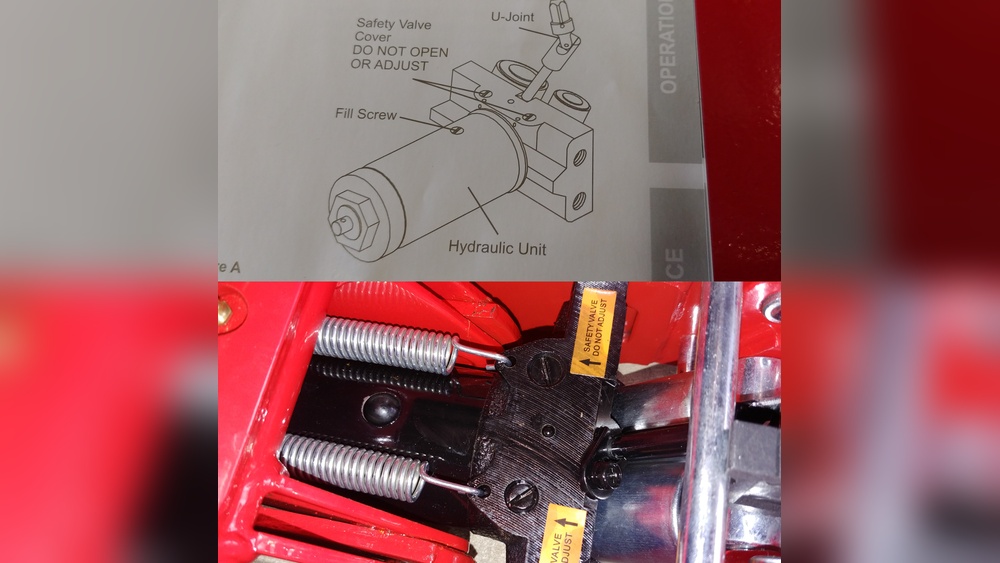
Fixing Hydraulic Fluid Leaks
Fixing hydraulic fluid leaks is a key step in repairing a weakened hydraulic floor jack. Leaks cause low fluid levels, which reduce the jack’s lifting power. Finding and sealing these leaks restores strength and safety. Follow these steps to fix leaks and keep your jack working well.
Locating The Leak
Start by cleaning the jack to remove dirt and oil. Check around the hydraulic cylinder, pump, and hose connections. Look for wet spots or fluid drips. Use a flashlight to see small leaks. Pressurize the jack slightly to spot slow leaks. Mark the leaking areas for repair.
Replacing Seals And O-rings
Leaks often come from worn seals or O-rings. Remove the hydraulic parts carefully. Take out the old seals and O-rings. Buy replacements that match your jack model. Apply a small amount of hydraulic fluid to new seals. Install them snugly without forcing. Reassemble the parts securely to avoid new leaks.
Refilling Hydraulic Fluid
Use the correct hydraulic fluid type for your jack. Open the fill port and pour fluid slowly. Check the fluid level with the dipstick or sight glass. Fill until the fluid reaches the recommended mark. Close the fill port tightly. Pump the jack several times to remove air bubbles. Check for leaks again before use.
Bleeding Air From The Hydraulic System
Bleeding air from the hydraulic system is essential for a weakened floor jack. Air trapped inside can cause poor lifting power and uneven movement. Removing this air restores the jack’s strength and smooth operation.
This process helps the hydraulic fluid flow correctly. It also prevents damage and extends the jack’s life. The procedure is simple and requires no special tools.
Why Air Causes Problems
Air in the hydraulic system compresses easily. This reduces the pressure needed to lift heavy loads. The jack feels spongy and may not lift at all. Air bubbles block fluid flow, causing jerky movement.
Hydraulic fluid cannot compress like air. The system needs fluid pressure to work well. Air makes the jack unreliable and unsafe. Fixing this issue improves performance and safety.
Step-by-step Bleeding Process
Start by placing the jack on a flat surface. Open the release valve to let the pressure down. Pump the handle several times to push fluid through the system.
Next, loosen the bleeder screw slightly. Watch for air bubbles escaping with the fluid. Tighten the bleeder screw once no more bubbles appear.
Close the release valve and pump the handle to check lifting power. Repeat the bleeding process if the jack still feels weak. Keep the hydraulic fluid level full during this process.

Credit: www.walmart.com
Repairing The Pump Mechanism
Repairing the pump mechanism is key to fixing a weakened hydraulic floor jack. The pump moves hydraulic fluid to lift heavy loads. Over time, parts inside the pump can wear out or get stuck. Fixing these parts restores the jack’s strength and safety. Follow clear steps to check and replace pump components. This keeps your jack working smoothly and safely.
Checking The Pump Piston
The pump piston pushes fluid through the jack. Dirt or damage can block its movement. Start by removing the pump cover carefully. Look for cracks, rust, or dirt on the piston. Clean the piston with a soft cloth and some oil. Test if it moves freely up and down. If it feels stuck or rough, the piston may need repair or replacement.
Replacing Worn Components
Worn parts cause leaks and low pressure in the pump. Check seals, O-rings, and springs for damage. These parts wear out with use and cause fluid loss. Remove old seals and clean the area before installing new ones. Use parts made for your jack model. Tighten all components properly to avoid leaks. After replacement, test the pump several times to ensure strong lifting power.
Testing The Repaired Jack
Testing the repaired hydraulic floor jack is a crucial step. It ensures the jack works safely and correctly. This step confirms your repair was successful. You must check the jack carefully before using it again. Follow the proper process to avoid accidents or damage.
Safety Checks
Start with a visual inspection. Look for leaks, cracks, or worn parts. Check the hydraulic fluid level and top it up if needed. Test the release valve to ensure it opens and closes smoothly. Make sure all bolts and nuts are tight. Never skip these basic safety checks.
Load Testing Procedures
Place the jack on a flat, stable surface. Use a weight close to the jack’s rated capacity. Slowly lift the weight and watch for any signs of slipping or dropping. Keep the weight lifted for a few minutes to check stability. Lower the weight carefully and observe the jack’s movement. Repeat the test a few times to confirm consistent performance.
Maintenance Tips To Prevent Future Issues
Maintaining a hydraulic floor jack is key to keeping it strong and safe. Small care steps stop big problems. Regular checks and proper care extend the jack’s life. Follow these tips to keep your jack working well for years.
Regular Inspection
Look over your floor jack before each use. Check for leaks in the hydraulic system. Find cracks or bends in the frame or handle. Make sure the wheels roll smoothly. Tighten loose bolts and nuts. Catching problems early saves costly repairs.
Proper Storage
Store the jack in a dry place away from dirt. Avoid leaving it outside in rain or snow. Keep it on a flat surface to prevent damage. Lower the jack fully before storing. Cover it with a cloth or plastic to keep dust off. Proper storage stops rust and wear.
Routine Fluid Checks
Check the hydraulic fluid level often. Use the correct type of fluid for your jack. Low or dirty fluid causes poor lifting power. Change the fluid as the manual suggests. Bleed air from the system to keep smooth operation. Clean fluid means smooth, strong lifting.
Frequently Asked Questions
How Do I Identify A Weakened Hydraulic Floor Jack?
A weakened hydraulic floor jack may show slow lifting, leaks, or failure to hold pressure. Check for oil leaks and reduced lifting power to confirm.
What Causes A Hydraulic Floor Jack To Weaken?
Common causes include hydraulic fluid leaks, worn seals, or air trapped in the system. Regular maintenance helps prevent these issues.
Can I Repair A Hydraulic Floor Jack Myself?
Yes, many repairs like replacing seals or bleeding air are DIY-friendly. Follow the manufacturer’s guide and use proper tools for safety.
How Do I Bleed Air From A Hydraulic Floor Jack?
Open the release valve and pump the handle several times. Close the valve while pumping to remove trapped air and restore pressure.
Conclusion
Repairing a weakened hydraulic floor jack is doable with patience and care. Follow the steps carefully to fix leaks or replace worn parts. Keep your jack clean and check it regularly for damage. Safety matters most, so test the jack before each use.
Taking small actions now can save money later. A working floor jack helps you work smarter and safer. Don’t ignore signs of trouble—fix them early. Your efforts keep your tools strong and reliable. Simple maintenance keeps your jack ready for the job.