If your 2 ton hydraulic floor jack isn’t lifting like it used to, don’t rush to buy a new one. You can fix it yourself and save money.
Rebuilding your floor jack might sound tricky, but with the right steps, you’ll get it working smoothly again. Imagine the satisfaction of bringing your jack back to life with your own hands. In this guide, you’ll discover simple, clear instructions that make the repair easy to follow.
Keep reading, and you’ll be ready to tackle the job confidently.

Credit: us.amazon.com
Tools And Materials Needed
Rebuilding a 2 ton hydraulic floor jack needs the right tools and materials. Having everything ready makes the process smooth and safe. Missing tools can cause delays or damage parts.
Below is a clear list of what to gather before starting. Check each item carefully. This helps to rebuild your floor jack correctly and quickly.
Basic Hand Tools
You need simple hand tools like wrenches, screwdrivers, and pliers. These help remove and tighten bolts and screws. A set of metric and standard wrenches is best. Include flathead and Phillips screwdrivers. Needle-nose pliers help with small parts.
Hydraulic Fluid
Hydraulic fluid is key to your jack’s function. Use the recommended type for your model. Do not use engine oil or other fluids. Clean hydraulic fluid keeps the jack working smoothly and safely.
Replacement Parts
Some parts wear out and need replacement. Common parts include seals, O-rings, and valves. Buy exact matches for your jack model. Using wrong parts can cause leaks or failure.
Cleaning Supplies
Clean parts work better and last longer. Use rags, brushes, and a cleaning solvent. Avoid harsh chemicals that can damage seals. Clean all parts before reassembling the jack.
Safety Gear
Protect yourself during the rebuild. Wear safety glasses and gloves. Keep a clean workspace to avoid accidents. Safety is important for every step.

Credit: www.youtube.com
Safety Precautions
Safety is the top priority when rebuilding a 2 ton hydraulic floor jack. This tool handles heavy loads and stores hydraulic pressure. Small mistakes can cause serious injuries or damage. Follow clear safety steps to protect yourself and others.
Use the right tools and wear safety gear. Work in a clean, well-lit area. Never rush or skip steps. Understanding the hazards helps prevent accidents.
Wear Protective Gear
Always wear safety goggles to protect your eyes from fluid or debris. Use gloves to protect your hands from sharp parts and oil. Wear closed-toe shoes to protect your feet in case parts fall.
Release Hydraulic Pressure
Before starting, release all hydraulic pressure. Turn the release valve slowly to avoid sudden drops. Check the jack is fully lowered to remove pressure safely.
Use Proper Tools
Use tools designed for hydraulic repair. Avoid makeshift tools that can slip or break. Proper tools make the job safer and easier.
Work On A Stable Surface
Place the jack on a flat, stable surface. Avoid working on uneven ground or slippery floors. Stability prevents the jack from tipping over.
Keep The Area Clean
Clear the workspace of clutter and spills. Oil or grease on the floor can cause slips. Clean tools and parts regularly during the rebuild.
Follow Manufacturer Instructions
Read the jack’s manual carefully before starting. Follow all recommended steps and warnings. Manufacturer guidance ensures safe and correct rebuilding.
Preparing The Jack For Disassembly
Preparing the jack for disassembly is the first key step in rebuilding your 2 ton hydraulic floor jack. This stage ensures safety and smooth work during the process. Taking time to prepare reduces errors and damage to parts.
Start with a clean work area free of dirt and clutter. This makes it easier to keep track of small parts and tools. Lay down a cloth or cardboard to protect surfaces and catch any spills.
Drain The Hydraulic Fluid
Remove the release valve to drain the hydraulic fluid. Use a container to catch the old fluid. Proper disposal is important to avoid environmental harm. Draining the fluid prevents leaks during disassembly.
Release All Pressure
Pump the handle several times with the release valve open. This action releases any remaining pressure inside the jack. Handling the jack without pressure avoids sudden movement or spills. Safety first.
Clean The Jack Exterior
Wipe the jack with a clean rag to remove grease and dirt. This prevents contamination of internal parts during disassembly. Clean surfaces also help identify damage or wear.
Gather Necessary Tools
Prepare tools like wrenches, screwdrivers, and pliers. Having the right tools ready speeds up the process. Check for any special tools required by your jack model.
Draining Old Hydraulic Fluid
Draining old hydraulic fluid is a key step in rebuilding a 2 ton hydraulic floor jack. The fluid wears out over time and loses its ability to lift properly. Removing the old fluid helps stop rust and dirt from damaging the jack’s parts.
Clean fluid keeps the jack working smoothly and safely. This process also prepares the jack for fresh hydraulic oil, which improves its strength and reliability.
Prepare The Jack For Draining
Place the jack on a flat surface. Lower the lifting arm fully to release pressure. Keep a container ready to catch the used fluid. Wear gloves to protect your hands.
Locate And Remove The Drain Plug
Find the drain plug at the base of the jack’s hydraulic cylinder. Use a wrench to loosen it carefully. Let the old fluid flow into the container. Avoid spilling fluid on the floor.
Flush The System If Needed
If the fluid looks dirty, flush the system with clean hydraulic oil. Pour a small amount inside, then drain it out. Repeat until the fluid runs clear. This step removes dirt and sludge inside the jack.
Close The Drain Plug Securely
After draining, tighten the drain plug firmly. Check for leaks around the plug. A tight seal keeps the new fluid inside and protects the jack from damage.
Disassembling The Hydraulic System
Disassembling the hydraulic system is the first key step in rebuilding a 2 ton floor jack. This process allows you to access all parts inside the jack. Careful disassembly prevents damage and ensures smooth reassembly later.
Start by preparing a clean workspace and gathering tools. Keep track of small parts and screws. Taking pictures during disassembly helps with reassembly.
Drain The Hydraulic Fluid
Place a container under the jack to catch the fluid. Open the release valve to let the fluid flow out. Use a clean cloth to wipe any spills. Proper fluid removal prevents mess and damage.
Remove The Pump Assembly
Unscrew bolts holding the pump in place. Gently pull the pump assembly away from the jack. Avoid bending or forcing parts. Set the pump aside carefully for inspection or replacement.
Detach The Hydraulic Cylinder
Locate the cylinder connected to the main frame. Remove any pins or clips securing it. Slowly slide the cylinder out of its housing. Inspect seals and piston for wear or damage.
Separate The Release Valve
Find the release valve on the jack body. Unscrew it carefully to avoid losing small springs. Clean the valve and check for blockages. A smooth valve ensures proper hydraulic pressure control.
Inspecting Components For Wear
Inspecting components for wear is a critical step in rebuilding a 2 ton hydraulic floor jack. This process helps spot damaged parts early. It prevents future breakdowns and ensures safe operation. Careful inspection saves time and money during repairs.
Each part of the jack should be checked closely. Look for cracks, rust, or worn surfaces. Even small damage can affect the jack’s strength and function. Using the right tools can make inspection easier and more accurate.
Checking The Hydraulic Cylinder
Start with the hydraulic cylinder. Look for leaks around seals and piston. Smooth movement without sticking is essential. Any dents or corrosion can cause failure. Replace damaged seals to keep pressure steady.
Examining The Pump Assembly
Next, inspect the pump assembly. Check the pump piston for wear or scoring. Test the check valve to ensure it holds pressure. Clean any dirt or debris inside the pump. Replace worn parts to restore proper pumping action.
Inspecting The Release Valve
The release valve controls the jack’s lowering speed. Make sure it turns smoothly and closes fully. Look for bent or broken valve components. Replace parts that do not seal tightly to avoid leaks.
Evaluating The Frame And Lifting Arm
Check the jack frame and lifting arm for cracks or bends. Rust weakens metal over time. Clean all surfaces and look for signs of metal fatigue. Straighten bent parts or replace if damaged. A strong frame is vital for safe lifting.
Assessing Wheels And Axles
Wheels and axles support the jack’s movement. Inspect for wear, flat spots, or cracks. Ensure wheels spin freely without wobbling. Lubricate axles to reduce friction. Replace damaged wheels for smooth operation.
Cleaning Parts Thoroughly
Cleaning parts thoroughly is a key step in rebuilding a 2 ton hydraulic floor jack. Dirt, grease, and rust can block the jack’s movement. These contaminants reduce the jack’s efficiency and lifespan. Taking time to clean each part ensures smooth operation and safety. Clean parts fit better, which improves the jack’s performance.
Use the right tools and cleaners for the job. Avoid harsh chemicals that can damage seals or metal. A clean workspace helps keep parts organized and free of new dirt. Clean parts make the rebuilding process easier and faster.
Disassembling And Sorting Parts
Start by carefully taking the jack apart. Lay parts on a clean cloth or tray. Sort them by type and size. This helps avoid losing small pieces. Check each part for damage or wear while sorting. Cleaning is easier when parts are separated.
Removing Dirt And Grease
Use a soft brush or cloth to remove loose dirt. Apply a mild degreaser to remove grease and oil. Let the degreaser sit for a few minutes. Scrub stubborn spots gently with a brush. Rinse parts with clean water and dry them well.
Cleaning Rust And Corrosion
Rust weakens metal parts and blocks movement. Use fine steel wool or sandpaper to remove rust. Work gently to avoid scratching parts. Apply rust remover if needed. Rinse thoroughly and dry parts immediately to prevent new rust.
Inspecting Seals And O-rings
Seals and O-rings keep oil inside the jack. Clean them with warm water and mild soap. Avoid using harsh chemicals that cause cracks. Check for tears or hard spots. Replace any damaged seals for a tight fit.
Drying And Lubricating Parts
Dry parts completely with a clean cloth or air dry. Moisture can cause rust and damage seals. Apply a light coat of hydraulic oil or grease to moving parts. This protects metal and ensures smooth operation. Proper lubrication extends the jack’s life.
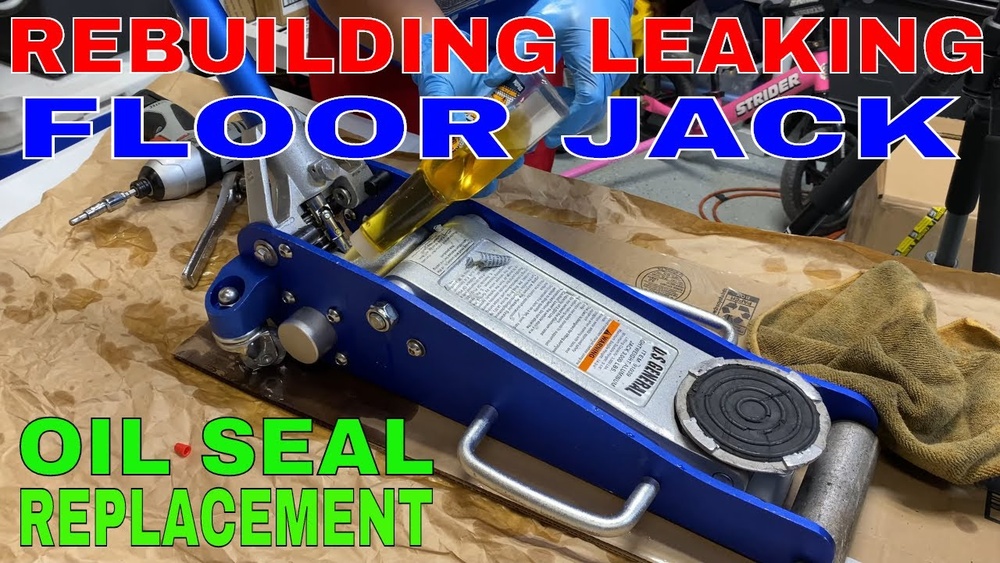
Replacing Seals And O-rings
Replacing seals and O-rings is key to fixing a 2 ton hydraulic floor jack. These small parts stop leaks and keep the jack working well. Worn or damaged seals make the jack lose pressure and fail to lift properly. Changing them restores strength and safety.
Seals and O-rings wear out over time due to pressure and use. Dirt and oil can also cause damage. Regular checks help catch problems early. Keep your jack working longer by replacing these parts as needed.
Removing Old Seals And O-rings
Start by cleaning the jack surface around seals. Use a flat tool to gently pry out old seals. Be careful not to scratch metal parts. Remove all pieces to avoid leaks later. Note the position of each seal for correct replacement.
Choosing The Right Replacement Parts
Use seals and O-rings made for your jack model. Check size, shape, and material before buying. Quality parts last longer and fit better. Avoid cheap or generic seals that wear quickly. Proper parts ensure smooth operation.
Installing New Seals And O-rings
Clean the groove where the seal fits. Lightly oil new seals to help slide them in place. Press seals evenly without twisting or stretching. Make sure seals sit flush and snug. Wrong installation causes leaks and pressure loss.
Testing The Jack After Replacement
Pump the handle slowly to build pressure. Watch for any oil leaks around new seals. Check if the jack lifts and holds weight well. Repeat sealing steps if leaks appear. Proper sealing keeps your jack safe and effective.
Reassembling The Hydraulic System
Reassembling the hydraulic system is a key step in rebuilding a 2 ton hydraulic floor jack. This process restores the jack’s ability to lift heavy loads safely and efficiently. Careful attention to detail prevents leaks and ensures smooth operation.
Start by cleaning all parts thoroughly. Remove old oil and dirt from each component. This prevents contamination and helps the system work properly.
Preparing The Hydraulic Cylinder
Inspect the cylinder for damage or wear. Replace any seals or O-rings before assembly. These parts keep the fluid inside and maintain pressure.
Apply a thin layer of hydraulic oil to the seals. This helps them slide into place without damage. Insert the piston carefully into the cylinder.
Installing The Pump Assembly
Check the pump parts for cleanliness and damage. Assemble the pump with new seals if needed. Tighten screws and bolts evenly to avoid leaks.
Lubricate moving parts lightly with hydraulic oil. This improves the pump’s response and reduces wear.
Connecting The Valve And Reservoir
Attach the valve assembly to the cylinder. Ensure it fits snugly without gaps. Secure the reservoir and fill it with fresh hydraulic oil.
Make sure the oil level matches the manufacturer’s recommendation. Air inside the system causes poor lifting performance.
Testing The Reassembled System
Close the release valve and pump the handle slowly. Watch for smooth movement of the piston. Check for any signs of oil leaks around seals and joints.
Open the release valve to lower the jack. Repeat the cycle to confirm consistent lifting and lowering. Adjust components if performance is uneven.
Refilling Hydraulic Fluid
Refilling the hydraulic fluid is a key step in rebuilding a 2 ton hydraulic floor jack. The fluid helps the jack lift heavy loads smoothly and safely. Without enough fluid, the jack will not work properly or may even fail.
Using the right type of hydraulic fluid is important. Most jacks use a special hydraulic oil. Avoid using motor oil or other liquids. The wrong fluid can damage the seals and parts inside the jack.
Locate The Hydraulic Fluid Reservoir
Start by finding the reservoir where the fluid goes. It is usually under a small cap on the jack body. Clean around the cap to stop dirt from entering. Unscrew the cap slowly and set it aside.
Check The Fluid Level
Look inside the reservoir. The fluid should be near the top but not overflowing. If the fluid looks dark or dirty, drain it first. Clean fluid ensures the jack works well and lasts longer.
Add The Hydraulic Fluid
Pour the correct hydraulic fluid into the reservoir. Use a funnel to avoid spills. Add fluid little by little while checking the level. Stop filling before the fluid reaches the top.
Replace The Cap And Test The Jack
Put the cap back on tightly. Pump the jack handle several times. This moves the fluid and removes any air inside. Check if the jack lifts smoothly. Add more fluid if needed, but do not overfill.
Bleeding Air From The System
Bleeding air from the system is a key step in rebuilding a 2 ton hydraulic floor jack. Air trapped inside the hydraulic fluid can cause poor lifting performance. The jack may feel spongy or fail to hold weight properly. Removing this air restores proper pressure and smooth operation.
This process involves releasing trapped air bubbles from the hydraulic fluid. It improves the jack’s lifting strength and safety. Without bleeding, the jack might leak or lose pressure quickly.
Preparing The Jack For Bleeding
Start by placing the jack on a flat surface. Lower the lifting arm completely. Open the oil fill plug to access the reservoir. Check the fluid level and add hydraulic oil if needed.
Close the release valve tightly before beginning the bleed. Make sure you have a clean cloth nearby to catch any spills.
How To Bleed Air From The System
Open the release valve slightly to let out air. Pump the handle slowly several times. This forces air bubbles out through the valve. Watch for bubbles in the fluid or hear escaping air.
Keep pumping until no more bubbles appear. Tighten the release valve securely. Check the fluid level again and top off if necessary.
Testing The Jack After Bleeding
Close the oil fill plug securely. Pump the handle to lift the arm. The movement should feel smooth and firm. Hold the lift position to check for leaks or pressure loss.
If the jack fails to hold or feels soft, repeat the bleeding process. Proper bleeding ensures safe and reliable jack operation.

Credit: us.amazon.com
Testing The Floor Jack
Testing the floor jack is a critical step after rebuilding it. This ensures the jack works safely and lifts the load properly. Skipping this step risks accidents or damage.
Testing confirms the hydraulic system holds pressure. It also checks the stability and smooth operation of the jack. Follow these steps carefully for a safe test.
Preparing The Floor Jack For Testing
Place the jack on a flat, solid surface. Clean the area around the jack to avoid slipping. Remove any tools or debris that might interfere.
Check the hydraulic fluid level. Add more if it is low. Inspect the jack for leaks before proceeding.
Performing The Load Test
Start by pumping the handle slowly. Watch the jack lift evenly. Stop if you hear unusual sounds or see jerky movements.
Use a weight close to the jack’s 2-ton limit. Lift the load a few inches off the ground. Hold it there for at least one minute.
Check if the jack holds the load steadily. If the jack lowers by itself, there is a problem.
Checking For Leaks And Pressure Loss
Look under and around the jack for fluid leaks. Inspect seals and connections closely. No leaks should be visible during or after testing.
Lower the jack slowly after the load test. The descent should be smooth and controlled. Sudden drops mean hydraulic issues.
Maintenance Tips For Longevity
Keeping your 2 ton hydraulic floor jack in top shape saves money and time. Regular care prevents wear and tear. Simple steps can extend the jack’s life and keep it working safely.
Here are key maintenance tips to help your jack last longer.
Check And Change Hydraulic Fluid Regularly
Hydraulic fluid keeps the jack lifting smoothly. Old or dirty fluid causes poor performance. Check the fluid level often. Change it every 6 to 12 months or as needed. Use the type recommended by the manufacturer.
Inspect For Leaks And Repair Immediately
Leaks reduce lifting power and cause damage. Look under the jack for oil spots. Check seals and hoses for cracks or wear. Fix leaks right away to avoid bigger problems.
Clean The Jack After Each Use
Dirt and debris can damage moving parts. Wipe down the jack after every job. Use a clean cloth and mild cleaner. Keep the wheels and handle free from grime.
Lubricate Moving Parts
Parts like the pump piston and wheels need oil. Lubricate them monthly or after heavy use. This reduces friction and prevents rust. Use light machine oil or grease as recommended.
Store The Jack Properly
Keep the jack in a dry, clean place. Avoid damp or dusty areas. Store it with the release valve closed and the saddle lowered. This protects the seals and hydraulic system.
Frequently Asked Questions
How Do I Rebuild A 2 Ton Hydraulic Floor Jack Safely?
To rebuild safely, wear protective gear and work in a clean area. Follow the manufacturer’s instructions step-by-step. Use proper tools and avoid shortcuts to prevent accidents or damage.
What Tools Are Needed To Rebuild A Hydraulic Floor Jack?
You’ll need wrenches, screwdrivers, pliers, a rubber mallet, hydraulic fluid, and replacement seals. Having a clean cloth and lubricant also helps during assembly and maintenance.
How Often Should I Rebuild My 2 Ton Hydraulic Floor Jack?
Rebuild your jack if it leaks, won’t hold pressure, or moves slowly. Regular checks every 1-2 years help maintain performance and safety.
Can I Use Any Hydraulic Fluid For My Floor Jack?
No, use the hydraulic fluid recommended by the manufacturer. Using the wrong fluid can damage seals and reduce jack efficiency.
Conclusion
Rebuilding a 2 ton hydraulic floor jack takes time and care. Follow each step slowly and carefully. Use the right tools and clean parts well. Check seals and valves for any damage. Test the jack after rebuilding to ensure safety.
This work can save money and extend jack life. Stay patient and focused during the process. You can keep your jack working strong for years. Simple maintenance helps avoid costly repairs later. Keep these tips handy for future use.