Are you struggling to remove those stubborn plastic butterfly wall anchors without damaging your walls? You’re not alone.
These little anchors hold tight, making it tricky to get them out cleanly. But don’t worry—this guide will show you simple, effective steps to remove them quickly and safely. By the end, you’ll have your walls ready for a fresh start, whether you’re redecorating or fixing up.
Keep reading to learn how to tackle those anchors like a pro!
:max_bytes(150000):strip_icc()/how-to-remove-drywall-anchors-7562285-05-a8410a163a5c4e51b297fab92ecb23e2.JPG)
Credit: www.thespruce.com
Tools Needed
Removing plastic butterfly wall anchors requires the right tools. Using proper tools makes the process easier and safer. The tools help protect your wall from damage.
Gather these basic tools before starting. Each tool has a specific purpose in removing the anchor.
Flathead Screwdriver
A flathead screwdriver helps pry the anchor gently from the wall. It fits under the anchor’s wings. It loosens the anchor without breaking the wall surface.
Needle-nose Pliers
Needle-nose pliers grip small parts of the anchor firmly. They help pull the anchor out slowly. Pliers give better control and reduce slipping.
Utility Knife
A utility knife cuts around the anchor if it is stuck. It cleans the edges of the hole. This tool makes it easier to remove the anchor cleanly.
Putty Knife
Use a putty knife to smooth the wall after anchor removal. It helps remove leftover debris. It prepares the surface for patching or painting.
Assessing The Wall Type
Removing plastic butterfly wall anchors starts with knowing your wall type. Different walls need different care. Choosing the right method prevents damage and makes removal easier.
Understanding the wall helps you pick the right tools. It also shows how deep the anchor sits. This knowledge saves time and effort.
Identifying Drywall
Drywall is common in many homes. It feels soft and hollow when tapped. Plastic butterfly anchors work well here. Be gentle to avoid tearing the surface.
Checking For Plaster Walls
Plaster walls feel hard and solid. They may have small cracks or bumps. Removing anchors from plaster needs care. Too much force can cause big holes.
Recognizing Concrete Or Brick Walls
Concrete and brick feel very hard. Anchors here hold tightly. Use tools that can handle tough material. Pulling anchors out without prep can break the wall.
Spotting Paneling
Paneling is wood or synthetic sheets on walls. It looks smooth and often shiny. Anchors in paneling require gentle removal. The material can split or chip easily.
Prepping The Area
Preparing the area before removing plastic butterfly wall anchors makes the task easier and safer. A clean, organized space helps prevent damage to walls and reduces frustration. Taking time to prep ensures a smooth removal process.
Clear The Surrounding Space
Remove any furniture or decorations near the wall. This prevents accidental damage and gives you room to work. Clear space also helps you reach the anchor easily.
Gather Necessary Tools
Collect tools like pliers, a screwdriver, and a utility knife. Having them ready saves time and effort. Check that tools are clean and in good condition.
Protect The Floor And Furniture
Place a drop cloth or old towel on the floor. Cover nearby furniture with a cloth or plastic sheet. This protects surfaces from dust or falling debris.
Turn Off Nearby Electronics
Switch off devices near the work area. This avoids any accidental damage from dust or tools. It also helps you focus without distractions.
Method 1: Pulling Out With Pliers
Removing plastic butterfly wall anchors can seem tricky. Using pliers is a simple way to pull them out carefully. This method avoids damaging your wall while taking out the anchors.
Start by gripping the anchor firmly. Then, use gentle movements to loosen it. Patience is key to avoid breaking the anchor inside the wall.
Grip And Wiggle Technique
First, open your pliers wide enough to hold the anchor’s wings. Hold the anchor close to the wall surface. Wiggle the anchor side to side slowly. This motion helps loosen the anchor’s grip inside the wall. Keep the movement gentle to avoid damage.
Using Steady Pressure
After loosening, pull the anchor straight out. Apply steady pressure with the pliers. Do not yank or pull too fast. Slow, even force helps remove the anchor fully. Check if the wall surface stays intact as you pull. Stop and wiggle again if you meet resistance.
Method 2: Pushing Through The Wall
Pushing through the wall is a simple way to remove plastic butterfly wall anchors. This method works by pushing the anchor completely through the drywall. It leaves a small hole that is easy to fix later. No need for special tools or extra effort.
Use a long, narrow tool like a screwdriver or a metal rod. Place it against the center of the anchor and push firmly. The anchor will slide inside the wall cavity. This clears the anchor without pulling or damaging the wall surface.
When To Use This Method
Use this method if the anchor is stuck or hard to pull out. It works best on drywall, not on plaster or thick walls. Choose this method for anchors that are deep or broken inside the wall. It saves time and effort compared to pulling or twisting.
Avoiding Wall Damage
Push gently to avoid making the hole larger. Use a tool with a smooth tip to protect the wall edges. After pushing the anchor in, fill the small hole with spackle or wall filler. Sand it smooth and paint over for a clean finish. This keeps your wall looking neat and undamaged.
Method 3: Cutting The Anchor
Method 3: Cutting the Anchor is a practical way to remove plastic butterfly wall anchors. This method works well when pulling the anchor out is difficult or could damage the wall. Cutting the anchor flush with the wall surface leaves room for patching and repainting. It is a neat and clean approach that minimizes wall damage.
Tools For Cutting
To cut the plastic anchor, use a small, sharp tool. A utility knife with a fresh blade works well. A pair of wire cutters or diagonal pliers can also cut the anchor cleanly. Make sure the tool fits the space and cuts precisely. Always wear safety glasses to protect your eyes from plastic bits.
Finishing The Surface
After cutting, the anchor will be flush with the wall. Use fine-grit sandpaper to smooth the area gently. Remove any loose plastic pieces or rough edges. Apply spackling or wall filler to cover the hole. Let it dry, then sand again for a smooth finish. Finally, repaint the area to match your wall color.
Repairing Wall Holes
After removing plastic butterfly wall anchors, small holes remain in the wall. Repairing these holes is important for a smooth, clean look. Filling and finishing the holes restores the wall’s surface. This process is simple and requires only a few tools.
Filling Small Holes
Use spackling paste or wall filler to fill the holes. Apply with a putty knife and press the filler into the hole. Smooth the surface to make it even with the wall. Let the filler dry completely before moving to the next step.
Sanding And Painting
Once the filler is dry, sand the area gently. Use fine-grit sandpaper to avoid damaging the wall. Sand until the surface feels smooth and flat. Clean off dust with a damp cloth. Paint over the repaired spot to match the wall color. Use a small brush for precise coverage.

Credit: www.hgtv.com
Preventing Future Damage
Removing plastic butterfly wall anchors can leave holes or damage on your walls. Preventing future damage is important to keep your walls strong and looking good. Using the right anchors and installing them properly helps avoid cracks, holes, and weak spots.
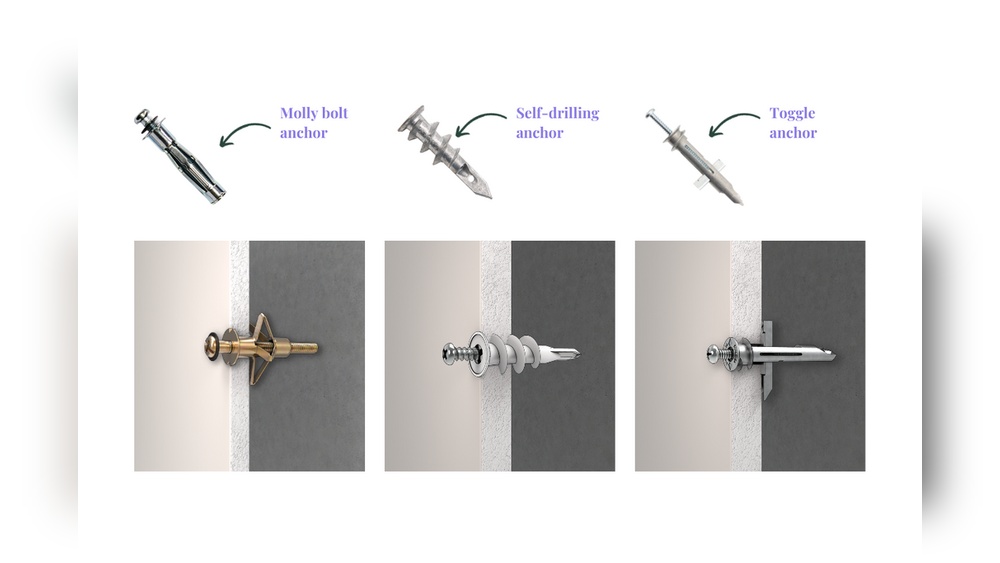
Choosing The Right Anchor
Pick anchors that fit the wall type and the item weight. Drywall needs different anchors than concrete or plaster. Plastic butterfly anchors work well for light items. For heavier objects, use metal anchors or toggle bolts. This choice stops anchors from pulling out or making big holes.
Proper Installation Tips
Drill holes carefully and the right size for the anchor. Too big holes make anchors loose, too small can crack the wall. Insert anchors gently without forcing them. Tighten screws slowly and stop when snug. Over-tightening can break the anchor or damage the wall.

Credit: www.youtube.com
Frequently Asked Questions
How Do You Safely Remove Plastic Butterfly Wall Anchors?
To remove plastic butterfly wall anchors, first unscrew any attached screws. Then, gently pull the anchor out using pliers. If it resists, push it through the wall cavity. Avoid damaging the wall by working carefully and slowly.
Can I Reuse Plastic Butterfly Wall Anchors After Removal?
Plastic butterfly wall anchors are usually not reusable. They often deform or break during removal. It’s best to replace them with new anchors for a secure hold and safety.
What Tools Are Needed To Remove Butterfly Wall Anchors?
You typically need a screwdriver, needle-nose pliers, and possibly a putty knife. These tools help unscrew, grip, and gently pry out the plastic anchor without damaging the wall.
Will Removing Anchors Damage My Drywall?
If removed carefully, butterfly anchors won’t cause major drywall damage. Small holes may remain but are easy to patch with spackle and sand smooth before repainting.
Conclusion
Removing plastic butterfly wall anchors takes patience and care. Start by loosening the anchor gently with pliers. Pull straight out to avoid wall damage. If it resists, try pushing it through the wall. Small holes can be fixed quickly with spackle or filler.
Take your time and work carefully. This helps keep your walls neat and tidy. With these simple steps, removing anchors becomes easier. You can handle this task without stress or mess. A little effort goes a long way in home repair.