Are you ready to take control of your home lighting but unsure how to connect a double light switch? Whether you want to brighten up two rooms or control two lights from one spot, learning this simple electrical skill can save you time and money.
In this guide, you’ll discover clear, step-by-step instructions that anyone can follow—even if you’re not an expert. By the end, you’ll feel confident handling your wiring safely and efficiently. Keep reading, and unlock the power to transform your space with just a few easy moves.
Tools And Materials Needed
Connecting a double light switch needs the right tools and materials. Having them ready makes the job safer and faster. This section lists all essentials for the task. Simple tools and parts help you handle wiring with ease and confidence.
Basic Hand Tools
You need a screwdriver set with flathead and Phillips tips. A wire stripper is important for removing insulation cleanly. Needle-nose pliers help bend and hold wires. A voltage tester ensures power is off before working.
Electrical Materials
Get a double light switch rated for your home’s voltage. Use electrical wires that match the switch and fixture specs. Wire nuts secure wire connections safely. Electrical tape adds extra protection around joints.
Safety Gear
Wear insulated gloves to avoid shocks. Safety goggles protect your eyes from dust and debris. Use a sturdy ladder if the switch box is high on the wall. Clear the work area for easy movement.
Additional Supplies
A flashlight or headlamp helps in low light spaces. A voltage detector pen offers an extra check for live wires. A small container keeps screws and small parts from getting lost. Keep a notebook or phone to note wire positions.
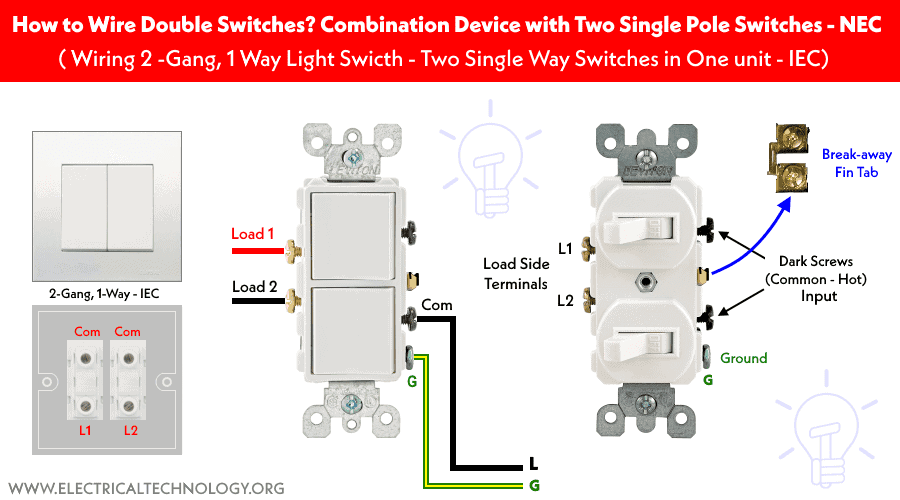
Credit: www.electricaltechnology.org
Safety Precautions
Safety is the first step before connecting a double light switch. Working with electricity can be dangerous. Taking the right precautions protects you and your home. Follow these simple safety tips to avoid accidents and damage.
Turn Off The Power
Always switch off the power at the main circuit breaker. Do not rely on the light switch alone. Use a voltage tester to confirm no electricity flows to the wires.
Use Proper Tools And Equipment
Choose insulated tools designed for electrical work. Avoid using damaged or worn tools. Wear rubber-soled shoes to reduce the risk of electric shock.
Work In A Dry Area
Make sure your hands and the workspace are dry. Water increases the chance of electric shock. Avoid working in damp or wet conditions.
Follow Wiring Instructions Carefully
Read the switch’s manual before starting. Connect wires exactly as shown in the guide. Mistakes in wiring can cause shorts or fires.
Wear Safety Gear
Use safety goggles to protect your eyes. Gloves can protect your hands from cuts and shocks. Keep a flashlight nearby in case of power loss.
Double Check Your Work
Inspect all connections before turning the power back on. Loose wires cause sparks and damage. Secure every wire tightly and neatly.
Identify Wiring Types
Identifying wiring types is a key step in connecting a double light switch safely. Each wire has a different job in the electrical system. Knowing these roles helps prevent mistakes and keeps your home safe.
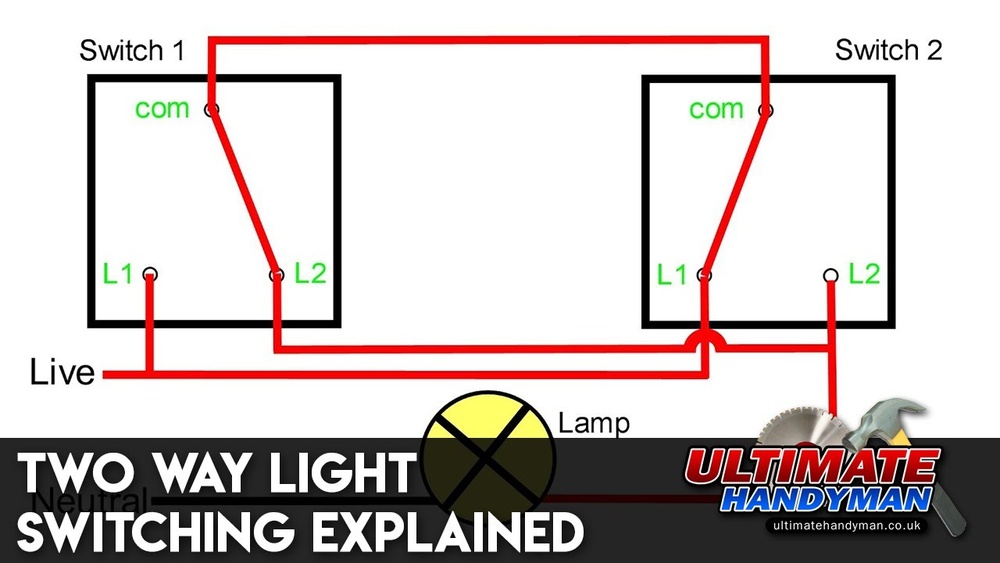
Live Wires
Live wires carry electricity from the power source to the switch. They are usually red or black. Handle them with care because they can cause shocks. Always turn off the main power before touching live wires.
Neutral Wires
Neutral wires complete the electrical circuit by carrying current back. They are often white or light gray. Neutral wires do not carry current when the switch is off. They connect directly to the light fixture in most cases.
Ground Wires
Ground wires provide a safety path for electricity. They reduce the risk of electrical shock or fire. Ground wires are typically green or bare copper. Always connect ground wires to the switch’s grounding screw.

Credit: www.sciencephoto.com
Turn Off Power Supply
Turning off the power supply is the most important step before connecting a double light switch. It keeps you safe from electric shocks. Never start any electrical work without cutting the power first.
Electricity runs through wires even if the light is off. So, simply switching off the light won’t stop the current. Always turn off the power from the main breaker or fuse box. This stops electricity from flowing to the switch.
Working with live wires can cause serious injury. It can also damage your electrical system. Taking the time to turn off the power protects both you and your home.
Locate The Main Breaker Panel
Find the main breaker panel in your home. It is usually in the basement, garage, or utility room. The panel contains switches that control power to different parts of the house.
Identify The Correct Breaker
Look for the breaker that controls the circuit for your light switch. It may be labeled with the room or area name. If not labeled, turn off breakers one by one to find the right one.
Switch Off The Breaker
Flip the breaker switch to the off position. This stops the electricity flow to the light switch. Make sure the switch stays in the off position until your work is done.
Test The Power Is Off
Use a voltage tester or a simple light bulb tester on the switch wires. Confirm no electricity is running through them. Never skip this step. It ensures your safety before touching any wires.
Remove Old Switch
Removing the old switch is the first step in connecting a double light switch. This process prepares the wall and wiring for the new switch. Safety is very important during this task. Always turn off the power at the circuit breaker before starting.
Careful removal helps avoid damage to wires and the electrical box. Follow these steps to remove the old switch safely and correctly.
Turn Off Power At The Circuit Breaker
Locate the correct circuit breaker for the switch. Flip the breaker to the off position. Use a voltage tester to check if the power is off. Never touch wires before confirming no electricity flows.
Remove The Switch Cover Plate
Use a screwdriver to take out the screws on the cover plate. Gently pull the plate away from the wall. Set the plate and screws aside for reuse or disposal.
Unscrew The Old Switch
Find the screws holding the switch to the electrical box. Unscrew them carefully. Pull the switch out slowly to expose the wires behind it.
Note Wire Connections
Observe how wires connect to the switch. Take a clear photo or draw a diagram. This step helps during the installation of the new switch.
Disconnect The Wires
Loosen the terminal screws or release the wires from push-in connectors. Gently remove the wires from the old switch. Keep the wires separated to avoid confusion later.

Credit: www.youtube.com
Connect Wires To Double Switch
Connecting wires to a double light switch is a key step in installing it safely. This process controls two lights or groups of lights from one switch box. Proper wiring ensures each light works independently without problems.
Follow these steps carefully to connect the wires. Double check everything before turning the power back on. Safety first.
Attach Live Wire
Locate the live wire, usually black or red. This wire carries power from the breaker. Connect it to the common terminal on the double switch. Tighten the screw firmly to hold the wire in place. Loose connections cause flickering or sparks.
Connect Load Wires
Find the load wires that lead to your lights. These wires are often black or red but separate from the live wire. Attach each load wire to its own switch terminal. Make sure each terminal holds one wire only. This controls each light independently.
Secure Ground Wire
Locate the bare copper or green ground wire. Attach it to the green grounding screw on the switch. This helps prevent electrical shocks. If your switch box has a grounding screw, connect the ground wire there too. Tighten all screws securely.
Mount The Switch
Connecting a double light switch involves wiring two switches in one box. Start by turning off power, then attach wires to each switch carefully. Secure the switch to the wall and test to ensure both lights work properly.
Prepare The Electrical Box
Start by making sure the electrical box is clean and free of debris. Check that the wires are properly stripped and ready to connect. This step helps prevent loose connections and ensures a safe installation. Also, verify the box size fits the double switch comfortably.
Align The Switch Properly
Hold the double switch inside the electrical box. Align it so the switch toggles face outward and are easy to reach. Make sure the mounting holes on the switch line up with the holes in the box. Proper alignment makes securing the switch easier.
Secure The Switch With Screws
Insert the mounting screws through the switch holes into the box. Tighten the screws with a screwdriver until the switch feels firm. Avoid overtightening to prevent damage to the switch or box. The switch should not move or wiggle once secured.
Check The Switch Position
After tightening, check the switch position again. Ensure it sits flush with the wall and is straight. The switches should toggle smoothly without obstruction. Adjust screws slightly if needed to improve alignment.
Test The Connection
Testing the connection is a key step after wiring a double light switch. This step checks if the switch and lights work correctly. It helps find wiring mistakes early. Safety is important during testing. Always handle electrical parts carefully.
Turn On The Power
Start by turning on the main power supply. This allows electricity to flow to the switch. Use a circuit breaker or fuse box to restore power. Never touch wires without power off first.
Check Each Switch
Flip each switch one at a time. Watch if the connected light turns on or off. This confirms the switch controls the right light. Switches should work smoothly without resistance.
Use A Voltage Tester
A voltage tester checks if electricity flows through the wires. Place the tester on switch terminals. The tester lights up if power is present. This tool helps confirm correct wiring.
Look For Flickers Or Delays
Observe the lights for flickering or delays. Flickers mean a loose connection or poor wiring. Fix any flickering before using the switch regularly. A steady light shows a good connection.
Turn Off Power Before Adjustments
Always turn off power before fixing wiring issues. This prevents electrical shocks or damage. Make sure no electricity flows while adjusting wires. Safety first to avoid accidents.
Troubleshooting Tips
Troubleshooting a double light switch can be simple with the right steps. Problems may happen due to wiring mistakes or faulty parts. Understanding common issues helps fix the switch quickly. This saves time and keeps your home safe.
Check The Power Supply
Start by turning off the main power. Use a voltage tester to confirm no electricity flows to the switch. This ensures safety before touching wires. If no power reaches the switch, check your circuit breaker or fuse box.
Inspect The Wiring Connections
Loose or wrong wires cause most switch problems. Remove the switch cover carefully. Look for disconnected or damaged wires. Tighten screws holding the wires. Match the wires to the correct terminals as per the instructions.
Test The Switch Functionality
Use a multimeter to test the switch. Set it to measure continuity. Flip the switch on and off. The meter should show a change. No change means the switch might be broken and needs replacement.
Examine The Light Fixtures
Sometimes the switch works, but the lights do not. Check the bulbs to see if they are burnt out. Test the light sockets for damage. Replace bulbs or fix sockets as needed to restore light.
Look For Signs Of Damage
Burn marks or melting on the switch or wires show a serious issue. Stop working and call a professional electrician. Do not try to fix electrical fire damage alone. Safety must always come first.
Frequently Asked Questions
How Do I Wire A Double Light Switch Safely?
To wire a double light switch safely, first turn off power at the circuit breaker. Connect the hot wire to the common terminal. Attach each switched wire to its respective terminal. Use wire nuts and electrical tape for secure connections.
Finally, mount the switch and restore power to test.
Can I Replace A Single Switch With A Double Switch?
Yes, you can replace a single switch with a double switch if wiring allows. Ensure the circuit supports controlling two lights or devices. Turn off power, disconnect the single switch, and connect wires to the double switch terminals accordingly. Test after installation.
What Tools Are Needed To Connect A Double Light Switch?
Essential tools include a voltage tester, wire stripper, screwdriver, and wire nuts. A voltage tester ensures power is off. Wire strippers prepare wire ends. Screwdrivers secure the switch and cover plate. Wire nuts connect wires safely and securely.
Why Won’t My Double Light Switch Work After Installation?
If a double switch fails, check for loose wires or incorrect connections. Confirm the power is on and circuit breaker is not tripped. Use a voltage tester to ensure electricity reaches the switch. Replace the switch if it’s defective.
Conclusion
Connecting a double light switch is easier than it seems. Follow each step with care and patience. Always turn off the power before starting your work. Use the right tools and check your wiring twice. This keeps you safe and ensures your switch works well.
With practice, wiring a double switch can become simple. Stay calm, work slowly, and enjoy the result. Your lights will work just the way you want.