Are you ready to brighten up your space with a new light and switch but don’t know where to start? Installing a light and switch yourself might seem tricky, but with the right steps, you can do it safely and quickly.
Imagine turning on your brand-new light with the flip of a switch you installed yourself—that feeling of accomplishment is just a few easy steps away. In this guide, you’ll discover simple instructions that anyone can follow, even if you’ve never touched electrical work before.
Keep reading, and you’ll have your room shining in no time.
Tools And Materials Needed
Installing a new light and switch needs the right tools and materials. Gathering everything before starting saves time and avoids problems. This section lists what you need to do the job safely and well.
Basic Tools List
Start with a screwdriver set. Both flathead and Phillips types are useful. A voltage tester helps check if wires have power. Wire strippers make it easy to remove insulation. Pliers come in handy for bending wires. A drill with bits may be needed for mounting. Electrical tape secures wire connections. A flashlight or headlamp provides light in dark spaces.
Safety Gear
Wear safety goggles to protect your eyes. Use insulated gloves to prevent shocks. Non-slip shoes keep you stable on ladders. Have a sturdy ladder to reach high places safely. Turn off power at the breaker before starting work. Double-check power is off using a voltage tester. Keep a first aid kit nearby for minor injuries.
Choosing The Right Light And Switch
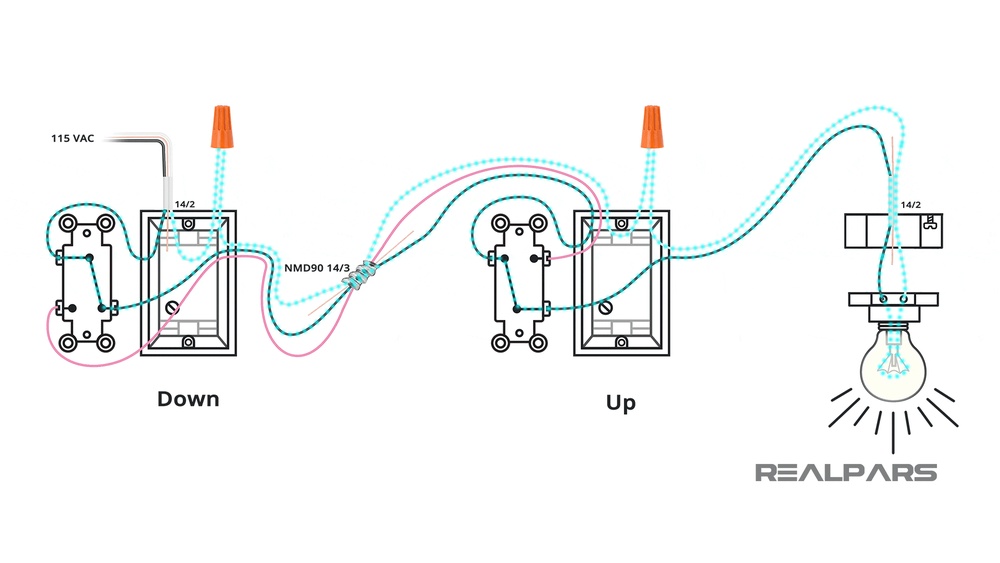
Select a light fixture that fits your room size and style. Check the light’s wattage matches your electrical system. Choose an energy-efficient bulb to save money. Pick a switch type that suits your needs, like a dimmer or standard switch. Ensure the switch fits the electrical box size. Buy materials from a reliable store for quality and safety.

Credit: diy.stackexchange.com
Preparing The Work Area
Preparing the work area is the first step to a smooth light and switch installation. A clean, safe space helps you focus and work efficiently. It also reduces risks of accidents or mistakes. Taking time to prepare saves time later.
Turning Off Power
Safety is the top priority. Start by turning off the power at the circuit breaker. This stops electricity from flowing to the switch and light. Use a voltage tester to check that the power is really off. Never skip this step.
Clearing The Space
Remove furniture and items near the switch and light fixture. Clear the floor to avoid tripping hazards. A tidy area gives you room to work comfortably. It also makes it easy to find your tools and parts.
Gathering Supplies
Collect all needed tools and materials before starting. Common tools include a screwdriver, wire stripper, voltage tester, and electrical tape. Have the new light fixture and switch ready. Organize everything close to your work area.
Removing The Old Light And Switch
Removing the old light and switch is the first step in installing new ones. This process must be done carefully to avoid damage and ensure safety. Take your time and follow each step closely.
Unscrewing Fixtures
Start by turning off the power at the circuit breaker. Use a screwdriver to remove the screws holding the light fixture and switch cover. Keep the screws in a safe place for reuse. Gently pull the fixture or switch from the wall to expose the wiring behind.
Disconnecting Wires
Use a voltage tester to confirm the power is off. Carefully loosen the wire nuts or screws connecting the wires. Separate the wires one by one. Note the position of each wire for the new installation. Handle the wires with care to avoid damage.
Handling Old Components Safely
Old wires and fixtures may have sharp edges or rust. Wear gloves to protect your hands. Place all removed parts in a safe container. Do not leave loose wires exposed. Dispose of old components according to local regulations.
Installing The New Switch
Installing a new switch is a key step in setting up your light. It controls the power flow to the light fixture. This section guides you through wiring, mounting, and testing the switch safely and correctly.
Wiring The Switch
First, turn off the power at the breaker box. Use a voltage tester to confirm no electricity flows. Connect the black (hot) wire to the switch’s brass terminal. Attach the white (neutral) wires together with a wire nut. Connect the green or bare copper wire to the switch’s ground screw. Secure all wire connections tightly to avoid loose contacts.
Mounting The Switch
Gently push the wired switch into the electrical box. Align the switch with the screw holes on the box. Use a screwdriver to fasten the switch securely. Do not overtighten, or the switch may crack. Attach the switch cover plate carefully to finish the look.
Testing The Connection
Restore power at the breaker box. Flip the switch on and off to check the light. If the light works, the switch is wired correctly. If not, turn off power and recheck the wiring. Testing ensures your new switch operates safely and properly.
Installing The New Light Fixture
Installing the new light fixture is a key step in updating any room’s look and feel. This process involves connecting wires, securing the fixture to the ceiling or wall, and adding bulbs and covers. Each step is important to ensure the light works safely and looks great.
Wiring The Light
Turn off the power at the circuit breaker before starting. Match the wires from the fixture to the wires in the ceiling. Usually, black connects to black, white to white, and green or copper is the ground wire. Use wire nuts to secure the connections tightly. Wrap electrical tape around the nuts for extra safety. Make sure no wires are exposed.
Securing The Fixture
Attach the mounting bracket to the electrical box using screws. Lift the fixture and align it with the bracket. Use the screws or bolts provided to fasten the fixture firmly. The fixture should feel stable and not wiggle. Check that it sits flush against the ceiling or wall.
Installing Bulbs And Covers
Choose bulbs that match the fixture’s recommended wattage. Screw the bulbs gently into the sockets. Avoid over-tightening as this can damage the bulb. Place any covers or shades over the bulbs. Secure them according to the fixture’s design. This step completes the look and protects the bulbs.
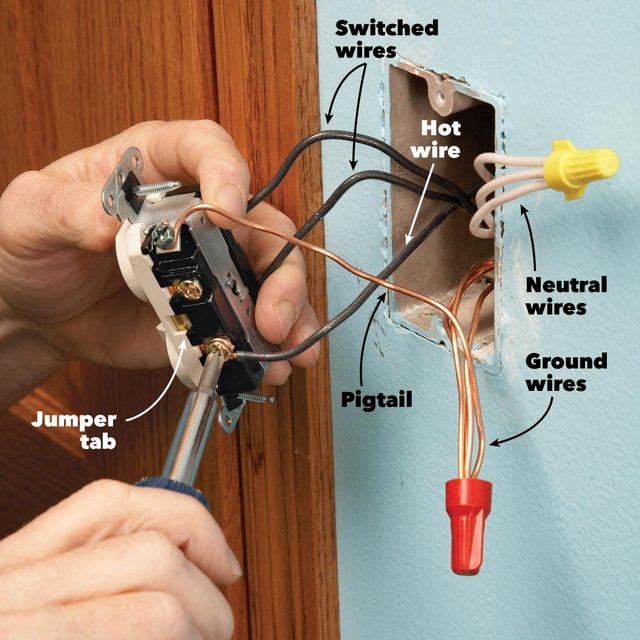
Credit: www.familyhandyman.com
Final Safety Checks
Final safety checks are crucial after installing a new light and switch. They ensure everything works safely and correctly. Skipping these steps can cause electrical problems or hazards.
Follow these checks carefully. They help confirm your installation is safe and functional. Take your time and be thorough.
Restoring Power
Turn the circuit breaker back on at the main panel. This restores power to your new light and switch. Stand clear of the switch and light fixture as you do this. Watch for any sparks or unusual sounds. If you notice anything strange, turn off the breaker immediately.
Testing Light And Switch Function
Flip the switch to test the light. The light should turn on and off smoothly. Check for flickering or dimness. Test any additional switches if you installed a three-way setup. Make sure all switches control the light properly. This confirms your wiring is correct.
Troubleshooting Common Issues
If the light does not turn on, double-check your wiring connections. Make sure wires are tight and correctly placed. Verify the bulb is working and screwed in properly. Check the circuit breaker again to ensure it’s on. Replace the switch if it feels loose or damaged. These steps fix most common problems quickly.
Tips For Maintenance And Upgrades
Maintaining your new light and switch keeps them working well and safe. Small care steps help avoid bigger problems later. Upgrading parts can save energy and improve your home’s look.
Regular Inspection
Check your light and switch often for any damage or wear. Look for loose wires, flickering lights, or switches that feel hot. Fix small issues quickly to prevent electrical hazards. Clean dust and dirt to keep parts working smoothly.
Energy-efficient Options
Use LED bulbs instead of old incandescent ones. LEDs use less power and last longer. Consider smart switches that let you control lights with your phone. These options reduce electricity bills and add convenience.
When To Call A Professional
Hire an electrician for complex wiring or if you see sparks or burning smells. Don’t try to fix serious electrical issues yourself. A professional ensures the work is safe and up to code. Save time and avoid risks with expert help.

Credit: www.dummies.com
Frequently Asked Questions
How Do I Safely Turn Off Power Before Installation?
Always switch off the circuit breaker controlling the light’s power. Use a voltage tester to confirm no electricity flows. This ensures your safety while installing the new light and switch. Never rely on just the wall switch to cut power.
What Tools Do I Need To Install A Light And Switch?
You’ll need a voltage tester, wire stripper, screwdriver, electrical tape, and wire nuts. A drill and ladder might help for ceiling lights. Having the right tools makes installation easier and safer.
Can I Install A New Switch Without Rewiring?
Yes, if existing wiring is compatible and in good condition. Simply connect the new switch wires to the existing circuit. But if wiring is old or damaged, a full rewire might be necessary.
How Do I Connect Wires To The New Switch?
Match the wires by color: black (hot), white (neutral), and green or bare (ground). Securely attach wires to the switch terminals using screws or push-in connectors. Tight connections prevent electrical hazards and ensure proper function.
Conclusion
Installing a new light and switch can be simple and quick. Follow safety steps carefully to avoid risks. Take your time to connect wires correctly. Test the switch to make sure it works well. Good lighting can improve any room’s look and feel.
With these easy steps, you can do it yourself. Save money and feel proud of your work. Enjoy your new light and the brightness it brings.