Wiring a light switch might sound tricky, but it doesn’t have to be. If you want to take control of your home’s lighting and save money on electrician fees, this guide is for you.
You’ll learn simple, step-by-step instructions that anyone can follow—even if you’re new to electrical work. By the end, you’ll feel confident handling your own light switch wiring safely and correctly. Ready to brighten up your space with your own hands?
Let’s get started!
Tools And Materials Needed
Before wiring a light switch, gather the right tools and materials. This step makes the job safer and easier. Having everything ready saves time and avoids mistakes.
Tools Needed
A few basic tools help you complete the wiring safely and quickly. You will need a screwdriver, wire stripper, and voltage tester. A pair of pliers comes in handy for bending wires. Use a flashlight to see in dark spaces. Safety gloves protect your hands from sharp edges.
Materials Required
Choose the right light switch for your project. Most homes use a single-pole switch. You will also need electrical wire, usually 14 or 12 gauge. Wire connectors help join wires securely. Electrical tape adds extra safety and insulation.
Safety Gear
Safety is important while working with electricity. Wear insulated gloves to avoid shocks. Safety goggles protect your eyes from sparks or dust. Use a sturdy ladder if needed. Never skip safety gear during electrical work.
Credit: futurehousestore.co.uk
Safety Tips Before Starting
Working with electrical wiring can be risky without proper safety measures. Taking the right precautions protects you from shocks and accidents. Before starting, understand the safety basics clearly.
Follow these essential safety tips to keep yourself safe while wiring a light switch.
Turn Off The Power
Always switch off the power at the circuit breaker. Do not rely on the light switch alone. Test the wires with a voltage tester to confirm no electricity flows.
Use Proper Tools
Choose insulated tools designed for electrical work. Avoid using damaged or worn tools. Proper tools reduce the chance of electric shock.
Wear Safety Gear
Wear rubber-soled shoes and safety gloves. Safety glasses protect your eyes from sparks. Keep your clothes tight to avoid catching wires.
Work In A Dry Area
Never work with electrical wiring in wet conditions. Water increases the risk of electric shock. Ensure the workspace is dry before you start.
Know Your Wiring
Identify all wires before touching them. Learn the difference between live, neutral, and ground wires. Clear knowledge prevents wiring mistakes.
Types Of Light Switches
Light switches control the flow of electricity to your lights. There are different types of switches. Each type works best for certain rooms or lighting needs. Knowing the types helps you choose the right switch for your home.
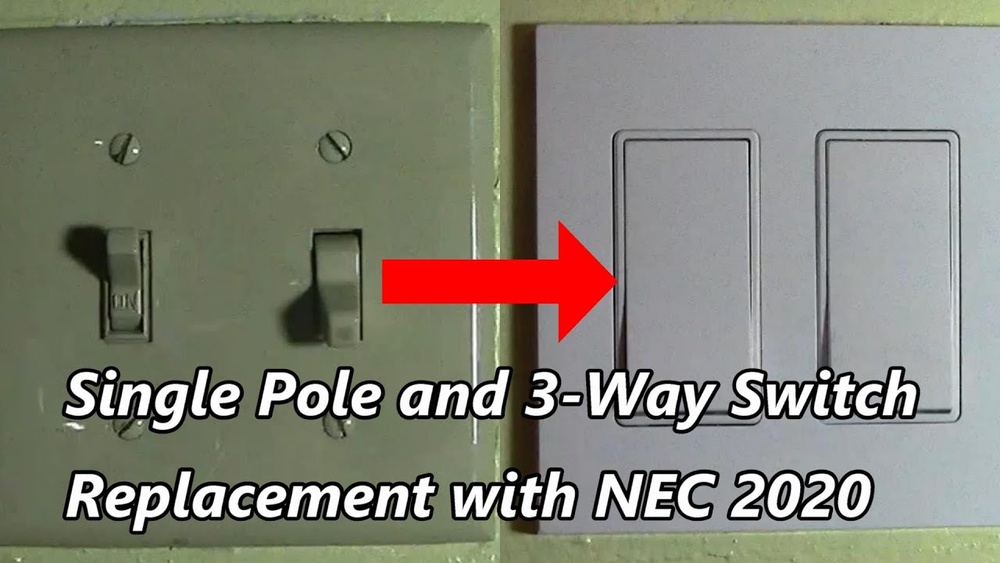
Single-pole Switch
This is the most common light switch. It controls one light or a group of lights from one location. It has two terminals and a simple ON/OFF function. This switch is easy to wire and install.
Three-way Switch
This switch works with another three-way switch to control a light from two locations. You see this in hallways or large rooms with two entrances. It has three terminals for wiring. This switch allows more control and convenience.
Dimmer Switch
A dimmer switch adjusts the brightness of your lights. It can replace a single-pole switch. Use it to create mood lighting or save energy. Dimmer switches need special wiring and compatible bulbs.
Credit: linkdhome.com
Turning Off The Power
Turning off the power is the most important step before wiring a light switch. Safety comes first. Electricity can cause serious injury or death. Always make sure the power is completely off before starting any electrical work.
Many people skip this step and risk electric shocks. Never touch wires or terminals with the power on. Taking a moment to turn off power protects you and your home.
Locate The Circuit Breaker
Find the circuit breaker box in your home. It is usually in the basement, garage, or utility room. Open the panel door to see the switches inside. Each switch controls power to different parts of the house.
Identify The Correct Breaker
Look for the breaker that controls the light switch you want to wire. The breakers are often labeled with room names or numbers. If not labeled, turn off breakers one by one and check which light goes off.
Switch Off The Breaker
Flip the correct breaker to the off position. This stops power flow to the light switch. Double-check by trying to turn the light on. It should not light up. If it still does, turn off the main breaker.
Use A Voltage Tester
Always test the wires with a voltage tester. This tool confirms no electricity is flowing. Touch the tester to the wires where you will work. No light or sound means it is safe to proceed.
Removing The Old Switch
Removing the old light switch is the first step in rewiring. It prepares the space for the new switch. Safety is very important here. Always turn off the power at the circuit breaker before starting. This stops any chance of electric shock. Use a voltage tester to check that the wires have no power.
After confirming the power is off, remove the switch cover plate. This reveals the switch and wiring behind it. Some covers just snap off. Others need a screwdriver to remove screws. Keep the screws safe for reuse later.
Turn Off The Power
Find the correct breaker in your electrical panel. Switch it off completely. Use a voltage tester on the switch wires to be sure. No spark or light means the power is off. Never skip this step. Safety first.
Remove The Cover Plate
Use a screwdriver or your fingers to take off the plate. The plate covers the switch and screws. Handle it gently to avoid damage. Set it aside with the screws.
Unscrew The Old Switch
Locate the screws holding the switch to the wall box. Use a screwdriver to loosen and remove these screws. Pull the switch out carefully. Do not yank the wires.
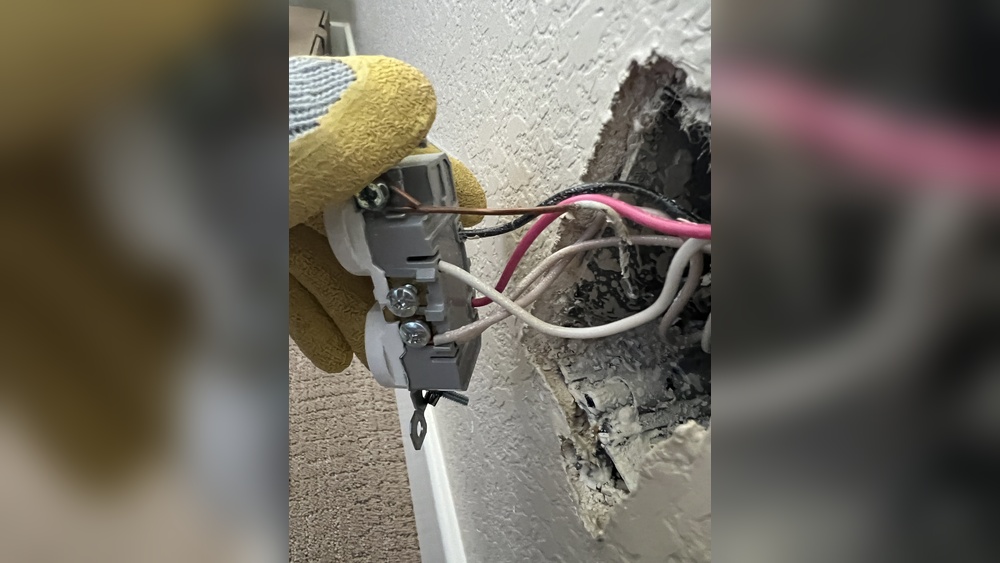
Disconnect The Wires
Identify the wires attached to the switch terminals. Loosen the terminal screws or release the push-in connectors. Gently pull the wires free. Note their positions for the new switch.
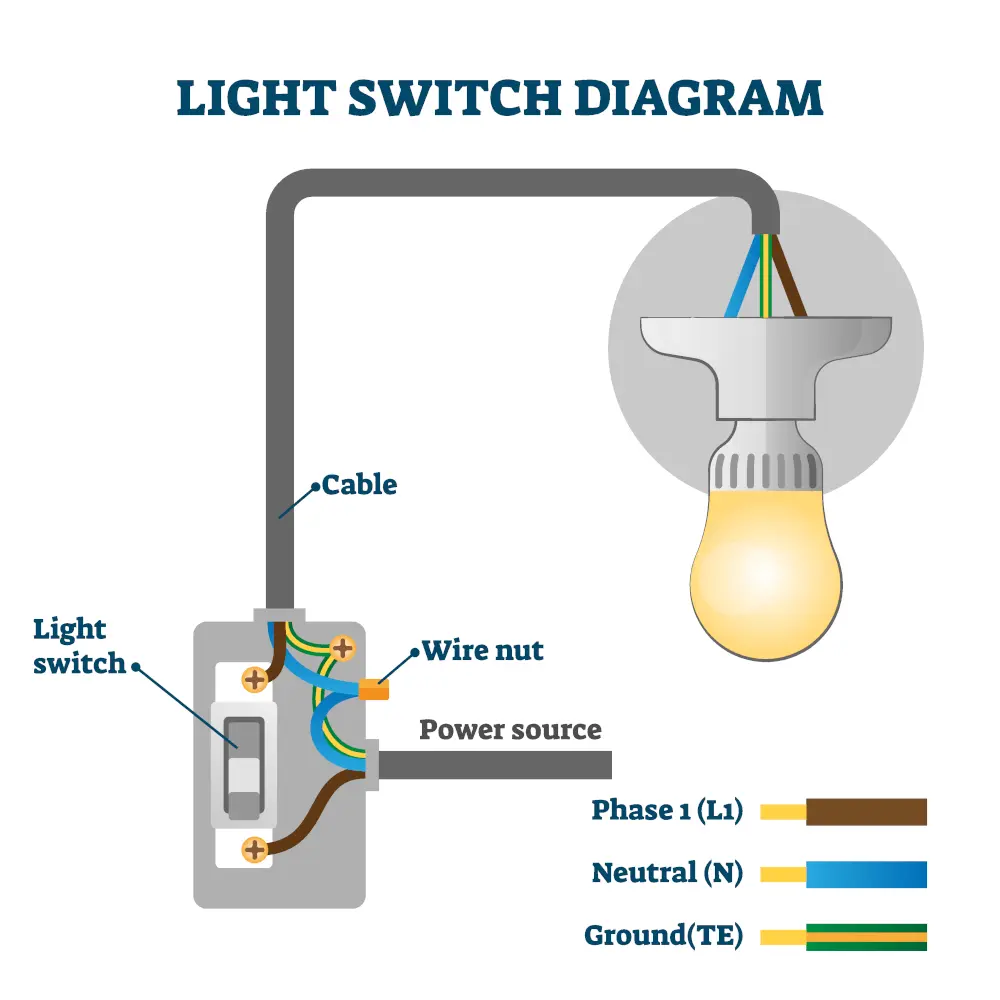
Identifying Wires
Identifying wires is the first step to wiring a light switch safely. Knowing each wire’s role helps avoid mistakes. This step protects you and your home from electrical hazards. Understanding wire colors and functions makes the process easier and faster.
Hot Wire
The hot wire carries electricity from the power source. It is usually black or red. This wire connects directly to the switch. Always treat the hot wire as live and dangerous. Turn off the power before touching it.
Neutral Wire
The neutral wire completes the electrical circuit. It usually has white insulation. This wire does not connect to the switch. Instead, it connects to the light fixture. It carries electricity back to the panel safely.
Ground Wire
The ground wire protects against electrical shocks. It is bare copper or green. This wire connects to the switch’s ground screw. It also connects to the electrical box if metal. Grounding improves overall safety.
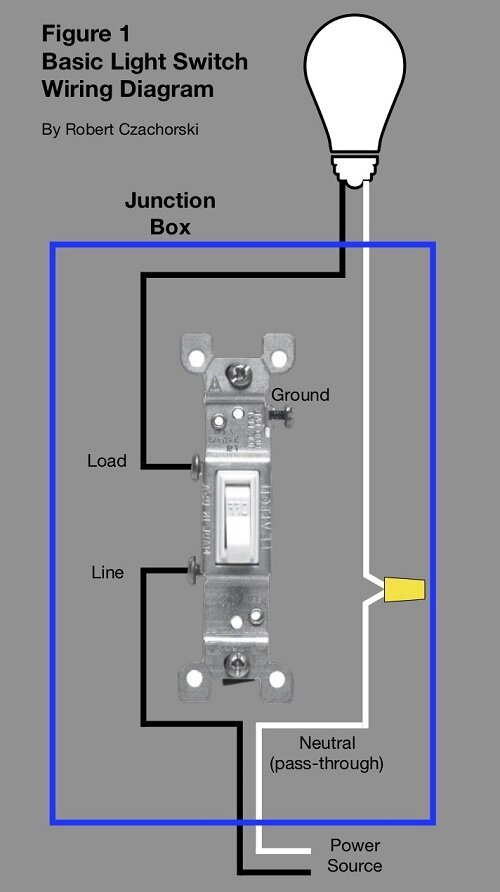
Wiring The New Switch
Wiring the new switch is an important step in replacing a light switch safely and correctly. Pay attention to each wire and its place. Follow the steps carefully to ensure the switch works well.
Connecting The Hot Wire
Identify the hot wire, usually black or red. Attach this wire to the switch’s brass terminal. Tighten the screw firmly to hold the wire. This wire carries power to the switch.
Attaching The Ground Wire
Find the ground wire, which is green or bare copper. Connect it to the green screw on the switch. This wire helps protect from electrical shocks. Secure it tightly for safety.
Securing The Neutral Wire
Neutral wires are usually white. Most switches do not connect to neutral wires. If your switch has a neutral terminal, attach the neutral wire there. Make sure connections are solid and safe.
Mounting The Switch And Cover Plate
Mounting the switch and cover plate is a key step in wiring a light switch. It secures the switch safely and gives a neat finish. Proper mounting also prevents electrical hazards and ensures the switch works well.
Take your time to align the switch correctly. Tighten screws firmly but do not over-tighten. Over-tightening can crack the switch or the wall plate.
Positioning The Switch In The Electrical Box
Place the switch inside the electrical box carefully. Make sure wires are not pinched or bent sharply. The switch should sit flush against the wall for a clean look.
Check that the switch screw holes line up with the box holes. This makes screwing easier and keeps the switch steady.
Securing The Switch With Screws
Use the screws that came with the switch. Insert them into the holes and tighten gently. Stop when the switch feels firm and does not move.
Do not force screws too hard. This can damage the switch or strip the threads, leading to a loose fit.
Attaching The Cover Plate
Place the cover plate over the switch carefully. Align it so the screw holes match the switch’s holes.
Insert the cover plate screws and tighten them just enough. The plate should sit flat without gaps or cracks.
A well-mounted cover plate protects the wiring and improves the room’s appearance.
Restoring Power And Testing
Restoring power and testing the light switch completes the wiring job. It confirms the switch works properly and safely. Take care during this step to avoid electric shock or damage. Follow the instructions below to turn on the power and check your work.
Turning The Circuit Breaker Back On
Locate the circuit breaker in the main panel. Flip the breaker switch that controls the light circuit to the ON position. This restores electricity to the wiring and switch. Do not rush. Make sure your hands are dry. Stand on a dry surface to stay safe.
Testing The Light Switch Function
Go to the light switch you wired. Flip it up and down slowly. Check if the light turns on and off each time. If it works, the wiring is correct. If the light does not respond, turn off the breaker again. Double-check your wiring connections before trying again.
Using A Voltage Tester For Extra Safety
Use a non-contact voltage tester near the switch wires. It detects live electricity without touching the wires. This tool confirms power is present or absent safely. Test the switch in both ON and OFF positions. This step ensures your wiring is safe and functional.
Troubleshooting Common Issues
Troubleshooting common issues helps fix light switch problems fast. Knowing what to check saves time and effort. Simple steps can solve many wiring troubles.
Switch Not Working
Check if the power is off before touching wires. Test the switch with a voltage tester. Loose connections can stop the switch from working. Tighten all wire screws. Replace the switch if it feels hot or broken.
Light Flickering
Flickering lights often mean loose wiring or bad bulbs. Make sure the bulb is screwed in tightly. Inspect the wires connected to the switch. Replace worn or damaged wires. Try a new bulb to rule out bulb issues.
Tripped Circuit Breaker
A breaker trips to stop electrical hazards. Check if the switch causes the breaker to trip. Overloaded circuits or short circuits are common reasons. Look for exposed wires or crossed connections. Call an electrician if unsure or if the breaker trips repeatedly.
When To Call A Professional
Wiring a light switch can be simple. But some situations need a professional. Safety is the top concern with electrical work. Wrong wiring can cause shocks or fire. Knowing when to call an expert saves trouble and risk.
Complex Electrical Systems
Older homes may have outdated wiring. Complex systems require special knowledge. Professionals understand different wiring types and codes. They ensure the switch works safely and correctly.
Unclear Wiring Layout
If wires are tangled or not labeled, it’s risky. Professionals can trace wires easily. They avoid mistakes that cause short circuits or damage.
No Electrical Experience
Without basic electrical knowledge, do not attempt wiring. Professionals have training and tools. They handle wiring tasks quickly and safely.
Frequent Electrical Problems
Switches that trip breakers or flicker need expert help. These signs show bigger electrical issues. A professional finds and fixes the root cause.
Local Electrical Code Compliance
Electric codes protect safety. Professionals know local codes well. They make sure wiring meets all rules and passes inspections.

Credit: serviceteam.co.uk
Frequently Asked Questions
How Do I Wire A Single-pole Light Switch?
To wire a single-pole switch, connect the black (hot) wire to the switch terminal. Attach the white (neutral) wires together with a wire nut. Connect the ground wire to the green screw. This setup controls one light from a single location safely.
What Tools Are Needed For Wiring A Light Switch?
You need a screwdriver, wire stripper, voltage tester, and wire nuts. A flashlight and electrical tape also help. These tools ensure safe, accurate wiring and proper connections for your light switch installation.
Can I Replace A Light Switch Without Turning Off Power?
No, always turn off power at the circuit breaker. This prevents electric shock or injury while working on wiring. Use a voltage tester to confirm power is off before starting any electrical work.
How To Identify Wires For A Light Switch?
Black wires are hot, white are neutral, and green or bare wires are ground. Use a voltage tester to confirm. Correct identification ensures proper and safe wiring connections in your light switch setup.
Conclusion
Wiring a light switch can be simple and safe. Always turn off power before starting work. Follow steps carefully for correct connections. Use the right tools and materials every time. Check your work before turning power back on. A properly wired switch keeps your home safe.
Practice patience and take your time with each step. This guide helps you build confidence in wiring. Small efforts lead to good results and safety. Keep learning and improving your home skills.