Are you ready to upgrade your home security without the hassle of keys? Installing a Kwikset Keyless Deadbolt is easier than you might think, and it can give you peace of mind with just a few simple steps.
Imagine never fumbling for your keys again or worrying about lost copies. In this guide, you’ll discover exactly how to install your Kwikset Keyless Deadbolt quickly and confidently. Keep reading to unlock the secrets to a safer, smarter door today.
Tools Needed
Installing a Kwikset keyless deadbolt is simple with the right tools. Having these tools ready saves time and avoids frustration. Each tool helps with a specific step in the installation. Let’s review what you need before starting.
Phillips Screwdriver
A Phillips screwdriver is essential for tightening screws. It fits the screws on the deadbolt and door plate. Choose a medium size for better control and grip.
Flathead Screwdriver
This helps to pry off old hardware or adjust small parts. It can also assist in removing the battery cover on the new lock. Keep it handy for small tasks.
Drill With Drill Bits
A drill speeds up the process of making holes. Use it to drill new holes or widen existing ones. Select drill bits that match the size of screws and latch holes.
Measuring Tape
Accurate measurements ensure the lock fits perfectly. Measure the door thickness and backset distance carefully. This tool avoids mistakes during installation.
Pencil
Marking spots on the door helps in precise drilling. Use a pencil to draw guide lines for screws and latch placement. Clear marks make the job easier.
Level
A level keeps the lock straight and aligned. Proper alignment is important for smooth locking and unlocking. Check the lock’s position before final tightening.
Preparing The Door
Preparing your door is the first step in installing a Kwikset keyless deadbolt. This process ensures the lock fits perfectly and works smoothly. Careful preparation saves time and prevents problems later.
Start by removing the old deadbolt. Then, check the door alignment to make sure everything is straight. These tasks create a solid base for the new lock.
Remove Old Deadbolt
Use a screwdriver to take out the screws holding the old deadbolt. Pull the lock parts gently from both sides of the door. Remove the latch from the door edge. Keep the screws for the new lock if they fit. Clean the door surface to remove dust and dirt. This makes installation easier and cleaner.
Check Door Alignment
Close the door and look at the gap between the door and frame. The gap should be even all around. Open the door and check if the latch lines up with the strike plate. Adjust the strike plate if needed. A well-aligned door helps the deadbolt lock smoothly. Fix any issues before installing the new lock.
Installing The Deadbolt
Installing the Kwikset keyless deadbolt is a straightforward process. You need to handle each part carefully to ensure the lock works well. Follow these steps to install the deadbolt correctly and secure your door.
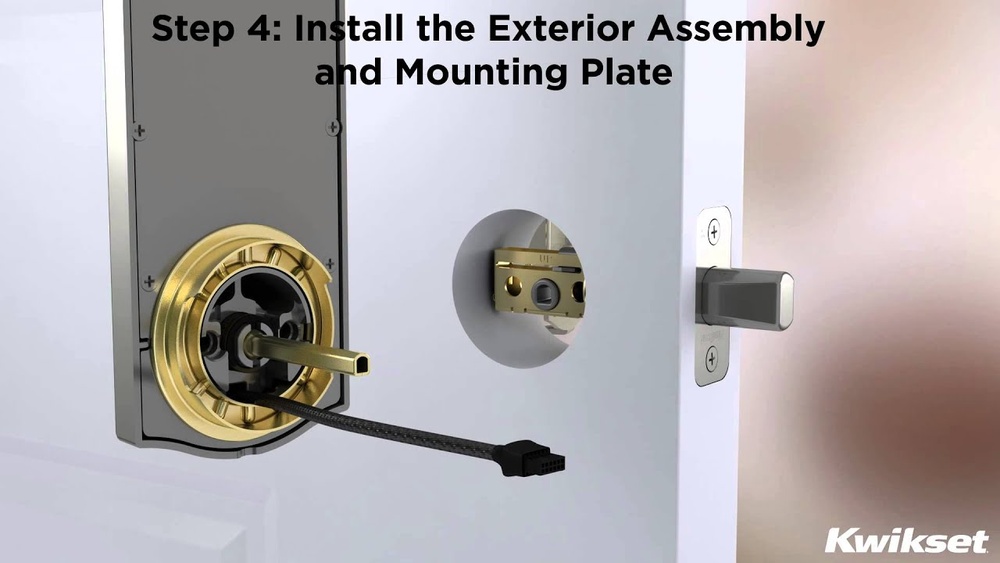
Insert Exterior Assembly
Start by placing the exterior assembly on the outside of the door. Align the keypad with the hole in the door. Make sure the tailpiece fits through the latch mechanism. The keypad should sit flush against the door surface.
Attach Interior Assembly
Next, position the interior assembly on the inside of the door. Line it up with the tailpiece from the exterior side. The interior part includes the thumb turn and battery cover. Hold it steady while preparing to connect both sides.
Secure With Screws
Use the provided screws to join the exterior and interior assemblies. Tighten the screws evenly to avoid misalignment. Do not overtighten, or the lock may not work smoothly. Check that the deadbolt moves freely after securing the screws.

Credit: www.youtube.com
Wiring And Battery Setup
Setting up the wiring and battery for your Kwikset keyless deadbolt is simple. This step powers the lock and connects the internal parts. Proper wiring ensures the lock works smoothly. The batteries keep the system running without interruptions. Follow these clear steps to connect the wiring harness and install the batteries correctly.
Connect Wiring Harness
Locate the wiring harness inside the lock assembly. The harness has a plug that fits into the connector. Align the plugs carefully before pressing them together. Avoid forcing the connection to prevent damage. Make sure the wires are secure and not loose. Tuck the wiring neatly inside the lock housing. This prevents pinching or disconnection during use.
Install Batteries
Open the battery compartment on the lock’s interior side. Insert four AA batteries in the correct direction. Follow the polarity marks (+ and -) shown inside the compartment. Use fresh batteries for best performance. Close the battery cover firmly to keep batteries in place. Check if the lock powers up by pressing a button. Replace batteries as soon as power becomes weak.
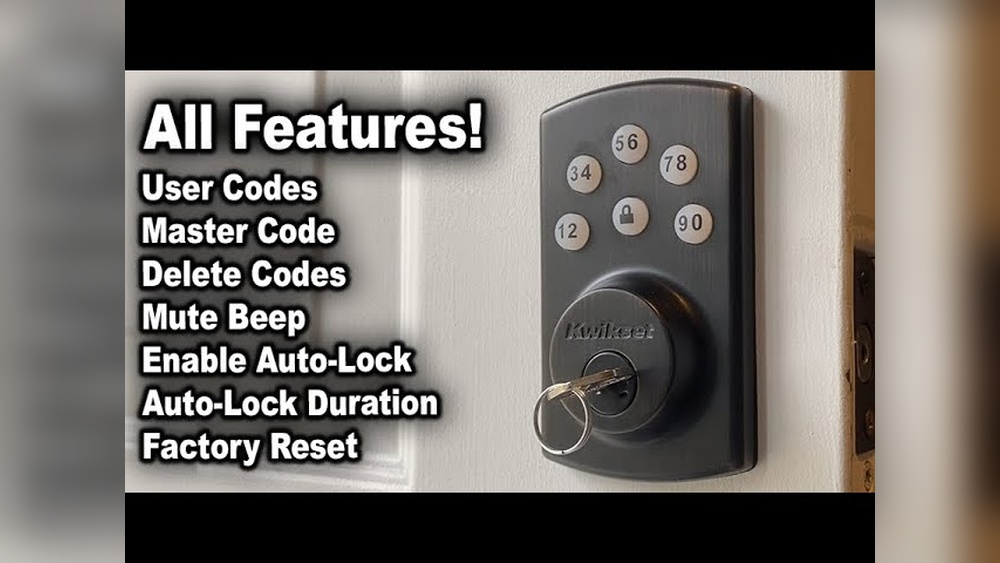
Programming The Lock
Programming your Kwikset keyless deadbolt is simple. It lets you control who can enter your home. Setting up codes is quick and secure. Follow these steps to program the lock correctly.
Set Master Code
Start by setting your master code. This code controls all other codes. It must be easy for you to remember.
Press the program button inside the lock. Enter the default master code provided. Then, choose a new master code with 4 to 8 digits. Confirm the new code by entering it again. This step completes the master code setup.
Add User Codes
After setting the master code, add user codes for family or guests. Each user code can have 4 to 8 digits.
Press the program button. Enter the master code. Choose the option to add a new user code. Enter the new user code and confirm it. Repeat for each person needing access.
Deleting or changing user codes works the same way. Always keep your master code secure to protect your home.
Credit: www.kwikset.com
Testing The Lock
Testing the Kwikset keyless deadbolt is important after installation. It ensures the lock works smoothly and keeps your home safe. You must check both manual and electronic functions. This helps avoid future problems and improves security.
Check Manual Operation
Start by turning the thumb turn inside the door. It should move easily without sticking. Make sure the deadbolt slides fully in and out of the door frame. Test the door handle as well. The door must open and close without resistance. If the bolt jams or feels tight, adjust the lock parts. Confirm the lock engages properly from both sides of the door.
Verify Keyless Entry
Enter your preset code on the keypad. The deadbolt should retract smoothly. Try locking the door with the keypad too. Confirm the lock accepts your code every time. Test with multiple codes if you set more than one. Check the keypad lights and sounds for feedback. If the lock does not respond, check the batteries and reset the codes.
Troubleshooting Tips
Troubleshooting your Kwikset keyless deadbolt can save time and frustration. Small issues may stop your lock from working correctly. Knowing common problems and fixes helps keep your door secure and easy to use.
Check the battery and installation steps carefully. Many problems happen due to simple mistakes or low power. Follow these tips to solve common troubles quickly.
Common Installation Issues
Make sure the deadbolt fits your door properly. A loose lock can cause jamming or failure to lock.
Check if the latch is aligned with the strike plate. Misalignment often stops the deadbolt from moving smoothly.
Test the keypad before fixing the lock to the door. If buttons do not respond, check wiring and battery connections.
Ensure all screws are tight but not over-tightened. Too much pressure can damage parts or block movement.
Battery Replacement Advice
Replace batteries as soon as the low battery light appears. Weak batteries cause slow or missed signals from the keypad.
Use fresh alkaline batteries for the best performance. Avoid rechargeable batteries as they may not provide steady power.
Remove old batteries carefully to prevent corrosion inside the compartment. Clean contacts if you see any dirt or rust.
After replacing, test the lock several times to confirm it works well. If problems persist, check the installation again or consult the manual.

Credit: www.youtube.com
Frequently Asked Questions
How Do I Install A Kwikset Keyless Deadbolt?
First, remove your old deadbolt. Align the new lock’s faceplate with the door edge. Secure the deadbolt and keypad with screws. Insert batteries and program your access codes. Follow the included manual for exact steps.
What Tools Are Needed For Kwikset Deadbolt Installation?
You will need a Phillips screwdriver, drill, tape measure, and pencil. A chisel may help adjust the door edge. Having all tools ready ensures a smooth installation process.
Can I Install Kwikset Deadbolt On Any Door?
Yes, it fits standard door thicknesses between 1-3/8 to 1-3/4 inches. Make sure your door has a standard borehole of 2-1/8 inches. Check the deadbolt specifications before installation.
How Do I Program The Kwikset Keyless Deadbolt?
Press the program button inside the lock. Enter your new user code on the keypad. Confirm the code according to instructions. Programming varies slightly by model, so consult the manual.
Conclusion
Installing a Kwikset keyless deadbolt is simple and quick. Follow each step carefully for best results. Test the lock several times to ensure it works well. Keep your code private to stay secure. This upgrade adds safety and convenience to your home.
Enjoy the ease of keyless entry every day.