Have you ever wondered how to connect a switch and a light quickly and safely? Whether you’re fixing a broken setup or installing a new light, knowing the right steps can save you time and frustration.
Imagine flipping your switch and seeing your room light up instantly—that simple action depends on a few key connections you can easily learn. In this guide, you’ll discover clear, step-by-step instructions that anyone can follow, even if you’re not an expert.
Keep reading, and you’ll gain the confidence to handle your lighting projects like a pro.

Credit: diy.stackexchange.com
Tools And Materials Needed
Connecting a switch and light requires some basic tools and materials. Having the right items makes the job safer and easier. You can prepare everything before starting to avoid delays.
Each tool and material has a clear purpose. Knowing these helps you work with confidence and accuracy. Below are the essential tools and materials you need.
Tools Needed
A screwdriver set is essential for removing and securing screws. Use both flathead and Phillips screwdrivers for different screws.
Wire strippers help remove the insulation from wires cleanly. This is important to make good electrical connections.
A voltage tester checks if wires have electricity. This tool keeps you safe by preventing shocks.
Needle-nose pliers assist in bending and twisting wires. They help in tight spaces and small connections.
Electrical tape insulates wire connections. It protects wires and prevents short circuits.
Materials Needed
Light switches come in different types, such as single-pole or three-way. Choose one that fits your project.
Use electrical wires rated for your home’s voltage. Common types include 14 or 12 gauge wire.
Wire connectors, also called wire nuts, join wires securely. They keep wires from touching and causing shorts.
Light fixtures must match your room’s style and electrical requirements. Make sure the bulb type is correct.
A switch box holds the switch inside the wall. It protects wires and keeps the switch stable.

Credit: community.smartthings.com
Safety Precautions
Working with electrical switches and lights requires care. Safety is the top priority. Following proper safety steps prevents accidents and injuries. It protects both you and your home.
Before starting, understand the risks involved. Electricity can cause shocks or fires if handled wrongly. Always prepare well and stay alert.
Turn Off Power At The Circuit Breaker
Switch off the power from the circuit breaker box. This stops electricity flow to the switch and light. Use a tester to check no current is flowing. Never rely only on the switch position.
Use Insulated Tools
Choose tools with insulated handles. These protect your hands from electric shocks. Avoid using metal tools without insulation. Keep tools dry and in good condition.
Wear Safety Gear
Wear rubber-soled shoes to avoid grounding. Use safety goggles to protect your eyes. Gloves made for electrical work add extra safety. Dress properly to reduce risk.
Work In A Dry Environment
Ensure the workspace is dry. Water conducts electricity and increases shock risk. Avoid working in wet rooms or during rain. Dry your hands before handling wires.
Double-check Connections
Inspect all wiring connections carefully. Loose wires can cause sparks or short circuits. Tighten screws and secure wires firmly. Label wires to avoid confusion.
Types Of Switches
Switches control the flow of electricity to lights. Different types of switches serve different purposes. Knowing about them helps in choosing the right one for your needs. Here are the main types of switches used in homes.
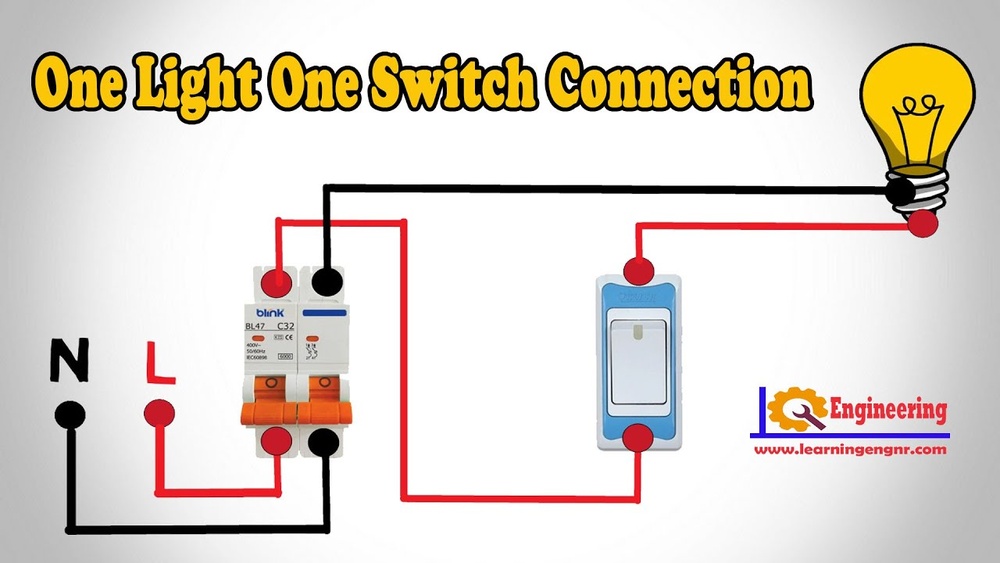
Single-pole Switch
This is the most common switch type. It controls one light or a group of lights from a single location. It has two terminals and a simple on/off function. Easy to install and use. Perfect for basic lighting control.
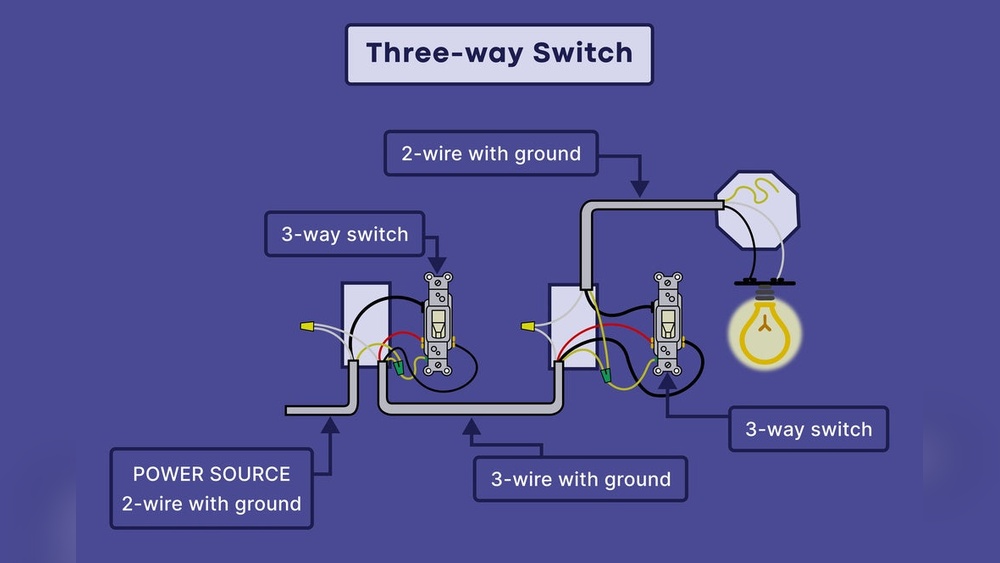
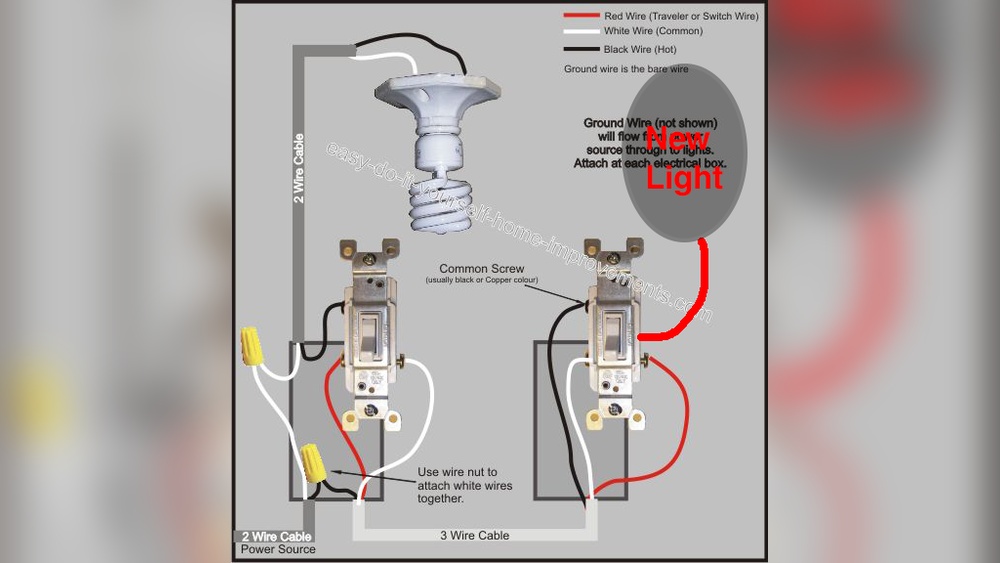
Three-way Switch
This switch allows control of one light from two different locations. Common in hallways or large rooms. It uses three terminals to connect with another three-way switch. More complex wiring but very useful for convenience.
Dimmer Switch
This switch adjusts the brightness of a light. It replaces a regular switch with a dial or slider. Helps save energy and sets the mood with soft or bright light. Works with many types of bulbs but check compatibility first.
Basic Wiring Concepts
Understanding basic wiring concepts is essential for connecting a switch and a light safely. This knowledge helps prevent electrical problems and keeps your home secure. Simple wiring rules guide how each wire should be handled and connected.
Grasping the role of different wires clears confusion. It also makes the wiring process smoother and safer. Each wire has a specific job in the circuit. Knowing these jobs helps avoid mistakes.
Live, Neutral, And Ground Wires
The live wire carries electricity from the power source. It is often called the “hot” wire. The neutral wire completes the electrical circuit by returning current. The ground wire protects against electrical shock. It directs stray electricity safely into the earth. Proper connection of these wires is crucial for safety and function.
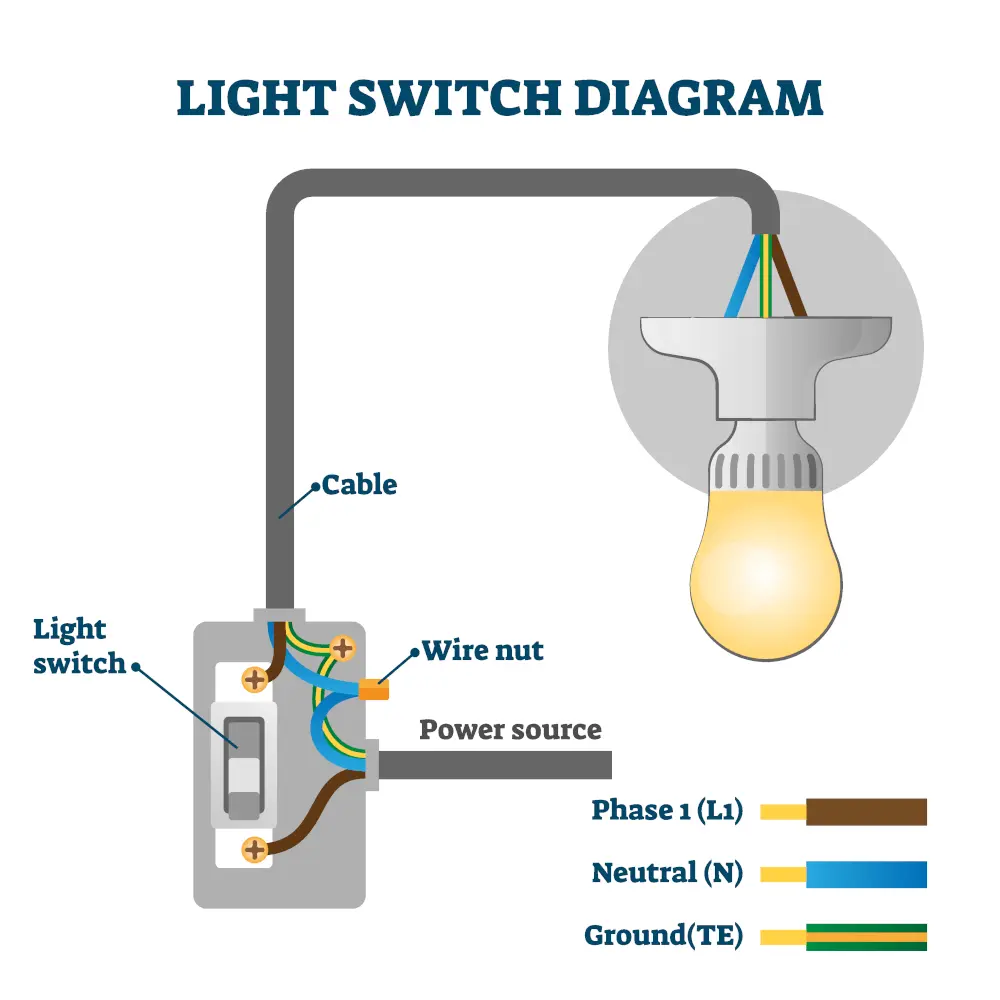
Wire Colors And Functions
Wire colors show their roles in the circuit. The live wire is usually brown or red. The neutral wire appears blue or white. The ground wire is green, green with yellow stripes, or bare copper. Following these colors helps identify wires quickly. It reduces the chance of wiring errors. Always check local codes for exact color rules.
Step-by-step Wiring Process
Wiring a switch and light is a simple task with the right steps. Follow this clear guide to connect them safely and correctly. Each step explains what to do and why it matters. This helps avoid mistakes and keeps you safe.
Turn Off Power
Start by turning off the power at the circuit breaker. This stops electricity from flowing. Use a tester to check no current is present. Safety is the top priority before handling wires.
Prepare Wires
Remove the switch and light covers carefully. Strip about half an inch of insulation from each wire end. Make sure wires are clean and straight. Proper wire preparation helps make strong connections.
Connect Switch Wires
Attach the live wire to the switch’s common terminal. Connect the other switch terminal to the wire going to the light. Tighten screws firmly to avoid loose connections. Follow the switch wiring diagram if available.
Connect Light Wires
Join the light’s live wire to the switch output wire. Connect the neutral wire from the power source to the light’s neutral wire. Attach the ground wires together for safety. Each connection must be secure for proper function.
Secure Connections
Use wire nuts or connectors on all wire joints. Wrap connections with electrical tape for extra protection. Push wires neatly back into the box. Replace the switch and light covers. Turn power back on and test the setup.
Testing The Connection
Testing the connection between a switch and a light is a crucial step. It ensures everything works safely and correctly. This process helps you catch wiring mistakes early. It also confirms the light turns on and off as intended. Taking time to test saves frustration later.
Turn On The Power
Start by turning on the power at the circuit breaker. This will supply electricity to the switch and light. Be careful to avoid touching any wires during this step. If unsure, use a voltage tester to confirm power is live.
Check The Switch Operation
Flip the switch up and down slowly. Notice if the light turns on and off smoothly. If the light does not respond, double-check your wiring. Make sure all wire connections are tight and correctly placed.
Use A Voltage Tester
A voltage tester helps verify power flow through the switch. Test the wires at the switch terminals. The tester should light up when the switch is on. No light means no current, indicating a wiring issue.
Inspect The Light Fixture
Look closely at the light fixture while testing the switch. Ensure the bulb is working and properly screwed in. A loose bulb can cause the light to flicker or not turn on. Replace the bulb if it is burnt out.
Troubleshooting Common Issues
Troubleshooting common issues helps fix switch and light connections fast. Problems can stop your light from working or cause flickering. Simple checks often solve these problems. Safety first: always turn off power before inspecting any wiring.
Switch Not Working
Check if the switch feels loose or stuck. A damaged switch may not connect properly. Use a tester to see if power reaches the switch. No power means a wiring or breaker issue. Replace the switch if it’s broken.
Light Flickering
Flickering lights often mean poor electrical contact. The bulb might be loose or old. Tighten or replace the bulb to test. Loose wiring inside the switch or fixture can also cause flickers. Secure all wire connections firmly.
Loose Connections
Loose wires cause many electrical problems. Turn off the power before checking wires. Make sure all wire nuts are tight and wires are twisted correctly. Inspect the switch terminals for corrosion or damage. Fix or replace parts as needed for a safe connection.
Credit: futurehousestore.co.uk
Frequently Asked Questions
How Do I Connect A Switch To A Light Fixture?
To connect a switch to a light, turn off power first. Connect the switch’s live wire to the power source. Then link the switch output to the light’s live wire. Finally, connect the neutral wires together and secure all connections.
What Tools Are Needed To Connect Switch And Light?
You need a screwdriver, wire stripper, voltage tester, electrical tape, and wire connectors. These tools ensure safe and proper installation. Always check power is off before starting work to avoid accidents.
Can I Use A Single Switch For Multiple Lights?
Yes, a single switch can control multiple lights wired in parallel. Ensure the switch and wiring can handle the total load of all lights combined. This setup is common for rooms with several light fixtures.
What Safety Precautions Should I Follow When Wiring?
Always turn off the main power supply before wiring. Use a voltage tester to confirm no electricity flows. Wear insulated gloves and avoid wet conditions. Follow local electrical codes and consider hiring a professional for complex jobs.
Conclusion
Connecting a switch and light is simpler than it seems. Follow each step with care and patience. Always turn off power before starting any work. Use the right tools and materials for safety. Test your connection to ensure the light works well.
Small mistakes can cause problems, so double-check your work. With practice, this task becomes easier and faster. A well-connected switch controls your light smoothly every time. Keep learning and stay safe with electrical projects at home.