Building a garden cinderblock wall can add charm and structure to your outdoor space. But if you want it to stand strong and last for years, anchoring it securely to your house is key.
You might wonder how to do this safely and effectively without calling in expensive help. This guide will walk you through simple, step-by-step methods to anchor your cinderblock wall to your home. By the end, you’ll feel confident to tackle the job yourself, saving time and money while ensuring your garden wall stays solid and secure.
Keep reading to discover the easy techniques that anyone can apply!
Credit: www.homedepot.com
Choosing The Right Cinderblocks
Choosing the right cinderblocks is a key step for building a strong garden wall. The right blocks make the wall last longer and stay safe. This choice affects how well the wall anchors to your house. Understanding the types and sizes helps pick the best blocks for your project.
Types Of Cinderblocks
Cinderblocks come in many types. Standard blocks have two large holes and are common for walls. Concrete blocks are stronger and have smaller holes. Some blocks are designed for better insulation. Hollow blocks are lighter and easier to handle. Solid blocks hold more weight but cost more. Pick blocks based on strength and wall design.
Size And Weight Considerations
Blocks come in different sizes. Standard size is 16 by 8 by 8 inches. Larger blocks cover more area but are heavier. Heavy blocks need stronger support and tools. Smaller blocks offer more control but take longer to place. Think about how heavy blocks affect your wall’s stability. Choose size and weight that match your building skill and wall purpose.

Credit: www.youtube.com
Preparing The Site
Preparing the site is the first step to a strong garden cinderblock wall. This stage ensures the wall stands firm and lasts longer. A well-prepared site makes the building process easier and safer.
Focus on clearing and leveling the ground. Then mark the layout. Both tasks set the base for the wall’s success.
Clearing And Leveling The Ground
Remove all plants, grass, and debris from the wall area. Clear soil, roots, and rocks. Use a shovel or rake for thorough cleaning.
Next, level the ground. Check for bumps or low spots. Use a spirit level or a long straight board to find uneven areas.
Add or remove soil to make the surface flat. Compact the soil firmly with a tamper or heavy tool. A solid base stops the wall from shifting or cracking.
Marking The Wall Layout
Use stakes and string to outline the wall’s path. Place stakes at corners and along the line. Tie string tightly between them.
Measure the length and height of the wall. Mark these on the string with colored tape or chalk. This guide helps keep the wall straight and even.
Double-check the layout from different angles. Adjust the stakes and string if needed. A clear, accurate layout saves time during building.
Tools And Materials Needed
Before anchoring your garden cinderblock wall to the house, gather the right tools and materials. This step ensures safety and a strong hold. Having everything ready helps the job go smoothly.
Essential Tools
You need a drill with masonry bits to make holes in the blocks and wall. A hammer helps with small adjustments. Use a level to keep the wall straight. A tape measure ensures correct distances. Safety glasses protect your eyes from dust and debris. Gloves keep your hands safe and clean. A wrench or socket set tightens bolts securely.
Anchoring Materials
Choose anchor bolts made for masonry walls. These bolts hold the wall firmly in place. Use washers and nuts to secure the bolts. Concrete screws or expansion anchors work well for cinderblocks. You also need construction adhesive for extra strength. Sealant helps protect joints from water damage. Use metal straps or brackets to connect the wall to the house safely.
Attaching Anchors To The House
Attaching anchors to the house is a key step in securing a garden cinderblock wall. This process keeps the wall stable and safe against wind or pressure. Proper anchoring prevents cracks and damage over time. It also helps the wall last longer and look better.
Selecting Anchor Types
Choose anchors based on your house’s wall material. For brick or concrete walls, use expansion anchors or sleeve anchors. For wood walls, lag screws with washers work best. Make sure anchors can hold the wall’s weight and force. Check the package for weight limits and size. Using the right anchor type ensures a strong hold.
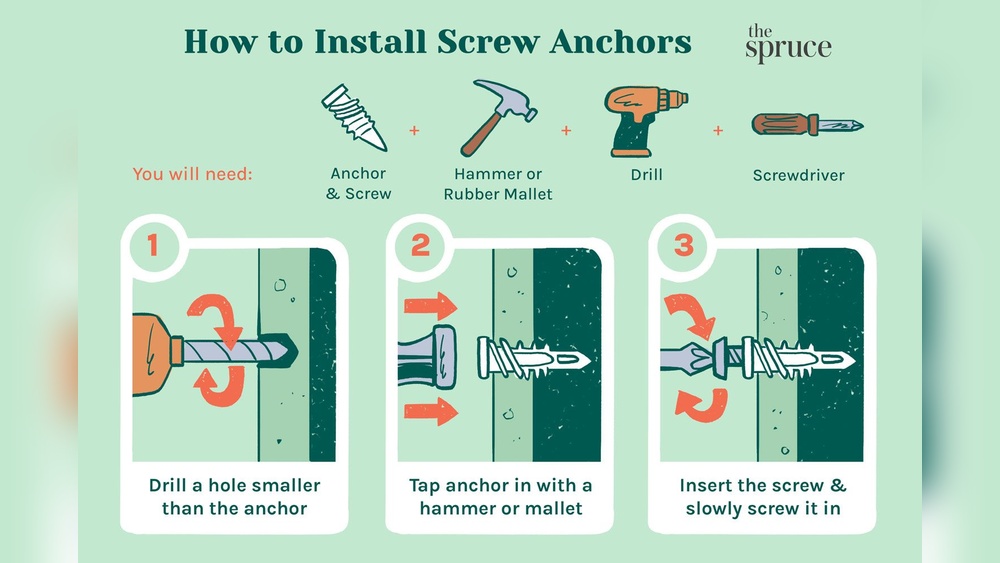
Drilling And Installing Anchors
Mark anchor spots on the house wall where the cinderblock wall aligns. Use a drill bit that matches the anchor size. Drill holes straight and clean. Remove dust from holes before placing anchors. Insert anchors carefully and tighten them securely. Avoid over-tightening to stop wall damage. After installing anchors, attach metal straps or brackets to connect the wall to the house. This completes a firm anchoring system.
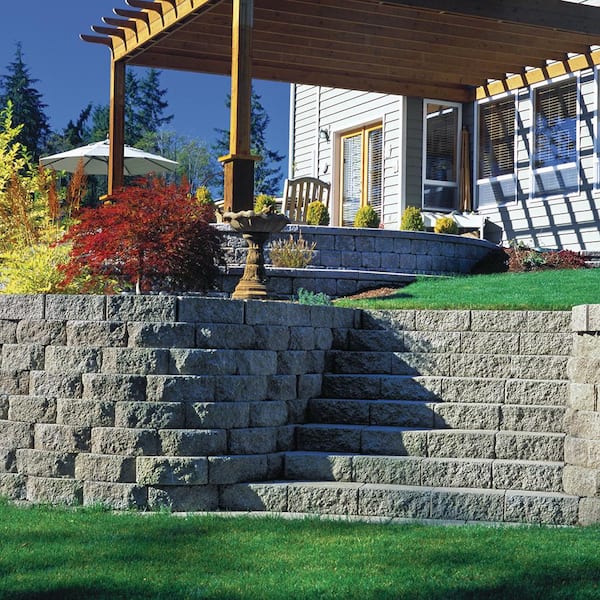
Building The Cinderblock Wall
Building a cinderblock wall next to your house creates a strong, long-lasting structure. Each step in the process matters. Careful work ensures the wall stays safe and looks good. Start with a solid base and follow each phase closely. Small details make a big difference in the wall’s strength.
Focus on laying blocks straight and tight. Use the right amount of mortar. Check the wall’s level often. These tasks help avoid future problems. Let’s explore how to build the cinderblock wall correctly.
Laying The First Course
Begin by placing the first row of blocks. This row sets the foundation for the entire wall. Clear the ground and make it flat. Position the blocks carefully on the mortar bed. Use a rubber mallet to tap blocks into place. Keep blocks close but avoid squeezing out mortar.
Applying Mortar Correctly
Use mortar to bind the blocks together. Mix mortar to a thick, creamy texture. Spread mortar evenly on the block ends and tops. Avoid putting too much mortar; it can cause gaps or mess. Press blocks into the mortar firmly but gently. Clean extra mortar from the joints before it dries.
Ensuring Level And Plumb
Check the wall’s straightness often. Use a level to keep blocks even horizontally. Use a plumb line to keep the wall vertical. Adjust blocks before the mortar sets. Fix any uneven spots immediately. A level, straight wall lasts longer and looks better.
Connecting The Wall To The House
Connecting a garden cinderblock wall to your house adds strength and stability. It keeps the wall steady during strong winds or soil pressure. Proper connection prevents cracks and leaning over time.
This step requires careful planning and correct tools. You must attach the wall securely without damaging your house’s structure. The connection should last many years with minimal maintenance.
Positioning Wall Ties
Wall ties link the cinderblock wall to the house frame. Place them every few feet along the wall’s length. Position ties at the same height as the wall’s mortar joints.
Insert ties into the mortar before it dries. Make sure ties are straight and flush with the wall surface. This helps the wall and house move together safely.
Securing With Anchors
Anchors hold the wall ties firmly to the house. Use masonry or expansion anchors for brick or concrete walls. For wood walls, use heavy-duty screws or lag bolts.
Drill holes in the house wall matching the tie positions. Insert anchors and tighten securely. Check that the wall stays straight and tight against the house.
Finishing Touches
Finishing touches make your garden cinderblock wall strong and neat. They protect the wall and keep it looking good for years. Proper finishing stops water and dirt from causing damage. This step is key to a long-lasting wall anchored to your house.
Sealing Gaps And Joints
Fill all gaps between the cinderblocks and the house wall. Use a good-quality exterior caulk or mortar. This stops air leaks and keeps moisture out. Smooth the sealant with a putty knife for a clean look. Check all joints carefully to ensure no space is left open.
Waterproofing The Wall
Apply a waterproof sealant on the cinderblock surface. Choose a product made for masonry or concrete walls. This layer stops water from soaking into the blocks. Water can cause cracks and weaken the wall over time. Let the sealant dry fully before exposing the wall to rain or sprinklers.

Credit: inmyownstyle.com
Maintenance Tips
Keeping your garden cinderblock wall anchored to your house is important for safety and durability. Regular maintenance helps avoid big repairs later. Small checks and fixes keep the wall strong and stable.
Inspecting Anchors Regularly
Check the anchors every few months. Look for rust, looseness, or damage. Use a flashlight to see hard spots. Tighten any loose bolts or screws. Replace anchors if they show signs of wear. Early detection stops bigger problems.
Repairing Cracks And Damage
Watch for cracks in the cinderblocks or mortar. Small cracks can grow and weaken the wall. Clean the cracks before filling them. Use concrete patch or mortar mix for repairs. Smooth the surface and let it dry fully. Fixing damage early keeps the wall safe.
Frequently Asked Questions
How Do You Anchor A Cinderblock Wall To A House?
Use metal wall ties or anchor bolts to connect the cinderblock wall to the house. Drill holes through the blocks and into the house wall. Secure the ties or bolts tightly to ensure stability and prevent shifting.
What Materials Are Needed To Anchor A Cinderblock Wall?
You will need metal wall ties, anchor bolts, a drill, masonry drill bits, screws, and a level. These materials help secure the cinderblock wall firmly to your house structure for safety and durability.
Can I Anchor A Cinderblock Wall Without Professional Help?
Yes, with the right tools and knowledge, you can anchor the wall yourself. Follow proper safety guidelines and instructions carefully to ensure a secure connection. However, for large or complex walls, consider hiring a professional.
How Deep Should Anchor Bolts Be Set In Cinderblocks?
Anchor bolts should be embedded at least 3 inches deep into the cinderblock. This depth ensures a strong hold and prevents the wall from loosening over time due to weather or pressure.
Conclusion
Anchoring a garden cinderblock wall to your house keeps it stable and safe. Use strong anchors and follow steps carefully. Check your work often to avoid problems later. A well-anchored wall lasts longer and looks better. Small effort now saves time and money later.
Keep tools and materials ready before starting. Take your time and work with care. This helps create a sturdy wall you can trust. Simple steps make the task easier for everyone.