Are you struggling to hang something sturdy on your plaster and lathe walls? You’re not alone.
These walls can be tricky, and using the wrong method might cause damage or make your fixtures fall. But don’t worry—installing plastic wall anchors is a simple fix that anyone can do. In this guide, you’ll learn exactly how to install plastic wall anchors step-by-step, so your shelves, pictures, or hooks stay secure and your walls stay intact.
Ready to get it right the first time? Keep reading and take the guesswork out of your next home project.
Credit: www.reddit.com
Choosing The Right Wall Anchors
Choosing the right wall anchors is key for a strong hold in plaster and lathe walls. These walls are fragile and need special anchors. Using the wrong anchor can cause damage or fail to hold the weight. Picking the right type and size makes your project safer and easier.
Types Suitable For Plaster And Lathe
Plastic wall anchors designed for hollow or brittle walls work best. Molly bolts and toggle bolts also fit well for plaster and lathe. These anchors spread the load across a larger area. They prevent cracking and provide a firm grip in the wall.
Anchor Size And Weight Capacity
Choose an anchor size that fits the screw and hole size perfectly. Bigger anchors hold more weight but need larger holes. Check the weight capacity on the package. Match it to the weight of the item you want to hang. Always pick anchors with a higher weight limit than the item.

Credit: www.youtube.com
Preparing The Tools And Materials
Preparing the right tools and materials is the first step to install plastic wall anchors in plaster and lathe. Having everything ready makes the work easier and faster. It also helps prevent mistakes that can damage the wall.
Understanding what tools you need and wearing the correct safety gear keeps you safe. This preparation makes the whole process smooth and successful.
Essential Tools Needed
You need a drill with a masonry bit. Choose the drill size based on the anchor size. A screwdriver or a drill driver helps to insert the anchors. A hammer might be needed to tap the anchors gently into the hole.
Use a tape measure to mark the exact spot on the wall. A pencil or marker helps to make clear marks. A level ensures your holes are straight, especially for multiple anchors.
Safety Gear Recommendations
Wear safety goggles to protect your eyes from dust and debris. Gloves protect your hands from sharp edges and rough plaster. A dust mask helps prevent inhaling dust during drilling.
Make sure your workspace is well-lit to avoid accidents. Use ear protection if the drill noise is loud. Staying safe helps you focus and finish the job well.
Locating The Anchor Spot
Locating the right spot for plastic wall anchors is key to a strong hold. Choosing the correct place on plaster and lathe walls can prevent damage and keep your items secure. You need to find a spot that supports the weight and is safe to drill.
This step requires care and accuracy. Knowing what lies behind the wall helps you pick the best anchor point. Below are simple ways to find and mark the spot clearly.
Finding Studs Behind Plaster
Studs give strong support for anchors. Use a stud finder tool to detect wood or metal behind plaster. Move the tool slowly across the wall surface. It beeps or lights up when it finds a stud. Mark these spots lightly with a pencil.
If you do not have a stud finder, tap the wall gently. A solid sound means a stud is behind. A hollow sound means no stud. This method is less precise but can help.
Marking Drill Points Accurately
Marking the drill point clearly avoids mistakes. Use a pencil to make small marks on the wall. Measure twice before marking. Use a level to keep marks straight and even.
Make sure the mark is on or near the stud for best support. Check the height to match your item’s needs. Clear marks guide your drill and keep the hole in the right place.
Drilling Into Plaster And Lathe
Drilling into plaster and lathe requires care. These walls are old and fragile. Wrong drilling can cause cracks or damage. Understanding the right tools and techniques helps secure anchors safely. Follow simple steps for a smooth process.
Choosing The Right Drill Bit
Select a drill bit made for plaster and wood. A masonry bit is too strong and may crack the plaster. Use a standard twist bit or a brad point bit. The bit size must match the wall anchor diameter. This ensures a tight fit and holds weight well.
Drilling Tips To Avoid Damage
Start drilling slowly to prevent cracks. Hold the drill steady and avoid pushing too hard. Let the bit do the work. Drill straight, not at an angle. Stop as soon as you reach the lathe or the hole is deep enough. Clean dust from the hole before inserting the anchor.
Installing The Plastic Wall Anchors
Installing plastic wall anchors in plaster and lathe walls is a smart way to hold screws firmly. These anchors help spread the weight and prevent damage to the wall. Proper installation is key to making sure the anchor stays strong and secure.
Inserting Anchors Properly
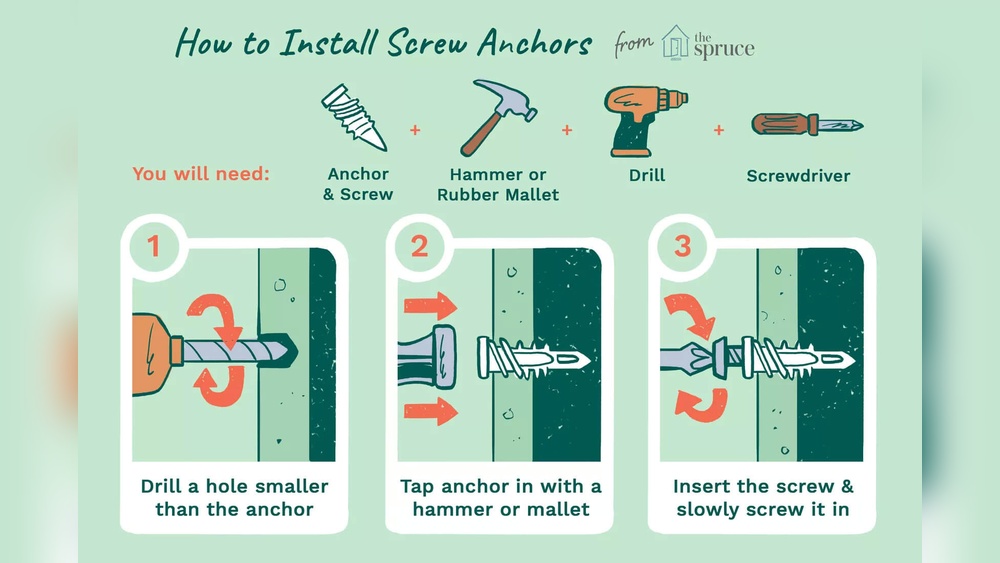
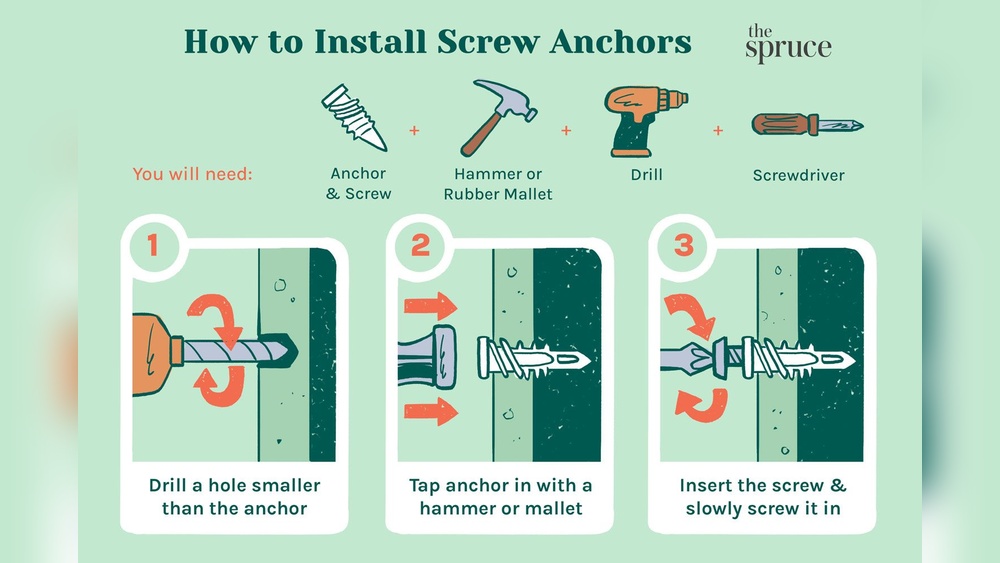
Start by drilling a hole slightly smaller than the anchor’s width. This keeps the anchor tight inside the wall. Gently push the plastic anchor into the hole. Tap it lightly with a hammer if needed. Avoid forcing it too hard to stop cracking the plaster. The anchor should sit flush with the wall surface.
Ensuring A Secure Fit
Next, insert the screw slowly into the anchor. The screw expands the anchor, locking it inside the wall. Do not overtighten the screw. Tightening too much can damage the anchor or wall. The anchor should hold firm but not break. Test by pulling gently on the screw to check for stability.
Mounting Items On Anchors
Mounting items on plastic wall anchors in plaster and lathe walls requires care. The anchors hold screws firmly in place, supporting the weight of the item. Using the right screws and tightening them correctly ensures a secure fit. Small mistakes can cause damage or make the mount unstable.
Follow these tips to mount items safely and avoid common problems.
Selecting Suitable Screws
Choose screws that match the anchor size. The screw should fit snugly inside the anchor. Too small screws can slip out and fail to hold. Too large screws can crack the anchor or wall.
Use screws made of strong materials like steel. Length matters too. The screw must reach deep enough into the anchor for a solid grip. Check the weight of the item and pick screws rated for that load.
Avoiding Over-tightening
Turn screws slowly and stop when tight. Over-tightening can crack the anchor or damage the wall. It also weakens the hold and may cause the screw to pull out.
Use a screwdriver or drill with a clutch to control pressure. Stop once the item feels secure and does not wiggle. Leave a small gap if needed to avoid stress on the plaster.
Troubleshooting Common Issues
Troubleshooting common issues with plastic wall anchors in plaster and lathe can save time and effort. Many people face problems like loose anchors or cracks in the plaster. These problems make the installation weak or cause damage to the wall. Fixing these issues early helps keep your wall strong and your items secure.
Loose Anchors
Loose anchors happen when the hole is too big or the anchor is too small. The anchor will not grip the plaster and lathe tightly. To fix this, remove the loose anchor and use a larger size. You can also fill the hole with wood filler or epoxy first. Let it dry before inserting the anchor again. This gives the anchor a better grip.
Another way is to use a toggle bolt instead. It spreads the weight over a larger area behind the wall. This prevents the anchor from pulling out easily.
Plaster Cracking Solutions
Cracks around the anchor show the plaster is under stress. This happens if the hole is drilled too close to a weak spot. To avoid cracks, drill slowly and carefully in the right spot. If cracks appear, remove the anchor and patch the hole with plaster or joint compound. Let it dry fully before drilling again.
Use a smaller drill bit and a proper anchor size next time. Avoid overtightening the screw, as this can cause more cracking. A gentle, steady turn is enough to hold the anchor firmly without breaking the plaster.

Credit: www.reddit.com
Frequently Asked Questions
What Are Plastic Wall Anchors Used For In Plaster Walls?
Plastic wall anchors provide strong support for screws in plaster walls. They prevent screws from damaging or pulling out of the fragile plaster and lathe. Anchors distribute weight evenly, allowing you to hang objects securely without cracking or loosening the wall material.
How Do You Drill Holes For Plastic Anchors In Plaster?
Use a masonry or carbide-tipped drill bit slightly smaller than the anchor size. Drill slowly to avoid cracking the plaster. Make sure the hole is deep enough to fit the entire anchor. Clean out dust before inserting the anchor for better grip.
Can Plastic Anchors Hold Heavy Items On Plaster And Lathe?
Plastic anchors can support medium-weight items, typically up to 25 pounds. For heavier objects, use specialized anchors like toggle bolts or metal anchors. Always check the anchor’s weight rating to ensure it safely holds the intended load.
Should I Use Screws Or Nails With Plastic Wall Anchors?
Always use screws with plastic wall anchors. Screws provide better grip and secure fastening inside the anchor. Nails can slip out easily and damage the anchor’s hold in plaster and lathe walls.
Conclusion
Installing plastic wall anchors in plaster and lathe is simple with the right steps. Use the correct tools and drill carefully. Make sure the anchor fits tightly to hold weight safely. Avoid rushing to prevent damage to the wall. Take your time to check each step before moving on.
This method helps you hang items securely on older walls. Now, you can confidently add shelves, pictures, or hooks without worry. Practice makes perfect, so try on a small spot first. You’ll find the process easy and useful for many projects.