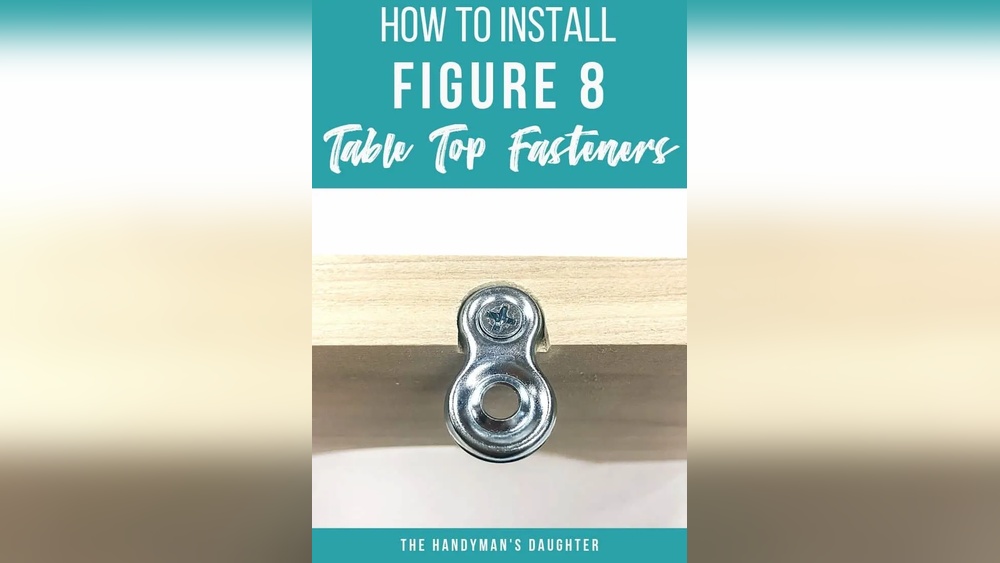
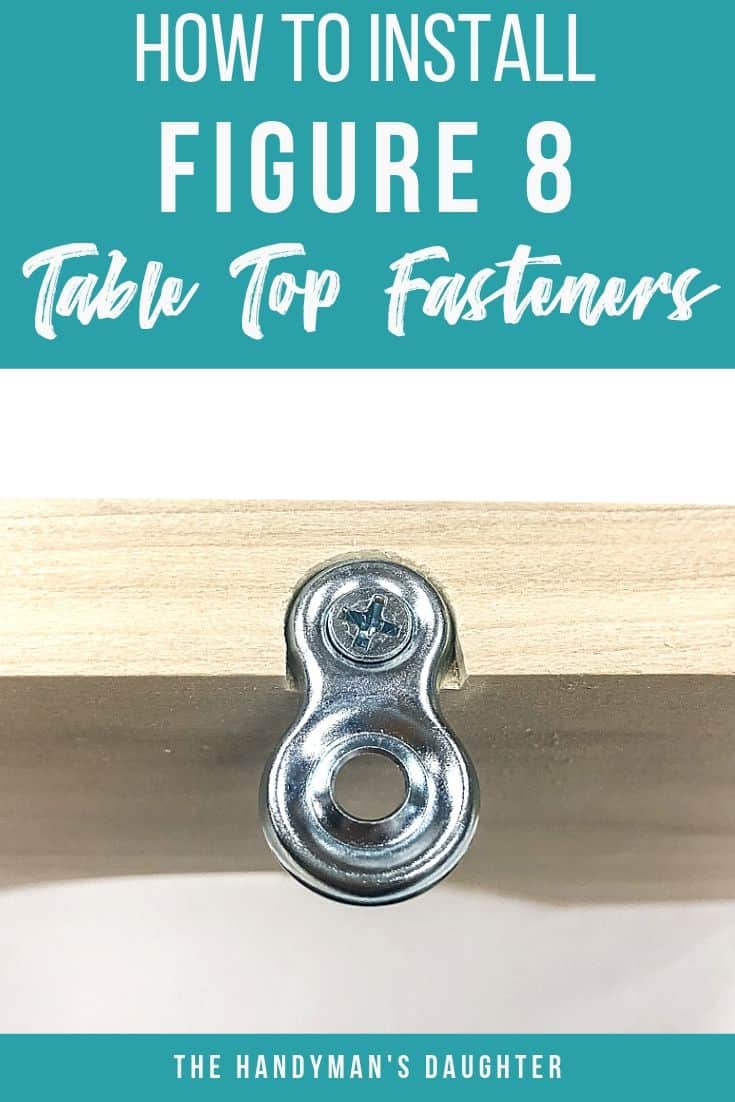
If you’re looking to secure tabletops or panels with a reliable and flexible solution, figure 8 fasteners are exactly what you need. These small but mighty fasteners allow for wood movement while keeping your pieces firmly connected.
Installing them might sound tricky, but once you know the simple steps, you’ll be able to add a professional touch to your furniture projects. In this guide, you’ll learn exactly how to install figure 8 fasteners quickly and correctly, so your work stays strong and looks great.
Ready to get started? Let’s dive in!
Choosing Figure 8 Fasteners
Choosing the right figure 8 fasteners ensures a strong, lasting hold for your project. These fasteners come in different types, sizes, materials, and finishes. Selecting the best option depends on your specific needs. Understanding these factors helps you pick the perfect fastener for your work.
Types And Sizes
Figure 8 fasteners vary in size to fit different thicknesses of wood. Small fasteners suit thin tabletops or panels. Larger fasteners work well for thick or heavy wood pieces.
Some fasteners have slotted holes for easy adjustment. Others offer fixed holes for a tighter hold. Choose the type that fits your installation style.
Materials And Finishes
Fasteners come in steel, brass, and zinc alloys. Steel fasteners provide strong support for heavy furniture. Brass offers a decorative look and resists corrosion.
Finishes protect the fasteners from rust and wear. Common finishes include black oxide, zinc plating, and brass coating. Pick a finish that matches your furniture’s style and environment.
Credit: www.thehandymansdaughter.com
Tools Needed
Installing figure 8 fasteners requires a few basic tools. Having the right tools makes the job easier and ensures a secure fit. Prepare these tools before starting your project.
Essential Tools
- Drill with appropriate drill bits
- Chisel for cleaning out the notch
- Screwdriver or screw gun
- Measuring tape or ruler for precise placement
- Pencil to mark drill points
- Clamps to hold pieces steady while working
Optional Accessories
- Depth stop or tape on drill bit to control hole depth
- Sanding block or sandpaper for smoothing edges
- Wood glue for added joint strength
- Protective gloves and safety glasses
- Small hammer for light taps if needed
Preparing The Wood
Preparing the wood is an essential first step for installing figure 8 fasteners. It ensures a secure fit and smooth assembly later. Proper preparation helps avoid damage and keeps the fasteners strong.
Focus on choosing the right wood thickness and marking exact fastener positions. These steps create a solid base for your installation.
Selecting The Right Wood Thickness
Choose wood that matches the fastener size. Too thin wood can crack under pressure. Thick wood provides better support and holds screws firmly. Measure the wood thickness before buying or cutting. Aim for a thickness that allows the fastener to sit flush or slightly recessed. This helps the fastener stay hidden and secure.
Marking Fastener Positions
Mark the exact spots where you will place the fasteners. Use a pencil and a ruler for straight, even lines. Place marks on both the tabletop and the frame for alignment. Make sure marks align perfectly to avoid gaps. Double-check measurements before drilling or chiseling. Clear marks guide you and prevent mistakes during installation.
Cutting Notches For Fasteners
Cutting precise notches is essential for installing figure 8 fasteners securely. The notch holds the fastener flush with the wood surface. Properly cut notches prevent wobbling and allow smooth movement for table tops or panels. Use the right tools and techniques to ensure clean, accurate cuts that fit the fastener perfectly.
Using A Chisel
Start by marking the notch area clearly on the wood. Choose a sharp chisel that matches the width of the fastener’s body. Gently tap the chisel along the marked lines to create clean edges. Work slowly to avoid removing too much material. Square off the edges to give the fastener a snug fit. Clean out any loose wood chips to ensure a smooth surface. Test the fit often to avoid overcutting.
Drilling Techniques
Drilling a hole first can speed up the notch cutting process. Use a drill bit slightly smaller than the fastener’s thickness. Drill carefully inside the marked notch area to remove most of the wood. Tape a small flag on the drill bit to mark the desired depth. This prevents drilling too deep and damaging the wood. After drilling, use a chisel to clean and square the edges. This combination of drilling and chiseling saves time and improves precision.
Installing The Fasteners
Installing figure 8 fasteners is a straightforward process that ensures a secure connection for your wood projects. These fasteners hold pieces together while allowing slight movement to prevent cracks or warping. Proper installation is key to their effectiveness and longevity.
Careful alignment and secure attachment will help your furniture last longer and look professional. Follow these steps to install figure 8 fasteners correctly.
Aligning And Positioning
Start by placing the fastener at the joint where two wood pieces meet. Ensure the fastener fits flush against the wood surface. Mark the screw holes with a pencil to avoid mistakes.
Use a square or ruler to keep the fastener aligned straight. Misalignment can cause stress or uneven pressure on the wood. Position the fastener so its center hole lines up with the edge of the adjoining piece.
Securing With Screws
Pre-drill small pilot holes where you marked the screw positions. This prevents the wood from splitting during screw insertion. Choose screws that match the fastener size and wood thickness.
Drive the screws slowly and evenly using a screwdriver or drill. Avoid overtightening to keep the fastener slightly flexible. Check the fastener remains flush and does not bend during this step.
Repeat the process for the other side of the fastener to complete the connection. Test the joint by applying gentle pressure to ensure it holds securely but moves slightly as intended.

Credit: www.youtube.com
Adjusting For Movement
Figure 8 fasteners secure wood pieces while allowing natural movement. Wood expands and contracts with changes in humidity and temperature. Adjusting fasteners for this movement prevents damage and keeps joints strong. Proper installation lets wood breathe and move without stress.
Allowing For Wood Expansion
Wood changes size across seasons. Fasteners must not hold wood too tight. Leave a small gap between fastener and wood edge. This gap gives room for wood to swell. Avoid cracking or splitting by not forcing fasteners too tight.
Use figure 8 fasteners that slide slightly in their slots. This sliding action absorbs expansion without loosening the joint. Keep screw holes a bit larger than screw diameter. This extra space helps screws move with the wood.
Rotating Fastener Placement
Change fastener direction for better movement allowance. Install figure 8 fasteners so they rotate slightly in their slots. Rotation reduces strain on wood and fasteners. Use a drill to pre-drill holes slightly off-center. This gives fasteners room to rotate as wood shifts.
Place fasteners at regular intervals. Avoid placing all fasteners in line. Stagger fastener placement to balance movement across the wood. This technique helps the wood expand evenly without warping.
Tips For Perfect Results
Installing figure 8 fasteners requires care for a strong, lasting hold. Follow these tips to get perfect results. Small mistakes can weaken the connection or cause damage. Proper tools and techniques make the job easier and more precise. Below are key tips to help you avoid common errors and use clamps effectively.
Avoiding Common Mistakes
Start by marking the exact spot for the fastener. Use a pencil and a ruler for accuracy. Drill shallow pilot holes to prevent wood from splitting. Choose the right drill bit size for the screws. Do not overtighten screws; it can crack the wood. Check that the fastener sits flush against the surface. Misalignment causes gaps and weak joints. Test the fit before final tightening to ensure stability.
Using Clamps And Supports
Clamps hold pieces steady during installation. Position clamps to keep parts aligned firmly. Use scrap wood between clamps and your workpiece to avoid damage. Supports help maintain pressure evenly across the joint. Tighten clamps slowly, checking alignment often. Remove clamps only after screws are fully set. This prevents movement and ensures a tight fit. Proper clamping reduces stress on the fasteners and wood.
Maintenance And Longevity
Maintaining figure 8 fasteners is key to their long life. Regular care keeps your furniture strong and safe. Simple checks and timely part changes prevent damage and looseness. Follow these tips to keep fasteners working well for years.
Checking Fastener Tightness
Check fasteners often to ensure they stay tight. Use a screwdriver to gently test each screw. Tighten screws if you find any loose ones. Loose fasteners can cause parts to shift or wobble. Regular checks stop small problems from growing bigger.
Replacing Worn Parts
Look for signs of wear on fastener parts. Cracks, bends, or rust mean it is time to replace them. Remove old fasteners carefully to avoid damage to wood. Install new figure 8 fasteners that fit your furniture size. Using fresh parts keeps your furniture stable and safe.

Credit: www.youtube.com
Frequently Asked Questions
How To Install Figure Eight Fasteners?
Mark fastener position on wood edge. Chisel a shallow notch for the fastener. Drill pilot holes carefully. Screw in the figure eight fastener. Align and allow movement for wood expansion. Tighten securely but do not overtighten.
What Drill Bit For Figure 8 Fastener?
Use a drill bit slightly smaller than the figure 8 fastener screw diameter. For example, a 3/16″ or 1/4″ bit works well. Pre-drill holes to prevent wood splitting and ensure a secure fit. Choose a bit based on your screw size and wood type.
What Is The Strongest Way To Attach Table Legs?
The strongest way to attach table legs uses metal brackets or plates secured with screws. This ensures even weight distribution and prevents wobbling.
How To Attach Prong Fasteners?
Align prong fasteners with pre-drilled holes, then push prongs through the material until secure. Fold prongs flat to hold.
Conclusion
Installing figure 8 fasteners is simple with the right steps. Start by marking and drilling carefully. Use a chisel to create clean notches for a secure fit. Screw the fasteners firmly but avoid over-tightening. These fasteners allow wood to expand and contract naturally.
This prevents cracks and keeps your furniture stable. Take your time and follow the instructions closely. Soon, your project will have a strong, flexible connection. Enjoy the balance of durability and easy installation that figure 8 fasteners offer.