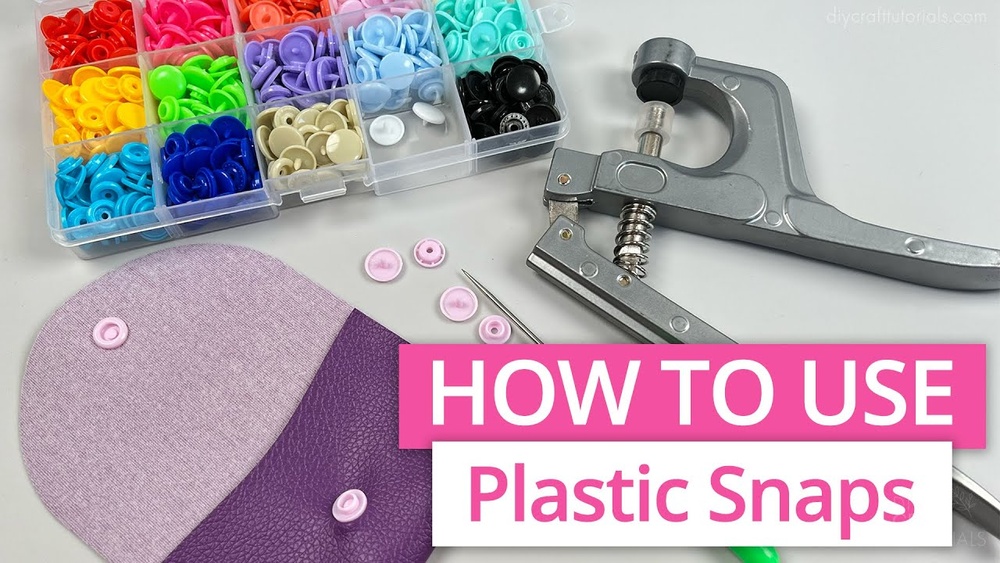
Have you ever struggled to attach snaps to your clothes or crafts and wished there was an easier way? Using a plastic snap fastener tool can make this task quick and simple, even if you’ve never tried it before.
In this guide, you’ll learn exactly how to use the tool step-by-step, so your projects look neat and professional every time. Keep reading to discover tips and tricks that will save you time and frustration, turning you into a snap fastener pro in no time.
Choosing The Right Snap Fastener Tool
Choosing the right snap fastener tool is important for a smooth project. The correct tool makes attaching plastic snaps easier and more secure. Selecting the right one saves time and avoids damage to your materials.
Types Of Snap Fastener Tools
There are hand-held and press machines for snap fasteners. Hand-held tools are simple and good for small jobs. Press machines work faster and suit larger projects. Some tools come with different sized dies for various snap sizes. Choose based on your project size and snap types.
Materials Compatible With Plastic Snaps
Plastic snaps work well with fabrics like cotton, denim, and polyester. Avoid using snaps on very thick or hard materials. Some snap tools may not work on delicate fabrics. Check the tool instructions to see which materials fit best. Proper matching helps snaps hold firmly without damage.

Credit: www.amazon.com
Preparing Your Workspace And Materials
Preparing your workspace and materials is the first step to using a plastic snap fastener tool. A clean, organized area helps you work faster. It also prevents mistakes and accidents. Taking time to gather everything you need makes the process smooth.
Gathering Tools And Supplies
Start by collecting all tools for the job. You need the plastic snap fastener tool itself. Also, have the snap fasteners ready in the sizes you want. Keep a pair of scissors nearby. Prepare the fabric or material where you will place the snaps. A ruler or measuring tape helps to place snaps evenly. Have a small container to hold tiny parts. This keeps them from getting lost.
Setting Up A Safe Work Area
Pick a flat, well-lit surface to work on. Good light helps you see small parts clearly. Avoid clutter around your workspace. Clear space reduces distractions and accidents. Use a sturdy table or desk to keep tools steady. Keep children and pets away while working. If needed, wear safety glasses to protect your eyes. Have a trash bin nearby for scraps and waste. A tidy area makes clean-up quick and easy.
Marking And Aligning Snap Positions
Marking and aligning snap positions is a key step in using a plastic snap fastener tool. Precise marks ensure the snaps fit perfectly on your project. Poor alignment can cause snaps to misfit or become loose.
Careful marking saves time and effort. It helps you avoid mistakes that damage fabric or material. This part of the process sets the foundation for a neat finish.
Measuring For Accuracy
Use a ruler or measuring tape to find the exact spot for each snap. Measure twice to be sure. Check both sides of the fabric or material.
Mark the points lightly with a pencil or fabric marker. Keep the marks small to avoid visible stains later. Accurate measuring keeps snaps even and aligned.
Using Templates Or Guides
Templates or guides help mark snap positions quickly and evenly. You can buy ready-made templates or create your own from cardboard or plastic.
Place the template on your material and mark the holes through it. This method saves time and keeps the snaps spaced correctly. It works well for projects with many snaps.
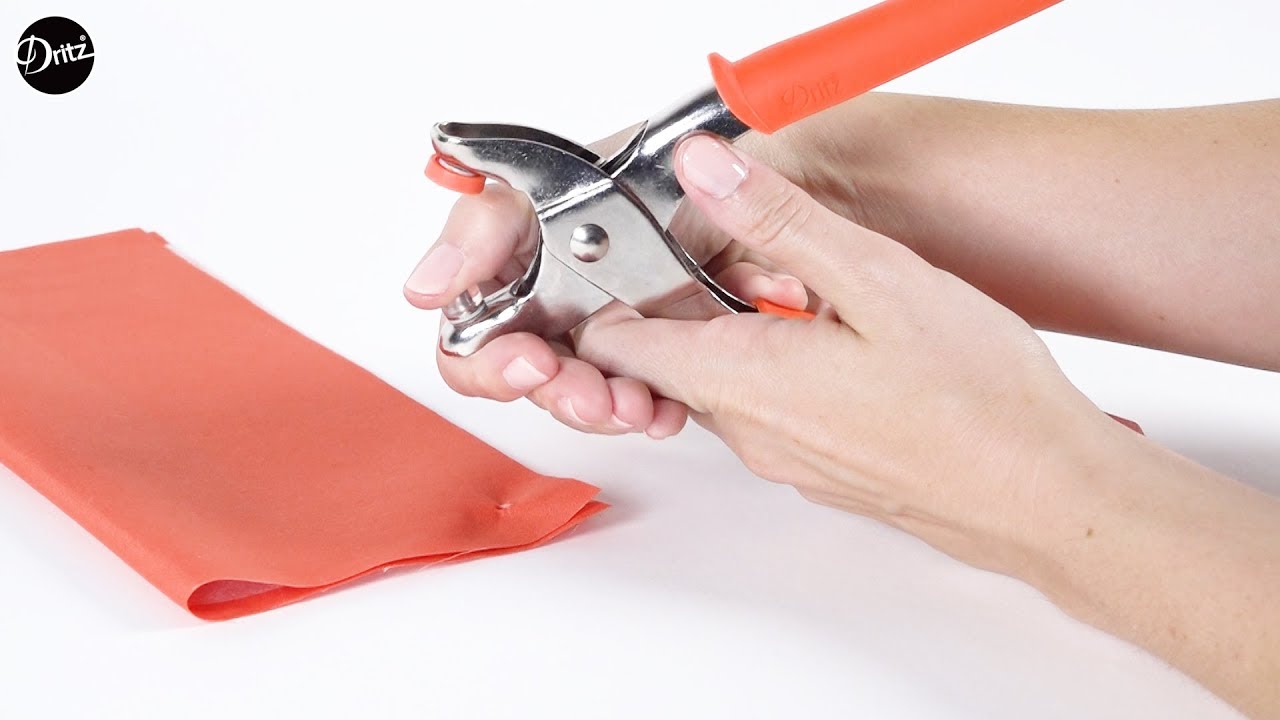
Attaching The Snap Components
Attaching the snap components is an essential step in using a plastic snap fastener tool. It ensures the snap parts hold firmly on the fabric or material. Proper attachment makes the snap easy to open and close without falling off.
Careful alignment and pressure are key. Follow these steps for a strong, clean snap connection.
Positioning The Snap Parts
Place the fabric on a flat surface. Align the snap components on opposite sides of the fabric. The socket and stud must face each other directly.
Check that the snap parts sit evenly. Avoid overlapping or tilting. This helps the snap close smoothly.
Use the tool’s guides or marks to hold the snaps steady. Accurate positioning prevents damage and poor fit.
Applying Pressure Correctly
Hold the tool firmly with one hand. Use steady force to press the snap parts together. Press slowly and evenly.
Too little pressure means the snap will be loose. Too much pressure can break the snap or fabric.
Stop pressing once you hear or feel a click. This shows the snap parts are locked securely.
Release the tool gently. Test the snap by opening and closing it a few times.
Testing And Adjusting The Snap Fastener
After attaching a plastic snap fastener, testing and adjusting it is important. This step ensures the snap works smoothly and lasts longer. Without proper testing, snaps may not close properly or could come apart easily. Adjusting the snap fastener tool can fix common issues and improve snap alignment.
Checking Snap Functionality
Press the snap closed to check its hold. It should snap firmly without too much force. Open the snap to ensure it releases easily. Test the snap several times to confirm consistent performance. If the snap feels loose or hard to close, adjustments may be necessary.
Fixing Misaligned Snaps
Misaligned snaps cause poor connection and wear out quickly. Use the snap fastener tool to realign the parts carefully. Remove the snap if it is badly placed and try again. Make small adjustments and test the snap after each change. Proper alignment helps the snap work smoothly and last longer.

Credit: www.thesewingdirectory.co.uk
Maintaining Your Snap Fastener Tool
Maintaining your snap fastener tool keeps it working smoothly for a long time. Proper care prevents damage and saves money on repairs or replacements. Follow simple steps to clean and store your tool after each use. This helps keep the tool in good shape and ready for your next project.
Cleaning After Use
Remove any fabric bits or dirt from the tool. Use a soft cloth to wipe the surfaces gently. Avoid water or harsh cleaners, which can cause rust or damage. Check the moving parts and clear any debris. This small effort stops the tool from jamming or breaking.
Storage Tips For Longevity
Store the tool in a dry place to avoid rust. Keep it in a box or pouch to protect it from dust. Do not leave the tool in humid or damp areas. Make sure it is stored where no heavy items can fall on it. Proper storage keeps the tool safe and ready for use.
Troubleshooting Common Issues
Troubleshooting common issues with a plastic snap fastener tool helps keep your projects smooth. Small problems can slow work or damage materials. Fixing these issues quickly saves time and effort. Learn simple tips to handle common snap fastener challenges.
Dealing With Loose Snaps
Loose snaps can cause your project to fall apart. Check if you placed the snap correctly in the tool. Press the snap firmly but not too hard to avoid damage. Use the right size snap for your fabric. If the snap remains loose, try tightening it with the tool again. Replace the snap if it still won’t hold.
Avoiding Damage To Materials
Snap fastener tools can harm thin or delicate fabrics. Place a small piece of scrap fabric under the material before pressing. Use gentle pressure to protect the fabric fibers. Avoid forcing the tool if it feels stuck. Practice on scrap pieces to learn the right pressure. Keep your tool clean to prevent rough edges from catching fabric.
Credit: www.youtube.com
Frequently Asked Questions
What Is A Plastic Snap Fastener Tool Used For?
A plastic snap fastener tool attaches snap buttons to fabric or plastic materials. It is ideal for DIY projects, repairs, and crafts. This tool ensures secure and durable fastening without sewing. It simplifies the process of adding snaps to garments or accessories.
How Do You Properly Align Snap Fasteners?
To align snap fasteners, place the socket and stud parts directly opposite each other. Use the tool’s guide to keep them steady. Ensure fabric layers are flat and not bunched. Proper alignment guarantees a secure snap and professional finish.
Can Beginners Easily Use A Snap Fastener Tool?
Yes, beginners can use a snap fastener tool easily. It requires minimal skill and no sewing experience. Following simple instructions helps achieve perfect snaps. Practice on scrap fabric to build confidence before working on your project.
What Materials Are Compatible With Snap Fastener Tools?
Snap fastener tools work well with fabric, leather, vinyl, and plastic. Choose snaps designed for your material type. Avoid thick or rigid materials that the tool cannot penetrate. Compatibility ensures secure and lasting snap attachment.
Conclusion
Using a plastic snap fastener tool makes attaching snaps simple. It saves time and keeps your projects neat. Practice a few times to get the best results. Always follow the tool’s instructions for safety. Keep your snaps aligned for a strong hold.
This tool works well on fabric, leather, and more. Enjoy creating with confidence and ease. Snap fasteners add a professional touch to your work. Try different sizes to fit your needs. The right tool can make your crafting better and faster.