Adding fasteners like bolts, nuts, and screws is a key step in creating a realistic and functional SolidWorks assembly. If you’ve ever struggled to place these small but crucial parts quickly and accurately, you’re not alone.
But what if you could simplify the process and save valuable time on your designs? You’ll discover straightforward methods to add fasteners in SolidWorks assemblies, using tools that make your workflow smoother and more efficient. Whether you’re new to SolidWorks or looking to sharpen your skills, keep reading to unlock tips that will help you build precise assemblies faster than ever before.
Credit: hawkridgesys.com
Solidworks Fastener Basics
Understanding the basics of fasteners in SolidWorks helps create strong and accurate assemblies. Fasteners hold parts together and ensure stability in your design. SolidWorks offers a variety of tools to easily add fasteners and customize them for your project.
Knowing the types of fasteners and their components makes the process smoother. It also helps avoid mistakes and saves time during assembly creation.
Types Of Fasteners
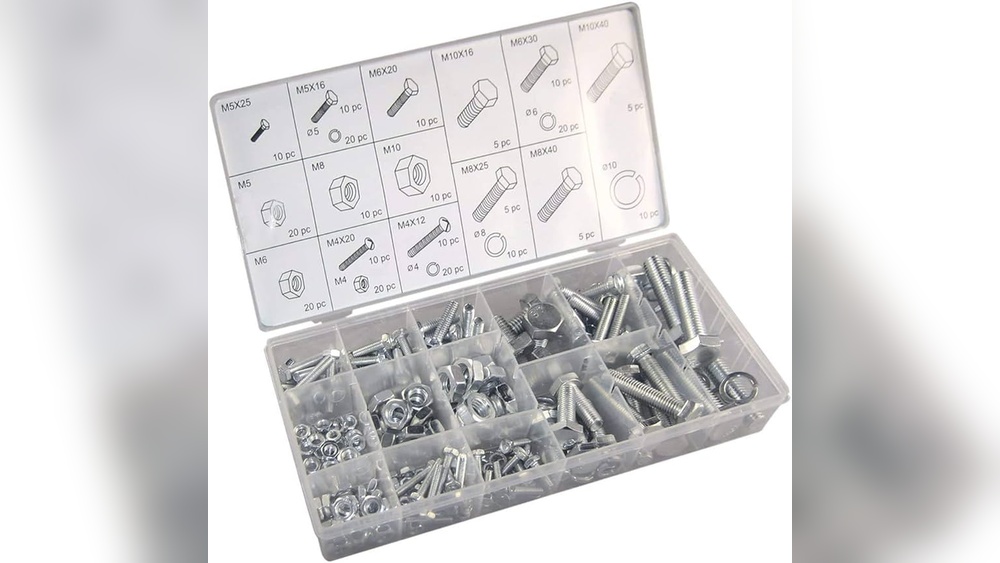
SolidWorks supports many common fastener types. Bolts, screws, nuts, washers, and pins are frequently used in assemblies. Each fastener type serves a specific purpose.
Bolts and screws join parts by threading into holes or nuts. Nuts secure bolts in place and prevent loosening. Washers distribute load and protect surfaces. Pins align or lock parts together.
Choosing the right fastener depends on your design needs and material compatibility. SolidWorks Toolbox provides a library of standard fasteners to select from quickly.
Fastener Components
A fastener consists of several basic components. The head is the top part that a tool grips for tightening. It comes in shapes like hex, flat, or round.
The shank is the long body that passes through parts. It may have threads on all or part of its length. Threads are helical ridges that allow the fastener to screw into a hole or nut.
The point or tip helps start the threading process. Washers and nuts are separate components added to improve fastening strength and stability. SolidWorks lets you control each component’s size and type for precise fitting.
Using Solidworks Toolbox
Using SolidWorks Toolbox simplifies adding fasteners in assemblies. It provides a ready-made library of bolts, nuts, screws, and washers. This tool saves time by automating the insertion of standard hardware. It ensures proper sizing and fits for your assembly parts. Follow these steps to use the Toolbox effectively and add fasteners quickly.
Activating Toolbox
Start by opening SolidWorks and your assembly file. Go to the “Tools” menu and select “Add-Ins.” In the list, find and check “SolidWorks Toolbox.” Click “OK” to activate the toolbox. The Toolbox icons will now appear in your toolbar. This allows access to fastener components for your assembly.
Selecting Fasteners
Click on the Toolbox toolbar to open the fastener library. Browse categories like bolts, screws, or nuts. Click the desired fastener to select it. Position the fastener in the assembly by clicking the target hole or surface. SolidWorks will automatically align the fastener to fit the hole. This step ensures correct placement and orientation.
Configuring Fastener Sizes
After selecting a fastener, adjust its size in the property manager. Choose the diameter, length, thread type, and other dimensions. SolidWorks Toolbox offers size options based on standards like ISO or ANSI. Pick the size that matches your design requirements. Confirm the settings to apply the fastener with the correct dimensions. This customization guarantees the fastener fits perfectly in your assembly.
Adding Fasteners Manually
The Smart Fasteners tool in SolidWorks simplifies adding bolts, nuts, and screws to assemblies. It saves time by detecting holes and placing the right fasteners automatically. This tool helps maintain design accuracy and consistency. Using it reduces manual work and errors.
The tool works well with Toolbox components, making assembly faster. It fits perfectly for both simple and complex assemblies. Understanding how to enable and use Smart Fasteners improves your workflow significantly.
Enabling Smart Fasteners
To start using Smart Fasteners, open your assembly file. Go to the Toolbox tab on the CommandManager. Click on the Smart Fasteners button to enable it. The tool will activate and be ready for use. Make sure your assembly has holes or features for fasteners. Otherwise, Smart Fasteners will not find any spots to place components.
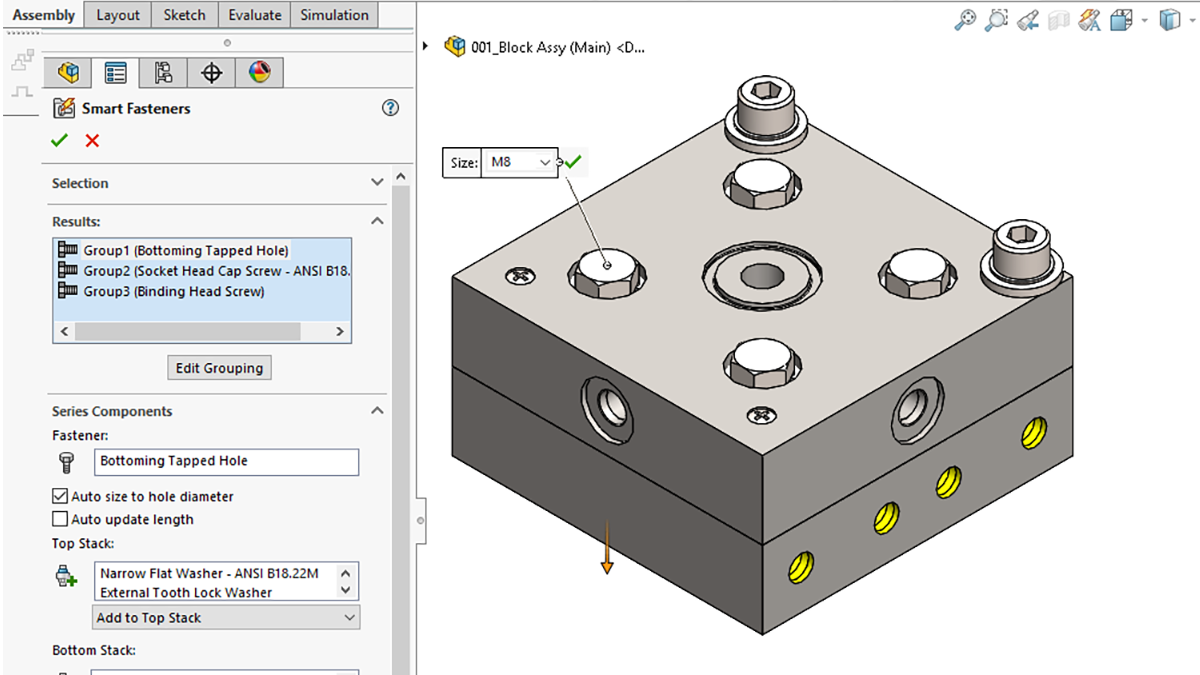
Automatic Hole Detection
Smart Fasteners scans your assembly for holes automatically. It recognizes the size and type of each hole. The tool matches fasteners from the Toolbox that fit these holes. This automatic detection saves you from searching for sizes manually. It also prevents mistakes in fastener selection. The tool can find multiple holes of the same size and type quickly.
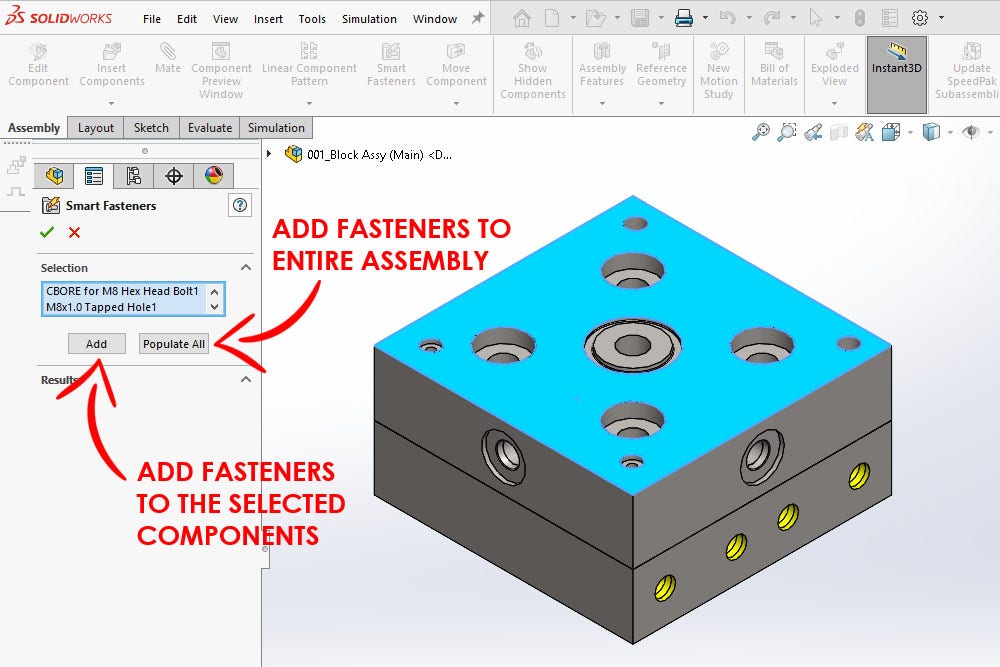
Batch Adding Fasteners
Smart Fasteners can add fasteners to many holes at once. Select one hole, and the tool finds all matching holes. Click Add, and fasteners appear in all those holes automatically. This batch process speeds up assembly work. You avoid placing each fastener one by one. It also keeps your assembly organized and consistent.
Smart Fasteners Tool
Patterning fasteners in SolidWorks assembly saves time and ensures consistency. It helps place multiple fasteners evenly without adding each one manually. This method improves accuracy and speeds up your design process.
Using Hole Wizard
Hole Wizard creates holes with fasteners automatically placed. Start by selecting the hole type and size. Then, choose the locations for the holes on the part.
After placing one hole, use the pattern tool to repeat it. The fastener will copy itself to all hole positions. This keeps fasteners aligned and spaced correctly.
Hole Wizard also updates fasteners if you change hole size. This keeps your assembly correct and saves edits later. It is a reliable way to add patterned fasteners fast.
Component Pattern Techniques
Component patterns let you duplicate fasteners across an assembly. You can use linear or circular patterns based on your design needs.
Start by selecting the fastener component in the assembly. Then, pick the pattern type and define the direction and spacing.
SolidWorks will create copies of the fastener along the chosen path. This is useful for bolts along a frame or screws around a circle.
Component patterns keep all fasteners linked. Editing one updates all copies automatically. This method offers control and efficiency for complex assemblies.
Patterning Fasteners
Mating fasteners efficiently in SolidWorks assembly saves time and ensures accurate designs. Proper mates keep parts aligned and working as intended. Understanding different mating options helps you place fasteners quickly and correctly.
Standard Mates
Standard mates like coincident, concentric, and distance are essential for fasteners. Use concentric mates to align bolt holes with fastener shafts. Apply coincident mates to position fastener heads against surfaces. These simple mates fix the fastener in place without extra steps.
Screw Mate Setup
The screw mate combines rotation and translation in one step. Set the pitch and direction to simulate real screw movement. This mate works great for bolts and screws in assemblies. It saves time by linking turning motion to linear movement automatically.
Rotational Constraints
Rotational constraints control how fasteners turn or stay fixed. Use them to prevent unwanted spinning or allow rotation as needed. Fix fastener heads with a lock mate to stop rotation. Allow nuts to turn freely with a proper rotational mate. These controls improve assembly realism and function.

Credit: www.youtube.com
Mating Fasteners Efficiently
Customizing fasteners in SolidWorks assembly lets you tailor each component to fit your design needs. This process improves both the look and function of your assembly. You can adjust size, shape, and style to match your project requirements.
SolidWorks provides tools for easy and precise fastener customization. It helps create professional, accurate assemblies without starting from scratch.
Modifying Dimensions
To change fastener size, select the fastener in your assembly. Open the property manager to find dimension options. Adjust length, diameter, or thread size as needed. This ensures your fastener fits perfectly in the assembly.
Modifying dimensions helps avoid interference with other parts. It also allows for better mechanical performance. Use standard size charts or custom values for accurate results.
Changing Appearance
Appearance changes help fasteners blend with your design style. Click the fastener, then open the appearances tab. Choose colors, finishes, or materials from the list. This gives your assembly a polished, realistic look.
Custom colors can highlight specific parts or match company branding. Applying textures like metal or plastic adds depth. These visual tweaks improve presentation and clarity of your design.
Customizing Fasteners
Speed matters when adding fasteners in SolidWorks assemblies. Faster assembly saves time and reduces errors. Follow simple tips to make the process smooth and quick.
Using Design Library
The Design Library holds many common fasteners. Drag and drop fasteners directly into your assembly. This avoids searching for parts repeatedly. You can customize the library with your preferred fasteners. It keeps your workflow organized and saves time.
Keyboard Shortcuts
Shortcuts speed up many tasks in SolidWorks. Use keys for common commands like insert, mate, and rotate. Memorize shortcuts for adding and editing fasteners. This reduces mouse clicks and keeps your focus. You can find shortcut lists in SolidWorks help or create your own.
Efficient Workflow Practices
Plan your assembly steps before starting. Group similar fasteners and add them all at once. Use smart fasteners to add bolts and nuts automatically to holes. Check your mates after adding fasteners to avoid conflicts. Save your assembly regularly to prevent loss of work.
Credit: hawkridgesys.com
Frequently Asked Questions
How Do I Add Fasteners To Solidworks?
Open the Toolbox, select Smart Fasteners, then choose the hole(s). Click Add to automatically insert fasteners. Apply mates to secure them.
How To Add Features In Solidworks Assembly?
Right-click the assembly feature in the FeatureManager tree and select Edit Sketch or Edit Feature. Use extruded, revolved, swept cuts, or hole features to add features directly in assemblies.
How To Attach Parts In Solidworks Assembly?
Open the Assembly tab, click “Insert Components,” select parts, then use “Mate” to define their relationships and positions.
How To Mate Fasteners In Solidworks?
Click Mate in Assembly toolbar or Insert > Mate. Choose Screw mate on Mechanical tab. Select rotation axes of fastener and hole. Define revolutions per unit length to mate fasteners accurately.
Conclusion
Adding fasteners in SolidWorks assembly is simple and efficient. Use the Toolbox or Smart Fasteners for quick results. Select holes, and the software adds bolts automatically. Proper mates ensure parts fit and move correctly. Practice these steps to speed up your design process.
SolidWorks helps create strong, accurate assemblies every time. Keep exploring features to improve your skills further. This approach saves time and reduces errors in your projects.