Have you ever struggled with your bracelet slipping off or found it tricky to put on? Creating your own bracelet fastener can solve these problems and add a personal touch to your jewelry.
In this guide, you’ll learn simple, quick steps to make a secure and stylish fastener that fits your bracelet perfectly. By the end, you’ll have the skills to customize your accessories and even impress friends with your handmade creations. Ready to make your bracelets more comfortable and unique?
Let’s get started!
Credit: www.kernowcraft.com
Materials Needed
Making a bracelet fastener needs some basic materials. These materials help you create a strong and stylish closure. Choosing the right items makes your bracelet last longer and look great.
Gathering the correct materials is the first step. It saves time and makes the process smooth. Below, find the main materials you need to start.
Types Of Fasteners
Fasteners come in many styles. Lobster clasps are common and easy to use. Toggle clasps add a classic look. Magnetic clasps are simple to open and close. Snap buttons offer a quick fastening option. Choose a fastener that fits your bracelet’s design.
Tools Required
Some tools make fastener attachment easier. Needle-nose pliers help open and close clasps. Wire cutters trim the cords neatly. Scissors cut threads or cords. A small ruler measures the bracelet length. These tools ensure precise and clean work.
Choosing The Right Cord
The cord holds the bracelet and fastener together. Leather cords offer durability and style. Nylon cords are flexible and strong. Waxed cotton cords resist fraying. Match the cord thickness to the fastener size. The right cord keeps your bracelet secure and comfortable.
Preparing The Cord
Preparing the cord is an important step in making a bracelet fastener. It ensures the cord is the right length and stays strong. This helps the fastener work well and last longer. Taking time to prepare the cord properly makes the whole bracelet better.
Measuring And Cutting
Measure the cord carefully before cutting. Use a ruler or tape measure for accuracy. Add a few extra inches to your length. This allows room for tying knots and attaching fasteners. Cut the cord with sharp scissors. A clean cut prevents fraying and makes the bracelet neater.
Sealing The Ends
Seal the cord ends to stop fraying. For synthetic cords, gently melt the ends with a lighter. Be careful to avoid burning the cord or yourself. For natural cords, apply a small amount of glue. Let it dry fully before handling the cord. Sealing keeps the bracelet looking tidy and strong.
Basic Fastener Techniques
Basic fastener techniques help secure bracelets with style and ease. These simple methods work well for many bracelet types. Understanding these fasteners can make your jewelry more comfortable and durable.
Each fastener style has its own look and function. Learning a few key techniques lets you customize your bracelet’s closure. It also makes your crafting faster and neater.
Sliding Knot
The sliding knot is a popular fastener for adjustable bracelets. It allows the bracelet to fit different wrist sizes. To create it, tie two knots on opposite sides of the cord. These knots slide closer or farther to tighten or loosen the bracelet.
This fastener uses just cord and simple tying. No extra tools or hardware are needed. It’s perfect for casual, handmade jewelry.
Button Loop
A button loop uses a small button and a loop of cord or thread. Sew the button to one bracelet end. Make a loop on the other end that fits over the button.
This fastener is secure and decorative. It works well with beads, leather, or fabric bracelets. The loop size must fit the button snugly to hold well.
Magnetic Clasp Attachment
Magnetic clasps are easy to use and very secure. They attach to bracelet ends using small loops or glue. The magnets snap together to close the bracelet quickly.
These clasps suit heavier or metal bracelets. They are helpful for people who struggle with tiny fasteners. Make sure to pick a strong magnet for a firm hold.

Credit: jewelrymakingjournal.com
Step-by-step Fastener Assembly
Assembling a bracelet fastener is simple with clear steps. This guide breaks down each part for easy understanding. Follow these instructions to create a secure and neat fastener for your bracelet. You will learn how to make the loop, attach the clasp, and secure the knot.
Creating The Loop
Start by cutting the bracelet cord to the right length. Leave extra cord for making the loop. Bend the cord back to form a small circle. Hold the circle tightly with your fingers. Wrap the extra cord around the base of the loop several times. This wrapping keeps the loop strong and tight.
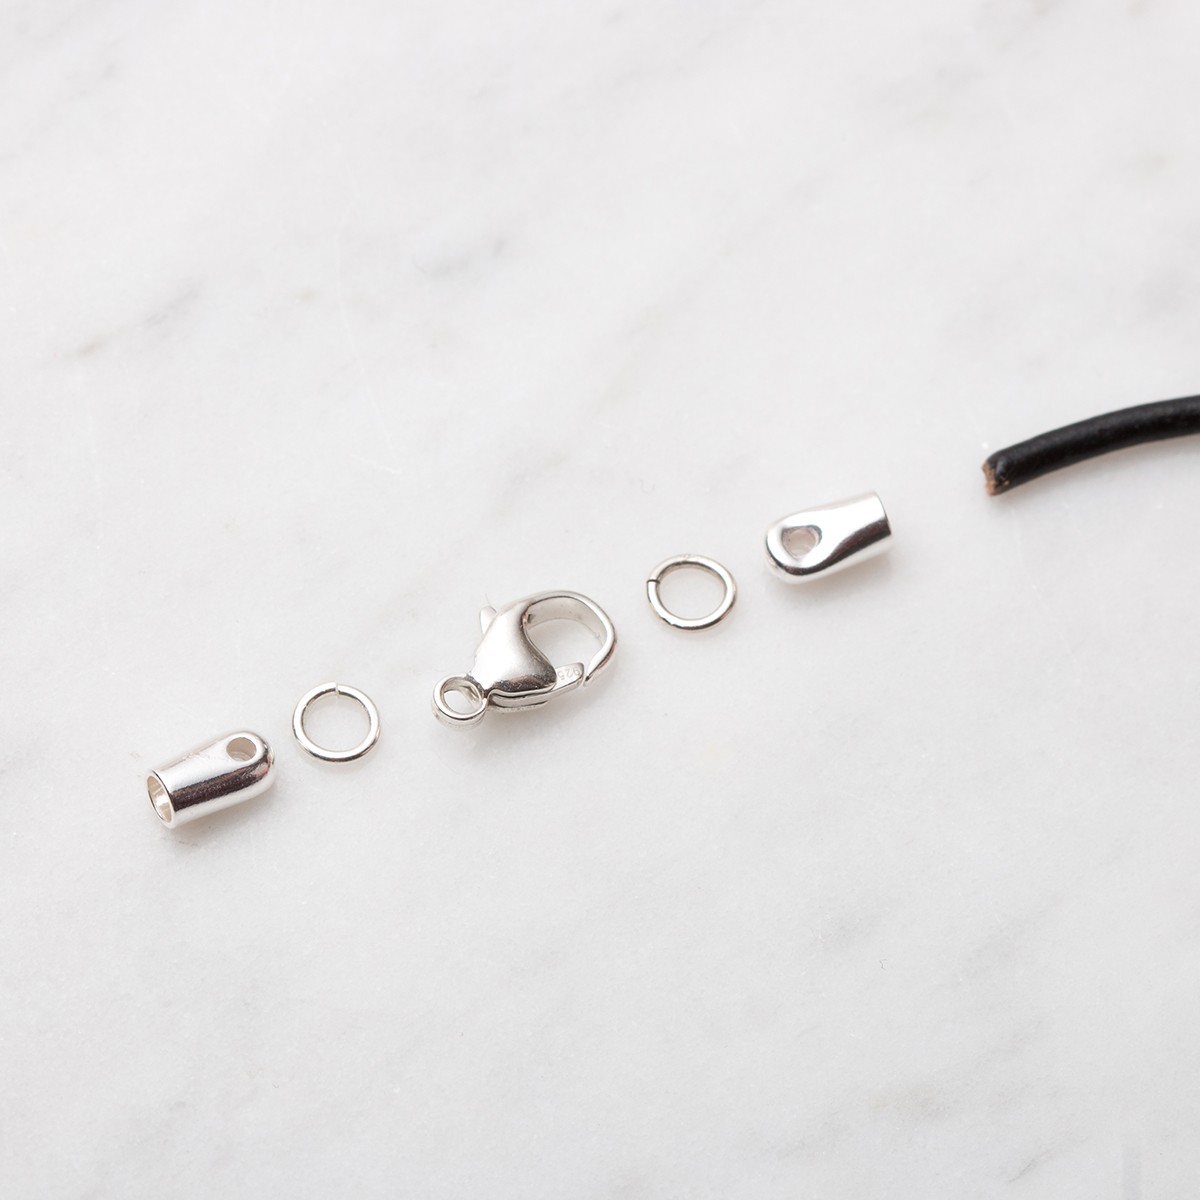
Attaching The Clasp
Choose a clasp that fits your bracelet style. Open the clasp using small pliers or your fingers. Slide the clasp onto the loop you just made. Make sure the clasp moves freely but stays in place. Close the clasp securely so it does not fall off. This step makes your bracelet easy to wear and remove.
Securing The Knot
Use a strong knot to hold the loop and clasp together. Tie a double knot around the wrapped area for extra strength. Pull the knot tight to prevent slipping. Trim any extra cord close to the knot. Apply a small amount of glue to keep the knot firm. Let the glue dry completely before wearing your bracelet.
Tips For Durable Fasteners
Making a bracelet fastener that lasts is important. A strong fastener keeps your bracelet safe on your wrist. It also stops it from breaking easily. Use these tips to create durable fasteners for your bracelets.
Reinforcing Knots
Tying knots tightly makes your fastener strong. Double or triple your knots for extra hold. Pull the knots firmly but gently to avoid damage. Wrap thread around the knot to keep it secure. Check knots regularly to ensure they stay tight.
Using Glue For Extra Strength
Apply a small drop of clear glue on knots. This helps keep knots from loosening over time. Use craft glue or fabric glue for best results. Avoid using too much glue to prevent stiffness. Let glue dry completely before wearing the bracelet.
Choosing Weather-resistant Materials
Select materials that do not weaken with water or sun. Nylon, polyester, and waxed cords are good choices. Metal fasteners should resist rust and tarnish. These materials keep your bracelet looking new longer. Weather-resistant parts reduce the need for repairs.
Customizing Your Fastener
Customizing your bracelet fastener lets you add a personal touch to your jewelry. It makes your bracelet unique and reflects your style. Small details can change the whole look of your fastener. You can make your bracelet more special with simple changes.
Adding Beads Or Charms
Attach small beads or charms to the fastener for decoration. Choose beads that match the bracelet’s theme or your personality. Charms can tell a story or show your hobbies. Use small jump rings to connect beads or charms safely. This adds texture and interest to the fastener area.
Color Coordination
Pick colors that match or contrast with your bracelet. Use colored threads, wires, or cords on the fastener. This creates harmony or a pop of color. Think about your outfit or favorite shades. A well-chosen color makes the fastener stand out or blend in.
Personalizing With Engraving
Engrave initials, dates, or short words on metal parts. It adds meaning and makes the fastener one-of-a-kind. Use simple fonts for clarity and style. Engraving works well on clasps or metal beads. It turns your bracelet into a keepsake.
Troubleshooting Common Issues
Troubleshooting common issues with bracelet fasteners helps keep your jewelry secure and easy to use. Small problems can make your bracelet uncomfortable or unsafe. Fixing these issues early saves time and frustration.
Loose Fasteners
Loose fasteners cause your bracelet to fall off easily. Check if the clasp parts are worn out. Tighten any screws or gently press metal parts closer. Replace weak jump rings with new, stronger ones for better hold.
Difficult To Open Or Close
Hard-to-use fasteners make putting on your bracelet frustrating. Clean the clasp to remove dirt or rust. Lubricate moving parts with a tiny drop of oil. Adjust the clasp shape slightly to improve the fit and movement.
Cord Fraying
Frayed cords weaken your bracelet’s strength. Cut frayed ends cleanly with sharp scissors. Use clear nail polish or glue to seal the edges. Consider replacing the cord with a thicker or coated one for more durability.

Credit: www.youtube.com
Frequently Asked Questions
What Materials Are Needed To Make A Bracelet Fastener?
You need jewelry wire, clasps, jump rings, and pliers. Optional tools include crimp beads and a wire cutter. These basic materials ensure a secure and professional-looking bracelet fastener.
How Do I Attach A Fastener To A Bracelet?
Thread the wire through the clasp and secure with a crimp bead. Use pliers to tightly close the crimp bead, holding the fastener firmly in place. This method keeps the bracelet durable and easy to wear.
Can I Make A Bracelet Fastener Without Special Tools?
Yes, simple fasteners can be made using basic household items like string and buttons. However, jewelry pliers and crimp beads improve durability and appearance. Using the right tools ensures a neat and lasting fastener.
What Types Of Fasteners Work Best For Bracelets?
Lobster clasps, toggle clasps, and magnetic clasps are popular options. Choose based on bracelet style and ease of use. Each type offers different levels of security and aesthetic appeal.
Conclusion
Making a bracelet fastener is easier than it seems. You only need a few tools and materials. Follow each step with care and patience. Practice a couple of times to get better. A strong fastener keeps your bracelet safe and neat.
Creating your own adds a personal touch to jewelry. Enjoy the process and wear your bracelet proudly. Keep experimenting with different styles and designs. Crafting becomes fun and rewarding. Try making fasteners for gifts or personal use.