Are you ready to give your cabinets a fresh, stylish look without spending a fortune? Installing cabinet hardware is one of the easiest and fastest ways to transform your space.
But if you’ve never done it before, it might feel a bit tricky. Don’t worry—this step-by-step video guide will show you exactly how to do it, even if you have zero experience. By the end, you’ll have the confidence and skills to upgrade your cabinets like a pro.
Keep reading and watch the video to unlock the secret to a simple, beautiful cabinet makeover!

Credit: www.homedepot.com
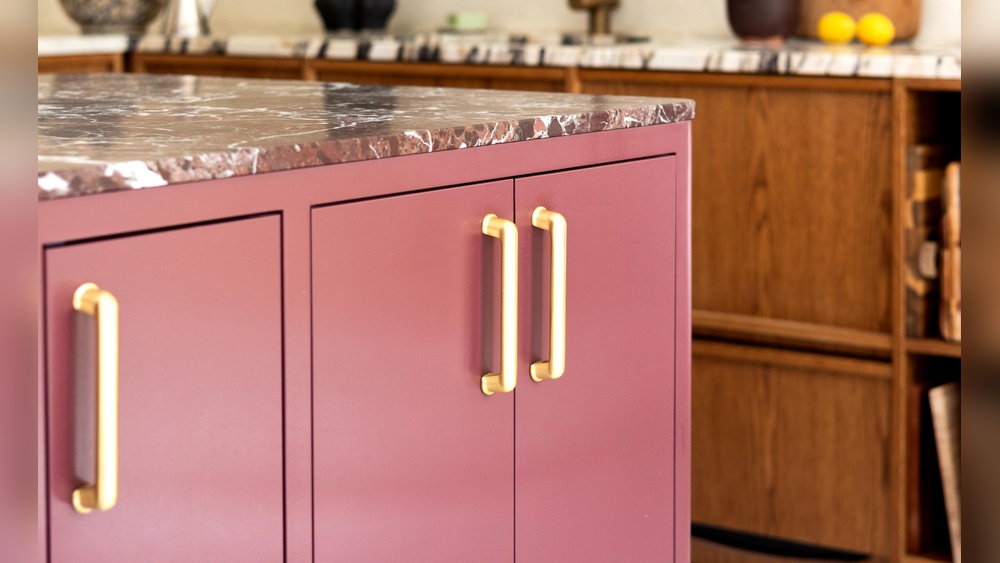
Choosing Cabinet Hardware
Choosing the right cabinet hardware is important for your kitchen or bathroom. It changes the look and feel of your cabinets. The right hardware makes cabinets easier to open and close. It also adds style and personality to your space.
Types Of Cabinet Hardware
Cabinet hardware includes knobs, pulls, and handles. Knobs are small and round, easy to grab. Pulls are longer and let you use your whole hand. Handles offer a firm grip and work well on bigger drawers. Choose a type that fits your cabinet style and use.
Materials And Finishes
Hardware comes in many materials like metal, plastic, and wood. Metal options include brass, stainless steel, and bronze. Finishes can be shiny, matte, or brushed. Pick a finish that matches your decor and stays durable. Some finishes hide fingerprints and scratches better.
Measuring For Fit
Measure your cabinet doors and drawers before buying hardware. Check the distance between holes if you replace old hardware. Measure carefully to avoid hardware that does not fit. Correct size ensures easy installation and good look. Use a ruler or tape measure for accuracy.
Tools You’ll Need
Installing cabinet hardware is simple with the right tools. Having the correct tools helps you work faster and get better results. Prepare your workspace and gather these tools before starting. This guide lists the basic and optional tools for your project.
Basic Tools
- Measuring tape – to measure exact screw placement
- Pencil – to mark drill spots
- Power drill or screwdriver – to drive screws
- Drill bits – to make pilot holes for screws
- Level – to keep handles straight
- Screwdriver set – for tightening screws
Optional Helpful Tools
- Template jig – for consistent hole spacing
- Magnetic bit holder – keeps drill bits in place
- Clamps – to hold hardware steady while installing
- Awl – to create starter holes for drill bits
- Safety glasses – protect your eyes from debris
Preparing Cabinets
Preparing cabinets is an important step before installing new hardware. It helps the new handles and knobs fit well and last longer. Careful preparation makes the whole process smooth and neat. Follow these steps to get your cabinets ready.
Cleaning Surfaces
Start by cleaning the cabinet surfaces. Use a soft cloth and mild soap with water. Remove all dirt, grease, and dust. Dry the surfaces completely with a clean towel. Clean surfaces help the new hardware stick better. It also makes the cabinets look fresh and neat.
Removing Old Hardware
Take off the old handles and knobs carefully. Use a screwdriver to remove screws without damaging the wood. Keep the screws if you plan to reuse them. Removing old hardware clears the way for new pieces. It also helps check if the cabinet doors need repairs or sanding.
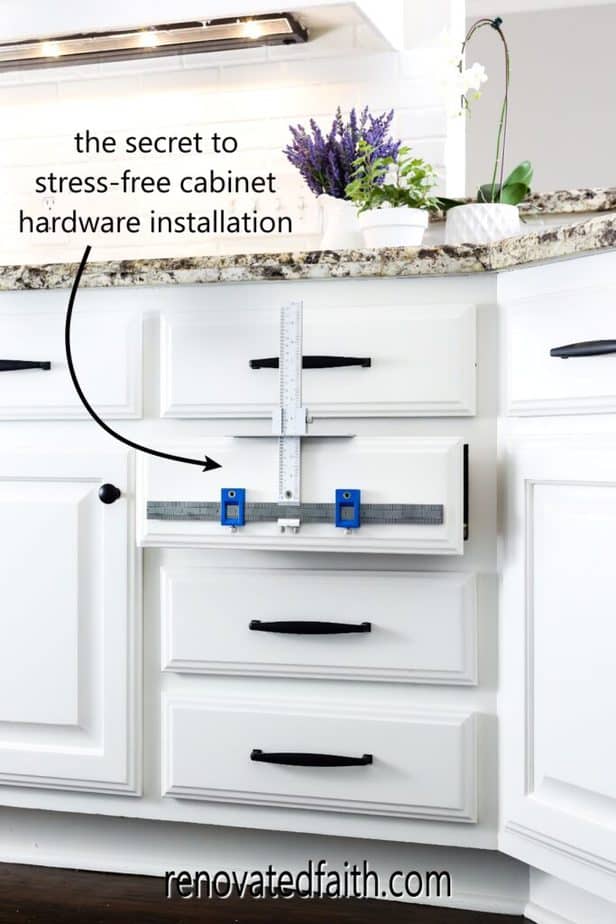
Marking Drill Points
Marking drill points is a key step in installing cabinet hardware. It ensures screws go in the right place. Precise marks help avoid mistakes and keep your cabinets looking neat. Taking time here saves effort later.
Measuring Placement
Use a ruler or tape measure to find exact spots for drill holes. Measure from the edges of doors or drawers. Check both sides to keep hardware aligned. Mark the spot lightly with a pencil.
Double-check your measurements before drilling. Consistent spacing creates a professional look. Small errors can make handles look crooked.
Using Templates
Templates make marking drill points faster and easier. Place the template on the cabinet surface. Align it carefully with edges or previous marks. Use a pencil to mark holes through the template.
Templates help keep hardware placement uniform. They reduce guesswork and improve accuracy. Reuse the template for all cabinets for the same style and size.
Drilling Holes
Drilling holes is an essential step in installing cabinet hardware. It creates space for screws that hold handles or knobs. Accuracy is key to making sure hardware fits well and looks good.
Using the right tools and methods helps avoid damage to cabinets. Careful drilling ensures a clean, professional finish. Let’s explore how to choose drill bits and use proper drilling techniques.
Choosing Drill Bits
Select drill bits that match screw size for secure fitting. Use a bit slightly smaller than the screw for a tight hold. For soft wood, a smaller bit prevents splitting. Hardened wood needs stronger bits like cobalt or titanium. A brad point bit helps start holes without slipping. Check bit condition before use. Dull bits can cause rough holes or break the wood.
Drilling Techniques
Mark drilling spots with a pencil or tape for accuracy. Use a drill with a steady speed to avoid cracking. Hold the drill perpendicular to the surface for straight holes. Start with a small pilot hole to guide the larger bit. Apply gentle pressure and let the drill do the work. Clear dust from holes to keep screws fitting well. Take breaks if drilling many holes to maintain control.

Credit: www.youtube.com
Installing Hardware
Installing cabinet hardware is a simple task that improves the look of your kitchen or bathroom. Proper installation ensures handles and knobs fit well and work smoothly. Follow clear steps to attach and secure your hardware easily.
Focus on accuracy and use the right tools. This makes the process faster and the result better. Below, find easy instructions to install your cabinet hardware correctly.
Attaching Handles And Knobs
Start by placing the handle or knob on the cabinet door or drawer. Align it with the pre-drilled holes or mark new spots carefully. Hold the hardware steady to avoid shifting during installation.
Check the position from different angles. The handle or knob should look even and balanced. Adjust if necessary before moving to the next step.
Securing With Screws
Insert screws through the holes from inside the cabinet. Use a screwdriver that fits the screw heads to avoid damage. Turn screws slowly and firmly until tight.
Do not over-tighten screws. This can strip the holes or crack the cabinet surface. Check that the hardware feels secure but still moves if designed to do so.
Final Adjustments
Final adjustments are key to a polished look for your cabinet hardware. This step ensures everything fits perfectly and works smoothly. Take your time here. Small tweaks can make a big difference in appearance and function.
Checking Alignment
Look closely at each handle and knob. Make sure they line up straight and match each other. Use a ruler or level for accuracy. Adjust any hardware that looks crooked or uneven. Proper alignment keeps your cabinets looking neat and professional.
Tightening Hardware
Secure all screws firmly, but avoid overtightening. Tight screws keep the hardware stable and prevent wobbling. Use a screwdriver to check each fastener. If any hardware moves, tighten it carefully. This step guarantees your cabinet hardware stays in place for years.
Troubleshooting Tips
Installing cabinet hardware can be simple, but problems may arise. This section covers common issues you might face. Learn quick fixes to keep your project on track. Simple solutions save time and reduce frustration.
Fixing Misaligned Holes
Misaligned holes happen when the drill slips or measurements are off. To fix this, fill the old holes with wood filler. Let it dry completely. Then, sand the area smooth. Mark the new holes carefully with a pencil. Use a drill guide to keep holes straight. This ensures the hardware fits perfectly and looks neat.
Handling Stripped Screws
Stripped screws can ruin your progress. If the screwdriver slips inside the screw head, try using a rubber band. Place it over the screw head and turn slowly. The rubber adds grip. If the screw is still stuck, use a screw extractor tool. It removes damaged screws without harming the cabinet. Replace stripped screws with new ones to keep your hardware secure.
Credit: renovatedfaith.com
Frequently Asked Questions
How Do I Choose The Right Cabinet Hardware?
Choose hardware that matches your cabinet style and finish. Consider size, shape, and material for functionality and aesthetics. Ensure the hardware complements your kitchen or bathroom decor for a cohesive look.
What Tools Are Needed To Install Cabinet Hardware?
You need a drill, screwdriver, measuring tape, pencil, and level. These tools help you mark, drill holes, and securely attach hardware. Using the right tools ensures precise and durable installation.
How Do I Measure For Cabinet Hardware Placement?
Measure the cabinet door or drawer width and height. Mark the desired hardware position using a pencil and level. Consistent placement improves appearance and usability across all cabinets.
Can I Install Cabinet Hardware Without Drilling?
Yes, some adhesive or magnetic hardware options require no drilling. However, they may not be as durable for heavy use. Drilling provides the strongest, long-lasting attachment for cabinet hardware.
Conclusion
Installing cabinet hardware is easier than it seems. Follow each step carefully and take your time. Use the right tools for accurate results. Measuring twice helps avoid mistakes. Once done, your cabinets will look fresh and new. Small changes can make a big difference in your space.
Enjoy the satisfaction of a job well done. Keep practicing, and you will get better every time. Simple projects like this boost your home’s style and value. Start your cabinet upgrade today with confidence.