Have you ever tried to lift your car with a small floor jack, only to find it won’t work properly? It’s frustrating when your jack won’t hold weight or moves unevenly.
But don’t worry—fixing your small floor jack is easier than you think. In this guide, you’ll learn simple, step-by-step tips to get your jack back in perfect shape. Keep reading, and soon you’ll have the confidence to handle any lifting job safely and smoothly.
Your car—and your peace of mind—will thank you.

Credit: navigatepa.com
Common Floor Jack Issues
Floor jacks are useful tools for lifting heavy objects safely. Over time, they can face common issues that stop them from working properly. Understanding these problems helps you fix your floor jack quickly. This section covers typical faults and how to spot them.
Leaks And Hydraulic Fluid Problems
Hydraulic fluid leaks are a frequent problem in floor jacks. The fluid helps lift heavy loads by creating pressure. Leaks reduce this pressure, making the jack weak or useless. Look for wet spots or puddles under the jack. Low fluid levels can cause jerky or slow lifting.
Air In The Hydraulic System
Air can enter the hydraulic system and cause trouble. It makes the jack feel spongy or soft when lifting. The jack may not hold weight properly. Bleeding the system removes trapped air and restores smooth operation. This process is simple and improves jack performance.
Damaged Or Worn Seals
Seals keep the hydraulic fluid inside the jack. Over time, seals wear out or crack. Damaged seals lead to leaks and loss of pressure. Inspect seals regularly for cracks or dryness. Replacing seals can stop leaks and keep the jack working well.
Faulty Release Valve
The release valve controls the lowering of the jack. A faulty valve can cause the jack to lower too fast or not at all. Dirt or damage often cause valve problems. Cleaning or replacing the release valve fixes this issue. Test the valve after repair to ensure safety.
Tools And Materials Needed
Fixing a small floor jack requires the right tools and materials. Having everything ready makes the job easier and faster. This guide lists the main items you need to complete the repair safely and effectively.
Essential Repair Tools
Start with basic hand tools like wrenches and screwdrivers. A socket set helps remove bolts quickly. Pliers are useful for gripping and bending parts. A hammer may be needed to tap stuck components loose. A clean cloth helps wipe dirt and oil from parts. Finally, a grease gun is important to lubricate moving parts after repair.
Replacement Parts
Identify worn or broken parts before buying replacements. Common parts include hydraulic seals, pistons, and valves. Check for leaks or cracks in the jack’s cylinder. Keep spare bolts and washers for tight fitting. Using original parts ensures the jack works properly and lasts longer.
Safety Equipment
Wear gloves to protect your hands from sharp edges and oil. Safety goggles shield your eyes from debris and splashes. Use a sturdy work surface to keep the jack stable. Keep a fire extinguisher nearby when working with lubricants. Good lighting helps spot small parts and damage clearly.
Preparing The Floor Jack For Repair
Preparing the floor jack for repair is the first step to fix it safely and correctly. It helps to avoid accidents and make the repair process easier. Proper preparation saves time and prevents further damage. Follow these steps carefully before you start fixing the jack.
Cleaning And Inspection
Start by cleaning the floor jack. Remove dirt, grease, and dust using a cloth or brush. Clean parts are easier to inspect. Check for visible damage like cracks or leaks. Look for worn or broken parts. Pay close attention to the hydraulic cylinder and seals. Make notes of any problems found during inspection.
Lowering And Securing The Jack
Before repair, lower the floor jack completely. Turn the release valve slowly to release pressure. Make sure the jack is fully down and stable. Place the jack on a flat, solid surface. Use wheel chocks or blocks to secure it from moving. Never work under a jack that is raised or unstable.

Credit: www.youtube.com
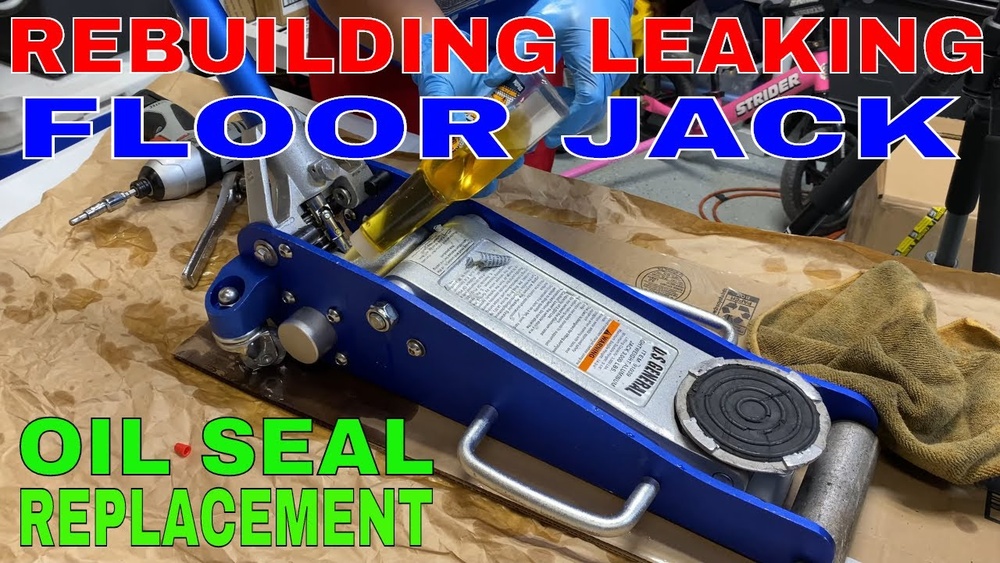
Fixing Hydraulic Fluid Leaks
Fixing hydraulic fluid leaks is key to keeping a small floor jack working well. Leaks cause poor lifting power and can damage the jack. Finding and fixing leaks stops fluid loss and keeps the jack safe to use.
Identifying Leak Sources
Start by cleaning the jack. Wipe off dirt and old oil to see fresh leaks. Look at the hydraulic cylinder, pump, and hoses. Check around seals and joints for wet spots. Use a flashlight for better view. Notice any cracks or worn parts. This helps find where fluid escapes.
Replacing Seals And O-rings
Leaking often comes from bad seals or O-rings. These parts wear out over time. Remove the leaking seal carefully. Match the new seal or O-ring exactly to the old one. Use tools to avoid damage. Fit the new part tightly in place. This stops fluid from leaking out.
Refilling Hydraulic Fluid
After fixing leaks, check the fluid level. Use the type of hydraulic fluid the jack needs. Open the fill plug and add fluid slowly. Watch the level to avoid overfilling. Replace the plug tightly to keep fluid inside. Test the jack to see if it lifts properly. Proper fluid level helps the jack work smoothly.
Bleeding Air From The System
Air trapped in a small floor jack can cause it to work poorly. The jack may feel soft or fail to lift properly. Bleeding air from the system removes trapped air. This process restores the jack’s strength and smooth operation.
Bleeding air is a simple task. It requires a few tools and careful steps. Follow the instructions carefully to avoid damage. Proper bleeding keeps the jack safe and effective.
Signs Of Air In The Jack
The jack feels spongy or soft when lifting. It may not hold weight steadily. The handle moves easily without resistance. You might hear a hissing sound inside the jack. Oil leaks can also signal air problems.
Step-by-step Bleeding Process
Place the jack on a flat surface. Open the oil fill plug and check the oil level. Pump the handle slowly several times. Keep the release valve open during pumping. This helps air escape from the system.
Close the release valve and check the jack’s lift. Repeat pumping if the jack still feels soft. Add hydraulic oil if the level is low. Tighten the oil fill plug securely after finishing.
Test the jack by lifting a small load. It should lift smoothly and hold steady. If problems continue, the jack may need professional repair.
Adjusting Or Replacing The Release Valve
The release valve plays a key role in a small floor jack’s operation. Adjusting or replacing this valve can fix issues like slow lifting or failure to hold pressure. This section guides you through finding the valve, adjusting it properly, and knowing when to replace it.
Locating The Release Valve
Start by placing the jack on a flat surface. Look near the base or handle area. The release valve often looks like a small screw or knob. It controls the hydraulic fluid flow. Identifying this valve is the first step to fixing your jack.
Valve Adjustment Techniques
Use a wrench or screwdriver to turn the valve. Turn it slowly to open or close the valve. Clockwise usually tightens and closes it. Counterclockwise loosens and opens the valve. Adjust it in small steps. Test the jack after each adjustment. Stop when the jack lifts smoothly and holds pressure.
When To Replace The Valve
Replace the valve if it leaks fluid or does not adjust properly. Signs include fluid dripping or the jack losing pressure quickly. Also, if the valve is damaged or rusted, replacement is necessary. Use a valve designed for your jack model. This ensures safety and proper function.
Testing The Repair
Testing the repair of a small floor jack is an important step. It confirms the fix works and ensures safety during use. This phase helps avoid accidents and damage. Follow clear steps to check the jack’s condition after repair. Focus on both safety and performance to get the best results.
Safety Checks
Start by inspecting the jack for leaks or cracks. Look at all seals and moving parts carefully. Make sure the jack is clean and free of debris. Check that the release valve closes tightly. Test the handle movement; it should be smooth and firm. Confirm no parts are loose or damaged. Safety checks prevent serious problems during lifting.
Functionality Tests
Place the jack on a flat surface for testing. Pump the handle slowly and watch the jack rise. It should lift steadily without jerking or slipping. Hold the jack at a raised position for a few minutes. The jack must not lower or lose pressure. Lower the jack carefully and check for smooth descent. Good functionality means the jack is ready for use.

Credit: navigatepa.com
Maintenance Tips To Prevent Future Issues
Keeping your small floor jack in good condition helps avoid costly repairs. Regular care extends its life and ensures safety during use. Simple maintenance steps prevent future problems and keep the jack working smoothly.
Regular Inspection Routine
Check your floor jack before each use. Look for leaks, cracks, and worn parts. Tighten loose bolts and nuts. Inspect the lifting arm and wheels for damage. Early detection saves time and money.
Proper Storage Practices
Store the jack in a dry, clean place. Avoid damp areas to stop rust from forming. Keep it on a flat surface to prevent stress on parts. Cover the jack to protect it from dust and dirt.
Hydraulic Fluid Care
Check the hydraulic fluid level often. Low fluid can cause poor lifting performance. Replace the fluid following the manufacturer’s instructions. Use the correct type of fluid to avoid damage. Clean the fluid reservoir to keep the system working well.
Frequently Asked Questions
How Do I Identify A Small Floor Jack Problem?
Check for oil leaks, unusual noises, or failure to lift. Inspect hydraulic fluid levels and ensure the release valve is tight. These signs indicate common issues needing repair or maintenance.
What Tools Are Needed To Fix A Small Floor Jack?
You typically need wrenches, screwdrivers, hydraulic fluid, and a jack repair kit. Having a clean workspace and safety gloves also helps for an efficient repair.
How Can I Bleed Air From A Small Floor Jack?
Open the release valve slightly, pump the handle several times, then close the valve. This process expels trapped air, restoring proper hydraulic pressure and jack function.
Is It Safe To Repair A Small Floor Jack Myself?
Yes, if you follow safety guidelines and understand the jack’s mechanics. Always work on a stable surface and avoid overloading the jack during repair.
Conclusion
Fixing a small floor jack is easier than it seems. Follow the basic steps carefully. Check for leaks, clean parts, and test the pump. Regular care helps the jack last longer. Stay safe by using the right tools. A working floor jack saves time and effort.
Keep it ready for your next job. Small problems don’t need big worries. Repair it soon and avoid bigger damage. Simple fixes keep your tools in good shape.