Are you looking to control your lights from more than one spot? Adding another switch and light can make your space more convenient and comfortable.
Whether you want to brighten up a dark corner or have easy control from multiple places, this guide is for you. You’ll learn simple, clear steps to get the job done safely and efficiently. Keep reading, and by the end, you’ll have the confidence to improve your home’s lighting setup all by yourself.
Tools And Materials Needed
Safety is the most important part of adding another switch and light. Working with electricity can be dangerous. Taking safety steps protects you and your home. Follow these precautions carefully before starting any work.
Turn Off The Power
Always switch off the circuit breaker for the area you work on. Double-check the power is off by testing the switch or light. Never start until you are sure no electricity flows.
Use Proper Tools
Choose tools made for electrical work. Insulated screwdrivers and wire strippers reduce the risk of shock. Avoid using damaged or worn tools.
Wear Safety Gear
Wear rubber gloves and safety glasses. Gloves protect your hands from shocks. Glasses keep debris and dust out of your eyes.
Check Wires Carefully
Inspect wires for damage before connecting. Do not use wires with cracks or frays. Replace any damaged wires to avoid hazards.
Follow Wiring Codes
Use the right wire size and type for your circuit. Follow local electrical codes and standards. This ensures safety and proper function.
Work In Dry Conditions
Keep the work area dry at all times. Water increases the risk of electric shock. Never work in wet or damp conditions.
Ask For Help When Needed
Call a professional if unsure about any step. Electrical work can be complex and risky. Better safe than sorry.

Credit: www.youtube.com
Safety Precautions
Turn off the power before starting any electrical work to avoid shocks. Use proper tools and check connections carefully for safety. Always follow local electrical codes to prevent hazards.
Assess The Existing Wiring
Start by examining the current wiring setup. Identify where wires run and how they connect. Locate the existing switch and light fixture. Note the type of wires used and their colors. This step helps avoid mistakes and ensures safety.
Decide On The New Switch And Light Location
Choose spots that make sense for daily use. Consider convenience and accessibility. Mark the positions clearly on walls or ceilings. Think about the light coverage area to avoid dark spots.
Plan The Wiring Path
Map out the route for new wires. Keep paths short and direct to reduce material use. Avoid running wires near water pipes or heat sources. Use existing holes or create new ones carefully.
Select The Right Materials
Pick wires that match your home’s electrical system. Use proper gauge wires for safety and efficiency. Get suitable switches and light fixtures for your needs. Quality materials prevent future problems.
Consider Electrical Codes And Safety
Check local electrical codes before starting. Follow rules about wire types and installation methods. Use circuit breakers and grounding for protection. Safety prevents hazards and keeps your home secure.
Planning Your Wiring Layout
Turning off power is the first and most important step before working with electrical wiring. It keeps you safe from electric shock. Always make sure the power is completely off before you start adding a new switch or light.
Never trust just the wall switch to cut power. The electrical box may still have live wires. Always use the main circuit breaker to turn off power to the area you will work on.
Locate The Correct Circuit Breaker
Find the circuit breaker that controls the room or area where you want to add the switch and light. The breaker box usually has labels. Turn off the breaker that matches the room’s wiring.
Test For Power Before You Begin
Use a voltage tester or multimeter to check if the wires have power. Test all wires in the switch box and light fixture location. If the tester shows no power, it is safe to start your work.
Keep The Breaker Off During The Entire Project
Leave the circuit breaker off while adding the switch and light. Turning it on too soon can cause shocks or damage. Only restore power after all wiring and connections are complete and secure.

Credit: diy.stackexchange.com
Turning Off Power
Running new electrical cables is a key step in adding another switch and light. It involves carefully planning and safely installing wires to connect the new devices. Understanding this process helps avoid common mistakes and ensures your project works well.
Electrical cables carry power from your home’s wiring to the new switch and light. You must choose the right type of cable for safety and code compliance. Proper cable installation keeps your home safe and your lighting system functional.
Planning The Cable Route
Start by deciding where the new switch and light will go. Look for the shortest, clearest path for the cable. Avoid sharp bends and obstacles like pipes or ducts. Mark the route on walls or ceilings to guide your work.
Choosing The Right Cable
Select cables rated for indoor use and the correct amperage. Most home lighting uses 14-2 or 12-2 NM cable. The numbers mean wire gauge and number of conductors. Use cables with a ground wire for safety.
Always switch off power at the circuit breaker before handling wires. Test with a voltage tester to ensure no electricity flows. This step protects you from shocks and accidents during installation.
Running The Cable
Pull the cable along the planned route. Use fish tape or wire pullers to guide it through walls or ceilings. Leave enough slack at switch and light boxes for connections. Secure the cable with staples, avoiding damage.
Connecting To Switch And Light
Strip the cable ends carefully to expose wires. Connect black wires to switch terminals and white to neutral points. Attach the ground wire to the green screw or grounding system. Double-check all connections for tightness and safety.
Removing Existing Switch And Light Fixtures
Connecting wires to switches is a key step in adding another switch and light. It controls the flow of electricity to the light fixture. Understanding how to connect wires safely ensures the switch works properly.
Each wire has a specific role and connects to a specific terminal on the switch. Knowing which wire goes where helps avoid electrical problems and keeps the system safe.
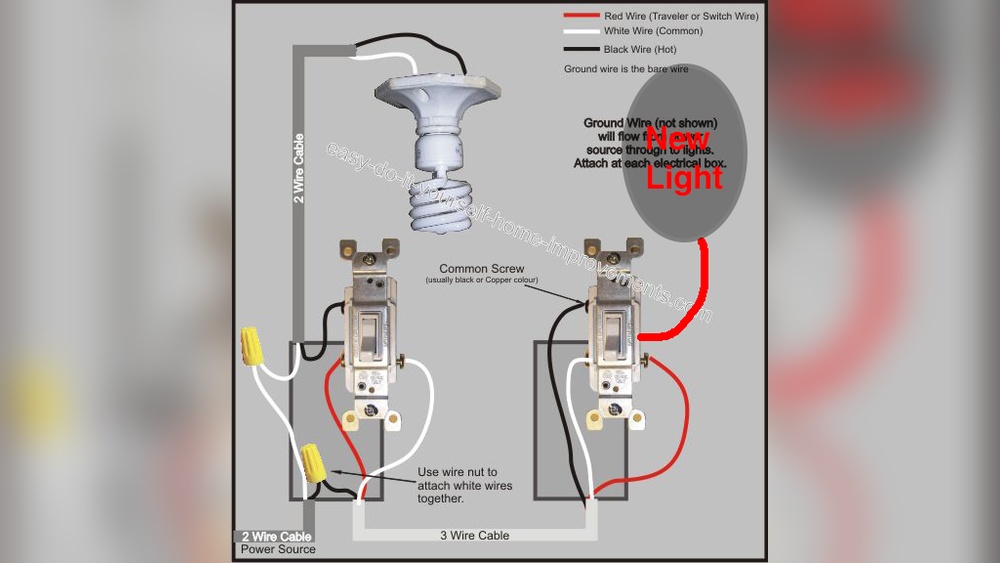
Identify The Wires
First, identify the wires in the switch box. Usually, you will find a hot wire, a neutral wire, and a ground wire. The hot wire carries electricity from the power source. The neutral wire completes the circuit. The ground wire protects against electrical faults.
Connect The Hot Wire To The Switch
Attach the hot wire to the switch’s common terminal. This terminal is often darker or marked “COM.” Secure the wire tightly under the terminal screw. This connection allows the switch to control the power flow.
Attach The Traveler Wires
In setups with multiple switches, traveler wires link the switches. Connect these wires to the traveler terminals on the switch. These terminals are usually brass-colored. They allow the switches to work together to control one light.
Connect The Ground Wire
Attach the ground wire to the green grounding screw on the switch. This step is important for safety. It prevents electrical shocks by directing stray electricity to the ground.
Secure And Test The Connections
Make sure all wires are tightly connected and no bare wire is exposed. Push the wires back into the box carefully. Attach the switch to the box and install the cover plate. Turn on the power and test the switch operation.

Credit: www.youtube.com
Running New Electrical Cables
Wiring the new light fixture is a key step in adding another switch and light. This process connects the new light to your home’s electrical system safely. It takes careful attention and the right tools. Follow clear steps to ensure the wiring is correct and secure.
Always turn off the power at the circuit breaker before starting. Use a voltage tester to confirm no electricity flows through the wires. Safety is the top priority during electrical work.
Gather Tools And Materials
Collect all necessary tools before beginning. You need wire strippers, screwdrivers, electrical tape, and wire nuts. Have the new light fixture and wiring cable ready. Use cables rated for your home’s electrical system.
Identify Existing Wiring
Locate the power source in your current switch box. Identify the hot, neutral, and ground wires. The hot wire is usually black or red, neutral is white, and ground is green or bare copper. Label each wire with tape for easy reference.
Run Cable To New Fixture Location
Measure and cut the cable from the switch box to the new light spot. Drill holes in the studs if needed to pass the cable through walls. Secure the cable with clamps to avoid movement. Leave extra wire length at both ends.
Connect Wires At The Switch Box
Connect the new cable’s hot wire to the switch’s terminal. Join the neutral wires together with a wire nut. Connect the ground wire to the grounding screw or wire bundle. Tighten all connections firmly.
Wire The New Light Fixture
Attach the fixture’s hot wire to the cable’s black wire. Connect the neutral fixture wire to the cable’s white wire. Join all ground wires to the fixture’s grounding point. Use wire nuts and electrical tape for secure joints.
Mount The Fixture And Test
Secure the light fixture to the wall or ceiling bracket. Restore power at the breaker. Test the switch to ensure the light turns on and off properly. Check for any flickering or loose connections.
Connecting Wires To Switches
Adding another switch and light can be simple, but some issues might appear. This section helps solve common problems fast. Fixing these issues saves time and keeps your project safe.
Check Power Supply And Wiring Connections
Power must be off before checking wires. Loose or wrong wires cause lights not to work. Make sure all wires are tight and connected to the right terminals. Use a voltage tester to confirm power is off before touching wires.
Test The Switch Functionality
Sometimes, the switch itself is faulty. Use a multimeter to check if the switch works. Replace the switch if it does not open or close the circuit properly. A bad switch stops the light from turning on or off.
Verify Light Bulb And Fixture
A broken bulb or fixture can cause problems. Try a new bulb to see if the light works. Check the fixture for damage or loose parts. Replace any damaged parts before finishing the installation.
Confirm Proper Grounding
Grounding keeps the system safe. Check if the ground wire is connected properly. A poor ground connection may cause flickering or no light. Always connect the ground wire to the metal box or ground screw.
Ensure Correct Switch Type
Use the right switch type for your setup. Single-pole switches work for one light and switch. Three-way switches control a light from two places. Using the wrong switch type causes confusion and failure.
Wiring The New Light Fixture
Neat and safe wiring is key when adding another switch and light. Proper wiring prevents hazards and keeps your setup working well. Organizing wires carefully helps avoid confusion later. It also makes repairs or changes easier. Follow simple tips to keep wiring tidy and secure.
Use Proper Wire Connectors
Choose the right wire connectors for your wires. Twist-on wire nuts or push-in connectors work well. They hold wires tightly and stop shorts. Avoid loose connections that cause sparks or failures.
Label Your Wires
Mark wires with tape or tags. Note their purpose, such as “switch” or “light.” Labels save time during installation and future fixes. They help you avoid mixing wires accidentally.
Keep Wires Short And Straight
Cut wires to the needed length only. Avoid long, tangled wires inside the box. Straight wires fit better and reduce clutter. They also lower the risk of damage from bending or pulling.
Secure Wires Inside The Box
Use cable clamps or staples to hold wires firmly. Loose wires can move and cause shorts. Proper securing keeps wires stable and safe. It also meets electrical code requirements.
Separate High And Low Voltage Wires
Keep power wires apart from data or low voltage wires. Separation stops interference and electrical noise. It also reduces risks of electrical faults.
Frequently Asked Questions
How Do I Wire A New Switch With An Existing Light?
To wire a new switch with an existing light, turn off power first. Run a cable from the new switch to the light fixture. Connect the wires by matching colors: black to black, white to white, and ground to ground.
Use wire nuts and secure connections.
Can I Add A Switch To Control One Light Separately?
Yes, you can add a switch to control one light separately by running a new cable from the switch to the light. Ensure the switch is wired inline with the light’s hot wire. This allows independent on/off control for that specific light.
What Tools Are Needed To Add Another Light And Switch?
Essential tools include a voltage tester, wire strippers, screwdrivers, pliers, electrical tape, and a drill. These tools help safely cut, strip, and connect wires. Having the right tools ensures a smooth installation and reduces risk of electrical hazards.
Is It Safe To Add A Switch Without An Electrician?
Adding a switch can be safe if you understand basic electrical work and follow safety rules. Always turn off the power at the breaker before starting. If unsure, consult a licensed electrician to avoid risks like shocks or faulty wiring.
Conclusion
Adding another switch and light can brighten up any room easily. Follow the steps carefully for safety and success. Use the right tools and materials to avoid problems. Double-check your wiring before turning the power back on. Take your time and don’t rush the work.
Small changes like this improve your home’s comfort and style. Enjoy your new lighting setup and the control it gives you. Simple upgrades make a big difference over time. Keep learning and improving your DIY skills for future projects.