If your Blackhawk floor jack is not working like it used to, you don’t have to buy a new one just yet. Rebuilding it can save you money and get your jack lifting smoothly again.
In this guide, you’ll discover simple steps to bring your floor jack back to life. Whether you’re dealing with slow lifting, leaks, or stuck parts, you’ll learn exactly what to do. Keep reading, and by the end, you’ll have the confidence to fix your Blackhawk floor jack on your own.
Tools And Materials Needed
Rebuilding a Blackhawk floor jack needs the right tools and materials. Having these ready helps the process run smoothly. It also ensures safety and accuracy during repair. Below is a list of essential items for this task.
Basic Hand Tools
Start with common tools like wrenches and screwdrivers. A set of socket wrenches is useful. Pliers and adjustable wrenches help with different bolt sizes. These tools allow you to remove and tighten parts easily.
Hydraulic Fluid
Use the correct hydraulic fluid for your jack model. This fluid helps the jack lift heavy loads safely. Avoid using motor oil or other liquids. Proper fluid keeps the jack working smoothly.
Replacement Parts
Order seals, O-rings, and gaskets specific to Blackhawk jacks. These parts prevent leaks and maintain pressure. Having fresh seals improves the jack’s performance. Check for wear on pistons and springs too.
Cleaning Supplies
Use rags, brushes, and a cleaning solvent. Clean parts remove dirt and old grease. This step prevents damage and helps new parts fit well. A clean workspace makes the job easier.
Safety Gear
Wear gloves and safety glasses to protect yourself. Hydraulic fluid can irritate skin and eyes. Proper gear reduces the risk of injury. Keep a fire extinguisher nearby for safety.
Credit: justiceorelse.com
Preparing The Jack For Rebuild
Preparing a Blackhawk floor jack for rebuild takes careful steps. This phase ensures safety and smooth work during the rebuild. Proper preparation avoids damage and saves time later.
Starting right helps the whole process. Clean the jack well and gather tools. Check the workspace for comfort and safety.
Cleaning The Jack Thoroughly
Remove dirt, grease, and dust from the jack. Use a degreaser or soapy water. Wipe every part, especially moving parts. Clean parts show damage clearly and help inspection.
Gathering Necessary Tools And Parts
Collect wrenches, screwdrivers, pliers, and replacement parts. Check the rebuild kit for the Blackhawk jack model. Having all tools ready saves time and stress.
Setting Up A Safe Workspace
Choose a flat, well-lit area. Use a sturdy workbench or table. Keep a tray for small parts to avoid loss. Safety glasses and gloves protect during work.
Disassembling The Floor Jack
Disassembling a Blackhawk floor jack is the first step to rebuild it. This process helps you check parts for wear and clean them well. Careful disassembly makes reassembly easier and safer. Follow each step slowly and keep track of all parts.
Removing The Handle
Start by lowering the jack completely to release pressure. Find the handle pin near the jack base. Use pliers or a punch to push the pin out. Pull the handle straight up to remove it. Set the handle aside in a safe spot.
Taking Out The Pump Assembly
Locate the pump assembly inside the jack body. Use a wrench to loosen the pump retaining bolts. Lift the pump assembly gently from the jack housing. Watch for small springs or seals that may fall out. Place the pump parts on a clean cloth.
Separating The Hydraulic Cylinder
Find the hydraulic cylinder connected to the pump. Use a wrench to remove the cylinder bolts carefully. Pull the cylinder away from the jack frame with steady force. Check for fluid leaks or damage on the cylinder. Keep the cylinder and related parts together for easy reassembly.
Cleaning And Inspecting Parts
Cleaning and inspecting parts is the first step to rebuild a Blackhawk floor jack. It helps find problems early. Clean parts work better and last longer. Inspection shows which parts need repair or replacement. Spend time here for a smooth rebuild process.
Cleaning Components
Start by wiping dirt and grease off each part. Use a clean cloth and some degreaser. Small brushes help reach tight spaces. Remove old oil and grime carefully. Dry parts completely before moving on. Clean parts make it easier to spot damage.
Checking For Wear And Damage
Look closely for cracks, rust, or worn areas. Check the hydraulic cylinder for leaks or dents. Inspect the pump and release valve for smooth movement. Test the wheels and handle for any cracks or bends. Replace any part that looks weak or broken. A safe floor jack needs strong, intact parts.
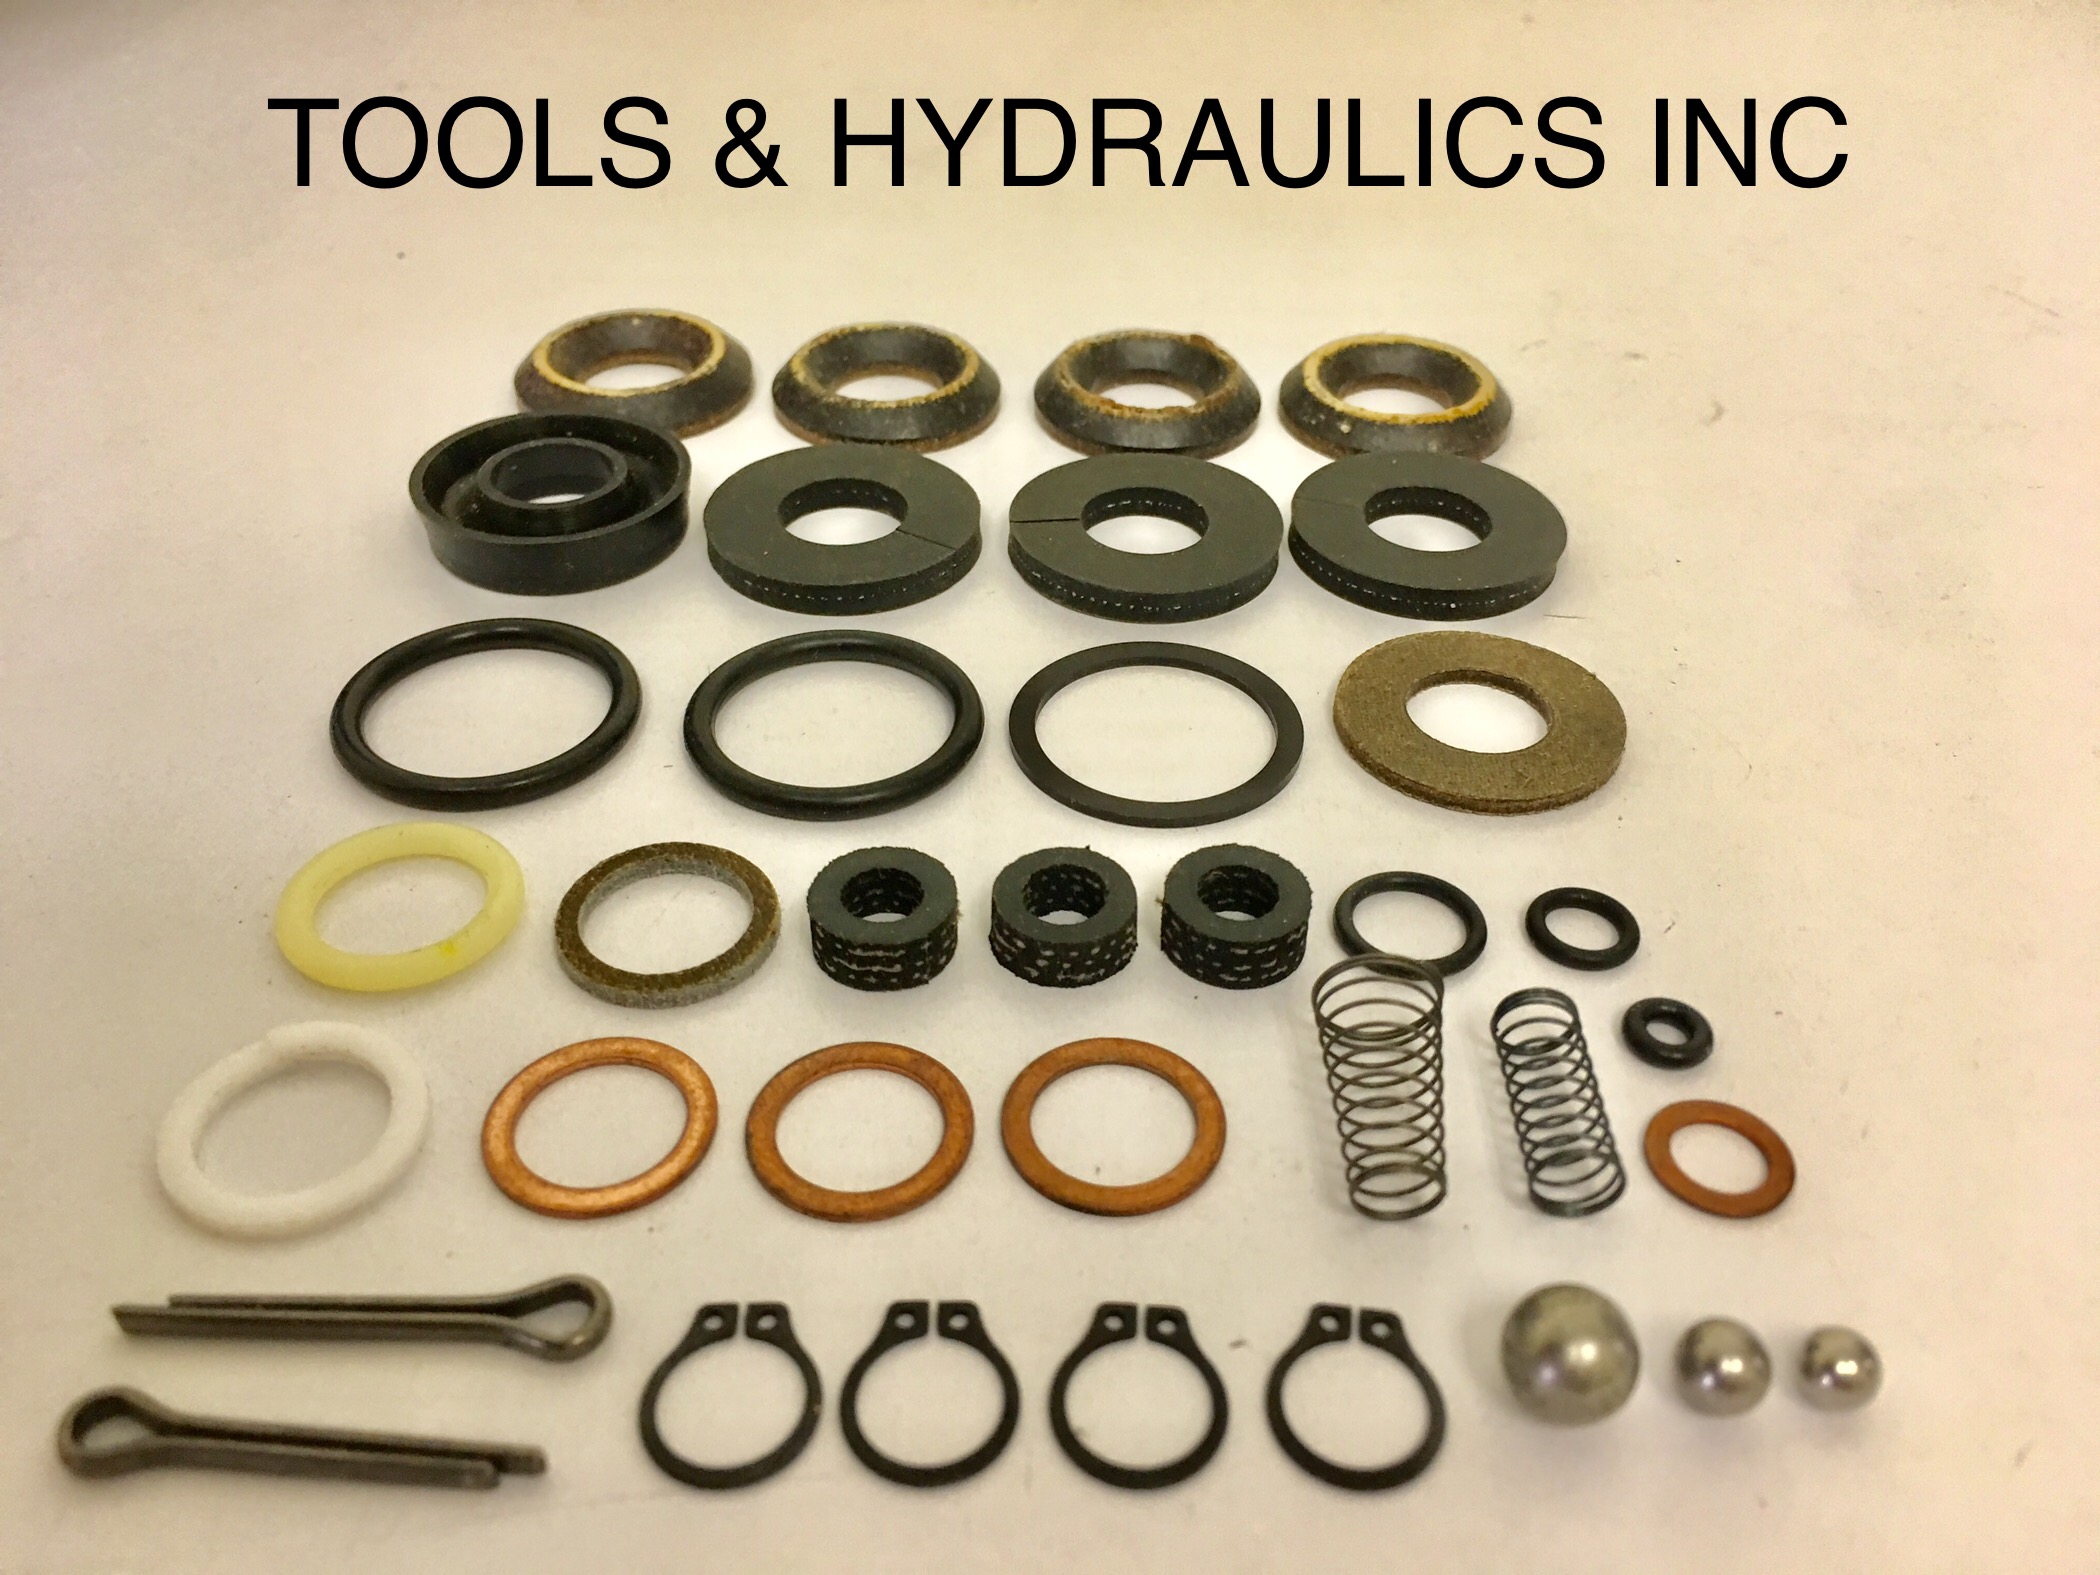
Replacing Seals And O-rings
Replacing seals and O-rings is a key step in rebuilding a Blackhawk floor jack. These small parts keep the hydraulic fluid inside and stop leaks. Worn or damaged seals cause the jack to lose pressure and fail to lift properly. Changing them restores the jack’s strength and safety.
Seals and O-rings wear out over time due to pressure and dirt. Checking them carefully helps find any cracks, tears, or hard spots. Using the right replacements ensures a tight fit and smooth operation. This section guides you through removing old seals and installing new ones.
Identify The Seals And O-rings To Replace
Start by locating all seals and O-rings on the jack. These parts are often around the cylinder, pump, and release valve. Clean the area well to see any damage clearly. Take note of different sizes and shapes for correct replacements.
Remove Old Seals And O-rings Safely
Use a small pick or screwdriver to lift out old seals gently. Avoid scratching metal parts during removal. Clean the grooves and surfaces where seals sit. Removing all dirt and residue helps new seals fit tight and work well.
Install New Seals And O-rings Correctly
Lubricate new seals with a bit of hydraulic fluid before placing them. Fit each seal or O-ring into its groove evenly. Press them down carefully without stretching or twisting. Proper installation prevents leaks and keeps pressure strong.
Test The Jack After Replacing Seals
After assembly, pump the jack several times to build pressure. Check for any leaks around the new seals. The jack should lift smoothly and hold weight without dropping. Testing confirms the seals work and the jack is safe to use.
Reassembling The Hydraulic System
Reassembling the hydraulic system is a key step in rebuilding a Blackhawk floor jack. This part controls the lifting power. Careful work ensures the jack works smoothly and safely. Follow each step clearly to avoid mistakes.
Preparing The Hydraulic Cylinder
Start by cleaning the hydraulic cylinder. Remove dirt and old oil. Check for any damage or rust. Replace seals if they look worn out. Clean parts help the system last longer.
Installing The Piston And Seals
Insert the piston into the cylinder carefully. Place new seals on the piston. Make sure seals fit tight but not too tight. This step stops oil leaks and keeps pressure strong.
Filling With Hydraulic Fluid
Pour the correct hydraulic fluid into the cylinder. Use only the type recommended for your Blackhawk jack. Fill slowly to avoid air bubbles. Air in the system can cause poor lifting.
Reattaching The Pump And Release Valve
Attach the pump assembly back to the cylinder. Secure the release valve in place. Check that the valve moves freely. This part controls the lifting and lowering action.
Testing The Hydraulic System
Test the jack by pumping the handle. Watch for smooth lifting and no leaks. Release the valve to lower the jack. Repeat until the motion feels steady and firm.
Refilling Hydraulic Fluid
Refilling the hydraulic fluid is a key step in rebuilding your Blackhawk floor jack. The fluid helps the jack lift heavy loads smoothly. Old or low fluid can make the jack weak or stop it from working.
Keep the work area clean to avoid dirt getting inside. Use the correct hydraulic oil recommended for your jack. This keeps the system safe and running well.
Locate The Fluid Reservoir
Find the small plug or cap on the jack’s body. It usually sits near the handle or base. This is where you add the hydraulic fluid. Clean around the cap to prevent dirt entry.
Drain Old Fluid
Place a container under the jack to catch old fluid. Remove the drain plug or tip the jack carefully to empty fluid. Dispose of the old fluid safely. This step stops contamination of the new oil.
Add New Hydraulic Fluid
Pour the fresh hydraulic oil slowly into the reservoir. Fill it until the fluid reaches the recommended level. Avoid overfilling, which can cause leaks or pressure issues.
Bleed Air From The System
Air trapped inside the hydraulic system can reduce jack performance. Pump the handle several times slowly to remove air bubbles. Check the fluid level again and top up if needed.

Credit: www.youtube.com
Testing And Adjusting The Jack
Testing and adjusting the Blackhawk floor jack is a key step after rebuilding it. This process ensures the jack works safely and lifts smoothly. Proper testing helps spot problems early. Adjustments improve performance and safety. Follow these steps carefully for the best results.
Checking For Leaks
Start by inspecting the jack for any oil leaks. Leaks reduce lifting power and can cause failure. Look around seals, valves, and the hydraulic cylinder. Use a clean cloth to wipe these areas. Watch for fresh oil spots during testing. Tighten or replace parts if leaks appear. Keep the jack clean to spot leaks easily.
Adjusting Pressure Settings
Pressure settings control how the jack lifts heavy loads. Low pressure means weak lifting. High pressure may cause damage or unsafe lifting. Use the adjustment screw to set the right pressure. Turn it slowly while testing the lift. Stop when the jack lifts smoothly and holds weight. Test several times to confirm settings. Proper pressure keeps the jack safe and effective.
Maintenance Tips For Longevity
Proper maintenance keeps your Blackhawk floor jack working well for years. Regular care prevents damage and ensures safety. Simple steps can help avoid costly repairs and downtime.
Follow these tips to extend the life of your floor jack. They keep the jack smooth and reliable every time you use it.
Check And Change Hydraulic Fluid
Hydraulic fluid makes the jack lift heavy loads easily. Check fluid levels often. Low fluid leads to poor lifting power. Change the fluid if it looks dirty or thick.
Use the recommended hydraulic oil. Avoid mixing different types of fluids. Always dispose of old fluid safely.
Inspect For Leaks And Rust
Leaks reduce the jack’s lifting ability. Look under the jack for wet spots. Tighten any loose parts around seals. Rust weakens the metal frame. Clean rusty parts and apply rust protector.
Lubricate Moving Parts Regularly
Keep wheels, pins, and joints smooth with lubrication. Use light machine oil or grease. Lubrication reduces wear and noise. Avoid over-lubricating, which attracts dirt.
Store The Jack Properly
Store your jack in a dry, cool place. Avoid damp areas that cause rust. Keep the jack lowered to relieve pressure on seals. Cover it to protect from dust.
Test The Jack Before Use
Test lifting and lowering before every job. Listen for unusual sounds or slow movement. Check the safety valve and release valve. Fix issues immediately to avoid accidents.

Credit: www.ebay.com
Frequently Asked Questions
How Do I Start Rebuilding A Blackhawk Floor Jack?
Begin by cleaning the jack thoroughly. Remove old grease, dirt, and debris. Inspect all parts for wear or damage. Gather necessary tools and replacement parts before starting the rebuild process.
What Tools Are Needed To Rebuild A Blackhawk Floor Jack?
You will need wrenches, screwdrivers, pliers, a hammer, and a hydraulic fluid container. A clean workspace and safety gloves are also recommended for a safe rebuild.
How Often Should I Rebuild My Blackhawk Floor Jack?
Rebuild your floor jack every 2-3 years or when it shows signs of leaking or poor lifting. Regular maintenance extends the jack’s lifespan and ensures safety during use.
Can I Rebuild A Blackhawk Floor Jack Myself?
Yes, rebuilding is possible with basic mechanical skills. Follow a detailed guide, use proper tools, and replace worn parts carefully to restore full function safely.
Conclusion
Rebuilding a Blackhawk floor jack takes patience and care. Follow each step to keep it working safely. Check parts for wear and replace damaged ones. Clean the jack well before putting it back together. Test the jack after rebuilding to ensure it lifts properly.
Regular maintenance helps your jack last longer. Keep your workspace tidy and organized during the process. You’ll save money by fixing the jack yourself. Enjoy the satisfaction of a job done right. Your Blackhawk floor jack will serve you well again.